Why are videos washed out on the Mac?
What to do about the notorious 'QuickTime Gamma Shift' in macOS
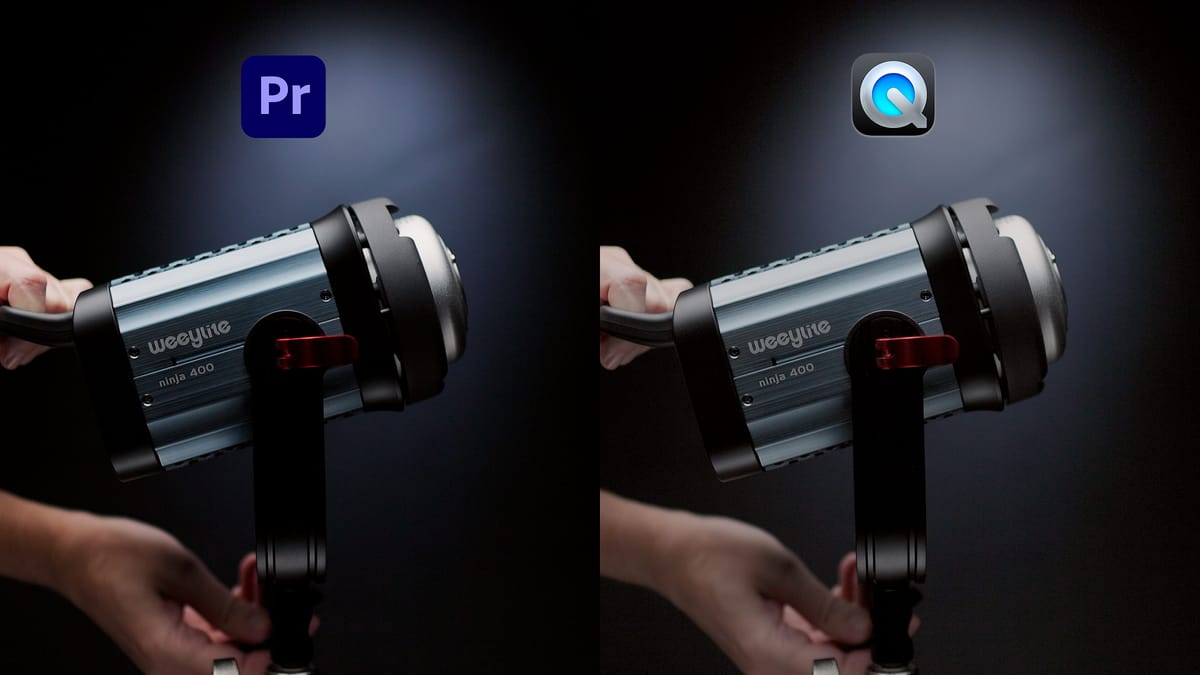
If you edit video using Adobe Premiere Pro on a Mac, chances are you’ve encountered a problem where exported video looks washed out and desaturated in QuickTime Player, Safari and Chrome when compared to the same video viewed inside Premiere on a timeline. This is known as the dreaded “QuickTime Gamma Shift”, and it unfortunately affects anyone currently editing video using Adobe Premiere Pro on a Mac.
Why does this happen? And what can you do about it? I'll explain what's going on in a minute, but here are three options macOS users should consider when exporting video from Premiere.
Option one: Do nothing
Simply export h.264 video from Premiere and use it as is. As long as you’re happy with your color grade, and like how your video looks inside Premiere, you may rest assured your exported video will appear as expected on the majority of televisions and computer displays out there. Mac users will see a slightly softer, less contrasty image, but videos never look the same on every screen anyway, so there is no silver bullet to fix this issue. Simply export as you normally would and move on.
Option two: Export gamma-corrected video for viewing on a Mac
Adobe offers a free QuickTime Gamma Compensation LUT. I’ll explain how this LUT works in a minute, but for now, this is a simple LUT that changes the contrast of exported video to appear "correct" when viewed using QuickTime, Chrome, Safari, or any color-managed macOS application. This will however create a darker video when viewed using Windows or any non color managed macOS application.
Option three: Add contrast to the Premiere Timeline with an Adjustment Layer
If you'd like to split the difference and export a video that looks a little better in macOS, but without being too dark in Windows, you may add extra contrast using an adjustment layer and Lumetri color at the top of your Premiere timeline. Or, to be more precise, you may apply the ASC CDL Color Correction effect to the adjustment layer, then set its Red, Green, and Blue Power settings to 1.09.
Exported video will then appear more similar to your Premiere color grade, but won’t look as dark as Adobe’s aforementioned LUT.
Which option is best for you?
It depends on whether your video will be seen by everyone (eg, YouTube) or only those using macOS.
If you are exporting video anyone may see at any time on any display, the simplest and safest bet is exporting video from Premiere normally, without LUTs or contrast adjustments.
If this is what you are currently doing, you don’t need to change anything with your workflow. Yes, it is annoying seeing slightly more washed out video in macOS, but then you aren't optimizing your video for one audience at the expense of everyone else. Also, if Apple were to fix the problem at some point in the future, all your past videos exported without a LUT or contrast adjustments would then display correctly in macOS.
If you are exporting a video that will be viewed only on a Mac — your display, a client’s display, etc — and not live online for months or years to come, then it may make sense to apply Adobe’s Gamma Compensation LUT or add your own extra contrast adjustment.
This option would be most useful when screening videos for clients, sharing videos with other macOS users, displaying video as part of a presentation from a MacBook, or other situations where the video will be viewed using macOS.
So all that said, what in the world is going on here? Why is this a problem in macOS, but not other operating systems? To answer that, we need to take a closer look at display gamma.
Understanding display gamma
Gamma is a mathematical way of quantifying contrast on a display. Here’s an illustration of the most commonly used gamma values. Think of gamma as a Tone Curve, with pure black at lower left, pure white at upper right, and shades of gray in between.
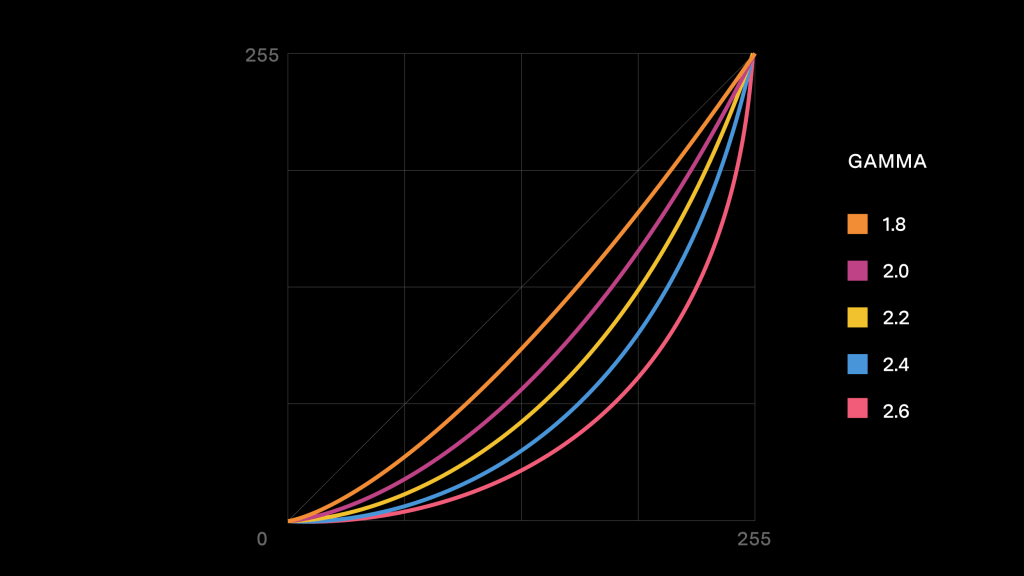
Films created for theaters typically use gamma 2.6 (the lowest curve in the chart above). Gamma 2.6 is high contrast with deep, dark shadows. Broadcast television uses gamma 2.4, while pretty much anything that’s not a television uses gamma 2.2.
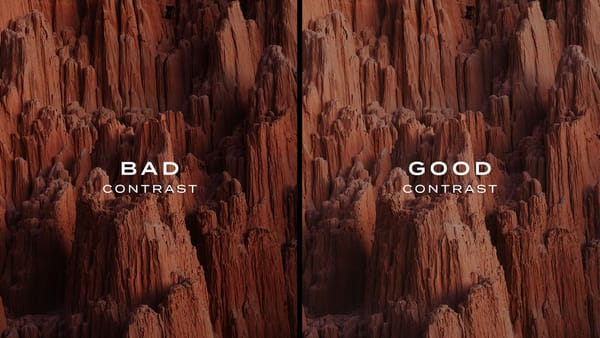
How do these gamma values affect photos and videos? Here are some helpful images published by display manufacturer BenQ. As you can see, the higher the gamma numerical value, the darker and more contrasty the image.
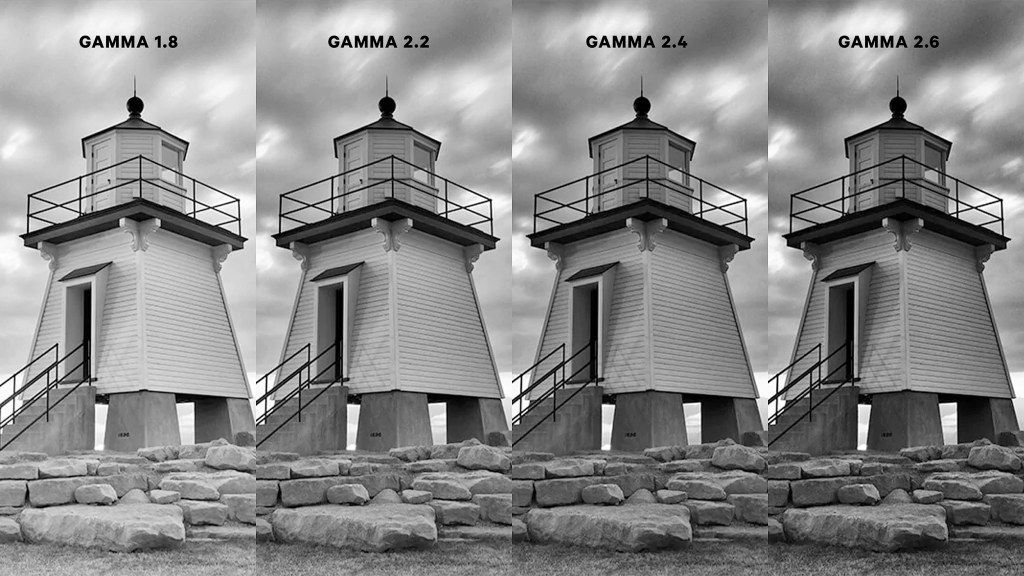
Gamma values are different between computers, televisions and movie theaters so images look their best in each environment. For example, with television, it was determined long ago that the stronger contrast and darker shadows of gamma 2.4 looked best because most people watched TV in dimly lit rooms. Same story with movie theaters, which were optimized for an even darker gamma value of 2.6.
But when PCs came along, screens were typically viewed in offices with brighter ambient light, so PC manufacturers adopted a brighter gamma value of 2.2. Apple went even brighter with gamma 1.8, but then changed their mind in 2009 and switched to gamma 2.2 (much to the delight of frustrated designers and photographers who always had to change the gamma settings of new Macs from 1.8 to 2.2 to see what the rest of the world was seeing).
Adobe Premiere was originally designed to edit video for television, so long ago it adopted gamma 2.4 and the Rec.709 color gamut. This meant that video edited inside Premiere would look the same when exported and viewed on a television. This may seem strange today when so much video content is now viewed using phones, tablets, laptops, etc, but these standards were adopted long ago before the internet, and continue to be the standard for professional video production today.
This is why, in case you've never noticed, streaming video from Netflix, Hulu, Amazon, Apple TV, etc, always looks a little softer and grayer when viewed on a computer monitor, for you're seeing gamma 2.4 video on a gamma 2.2 display. This is true for all computers, regardless of operating system or manufacturer.
But here is where things get weird. For whatever reason, Apple decided long ago that Rec.709 video should be displayed using a non-standard gamma value of 1.96.
Where does 1.96 come from? Well, you can fall into a deep rabbit hole online learning about file metadata, tags, the difference between scene and display referred gamma, but the main takeaway is this: Apple engineered ColorSync (macOS’s color management utility) to display Rec.709 video using gamma 1.96 instead of 2.2.
And because this gamma change happens in ColorSync, it affects every color managed application on the Mac, including QuickTime Player, QuickView, Preview, Safari, Chrome, and more. It explains why a video viewed in QuickTime Player looks just as washed out as the same video viewed on YouTube using Safari or Chrome for macOS, for all video rendering flows through ColorSync.
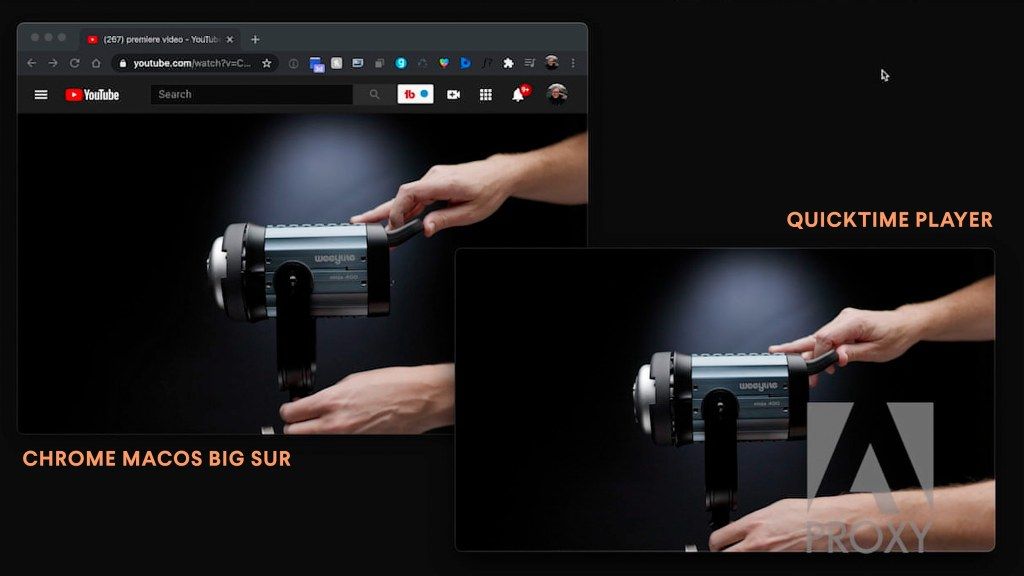
You may verify this by viewing video using Firefox for macOS. At the time of this article, Firefox for macOS does not use ColorSync color management, so the browser displays video using the correct gamma, not 1.96. Firefox isn't perfect (colors are often too saturated, especially red, to my eyes), but at least it is closer to the Premiere timeline than other browsers.
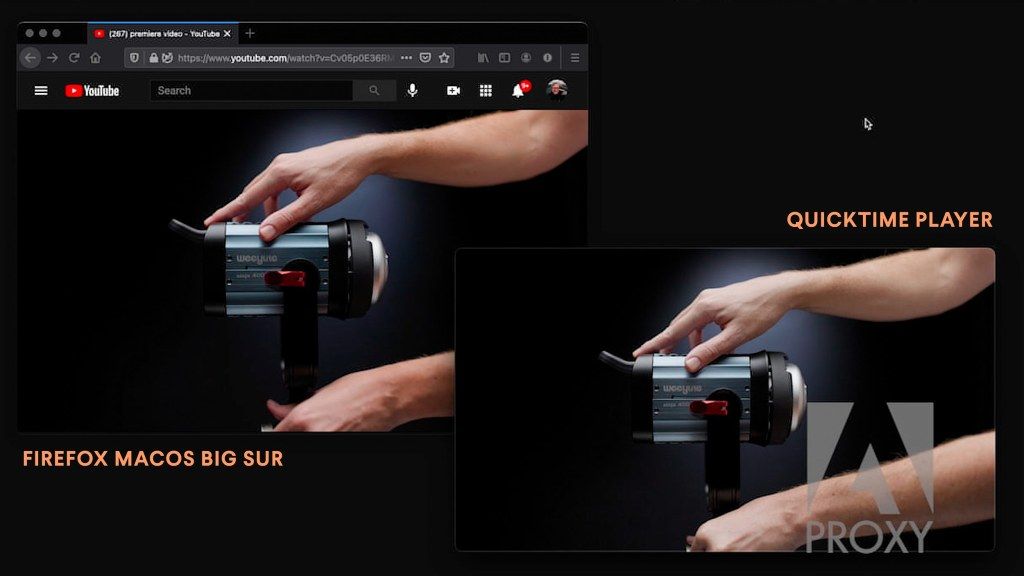
At the end of the day, the simple truth is that ColorSync on the Mac is interpreting Rec.709 video incorrectly, and will continue to do so until Apple changes their mind and stops using gamma 1.96.
Frequently asked questions about QuickTime Gamma Shift
While doing research for this article, I came across a few common questions about QuickTime Gamma Shift. Here are some answers and recommendations.
Will enabling Display Color Management in Premiere fix QuickTime Gamma Shift?
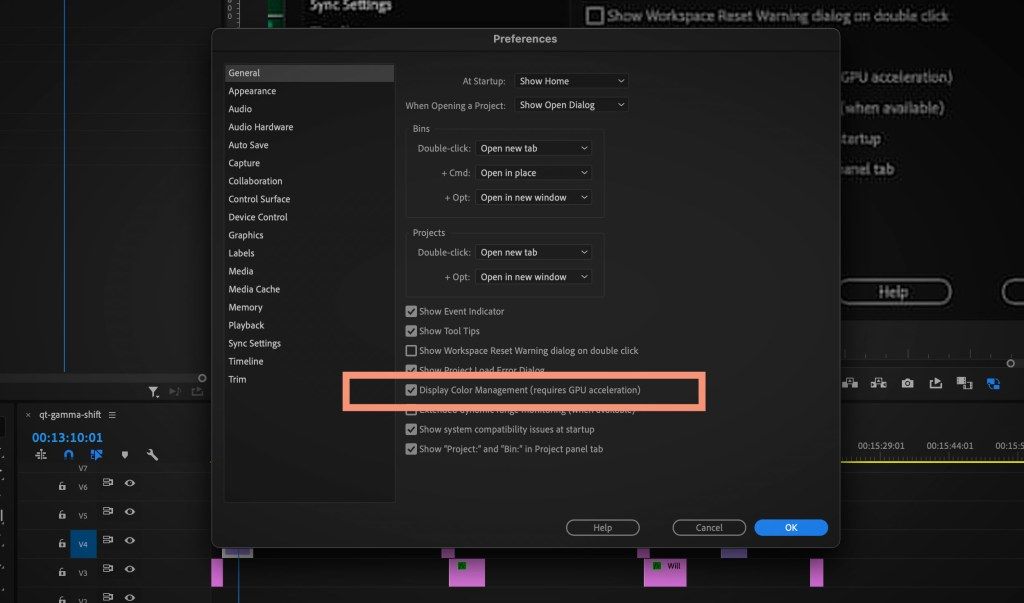
No. Display Color Management is an option in Premiere’s preferences that — when enabled — changes the appearance of Premiere’s timeline to simulate Rec.709 on a non-Rec.709 display. Enabling color management isn’t necessary when using an sRGB display, because the sRGB and Rec.709 color gamuts are nearly identical. So you may leave Display Color Management unchecked if using an sRGB display.
If however you are using an Apple Retina display, then you should absolutely enable Display Color Management and keep it enabled at all times. This is because Apple Retina displays use the DCI-P3 color gamut, not sRGB. DCI-P3 is larger, which means it is capable of displaying more colors than what sRGB/Rec.709 support. Enabling Display Color Management simulates Rec.709 inside Premiere on your DCI-P3 display, so you won't color grade video using colors that can’t be seen on television or elsewhere.
Whether you enable or disable Display Color Management, this setting won't change how exported video is displayed in QuickTime, through YouTube, or anyplace else. It only affects how video is displayed inside Premiere.
Will calibrating my display fix QuickTime Gamma Shift?
No. Display calibration simply ensures that the colors you see on screen are the actual colors you intend to use. Calibration won’t change how ColorSync is interpreting video, or change how videos are exported. It simply calibrates your display to make colors more accurate.
Will switching from Premiere Pro to DaVinci Resolve fix QuickTime Gamma Shift?
No. DaVinci Resolve users are affected by QuickTime Gamma Shift as well. As a matter of fact, DaVinci has its own gamma compensation fix in the form of a non-standard export profile named “Rec.709-A”, with “A” (I assume) signifying “Apple”. Rec.709-A is simply a hack — just like Adobe's aforementioned Gamma Compensation LUT — that makes exported Rec.709 videos look correct when using a ColorSync managed application in macOS.
Summary
Overall, QuickTime Gamma Shift has been around for years, and won’t be resolved until Apple decides to do something about it. Until then, Mac video editors will unfortunately continue pulling their hair out in frustration.
Thankfully, Adobe’s Gamma Compensation LUT does a good job of resolving Rec.709 video on Apple displays, but in my opinion should only be used when a Rec.709 video will be seen by Mac users only.
Tweaking the Rec.709 timeline in Premiere with additional contrast is also a good way to split the difference between gamma 2.4 and 1.96, but should only be used with videos that will primarily be viewed using computers, not televisions.
Looking forward, perhaps someday video editors will have a single color standard for online video similar to the Rec.709 standard used on television. But for now, if exporting video for all the world to see, I believe the best you can do is calibrate your display, color grade video to your liking inside Premiere, then export normally without applying contrast hacks.
Update (July 27, 2023)
Adobe has updated Premiere Pro (Beta) with a new "Viewer Gamma" Lumetri setting that allows users to choose between gamma 2.4 (broadcast television) and 1.96 (Apple gamma) when editing video inside Premiere. This setting does not change how videos are exported (they still use Rec.709 gamma 2.4), but users can at least now choose which gamma they want to use when color grading.
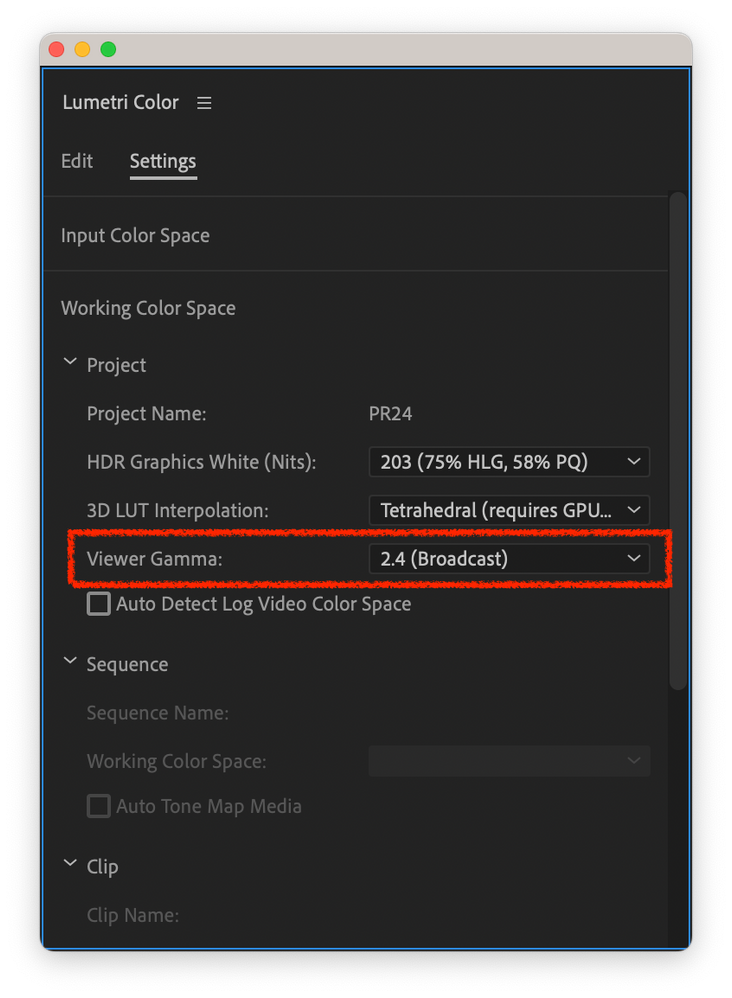
For example, if you are editing video for macOS viewers only, you may switch Viewer Gamma to 1.96, color grade however you like, then export normally. The exported video will then look "correct" and similar to what you see inside Premiere when viewed in QuickTime Player, Chrome, Safari, or any ColorSync managed application.
If you are editing video for YouTube, television, etc, keep Viewer Gamma set to 2.4 (Broadcast) for the most consistent results across all screen types and operating systems.
Helpful workaround, for the time being, until Apple drops 1.96 and adopts the Rec.709 gamma 2.4 setting in ColorSync (crossing fingers).

