How to expose Canon Log on the EOS R5 and R6
Nail your video exposure when shooting in C-Log and C-Log 3 by modifying these settings on your EOS R camera

(The following is an edited transcript of this video from my YouTube channel)
If you shoot video using C-Log on the Canon EOS R5 or R6, at some point you've probably looked at the desaturated, gray preview image on the back of the camera and wondered…am I exposing this correctly? Is the image too bright? Too dark? It can be really hard to tell sometimes.
This is one of the reasons why I prefer using an external monitor with the R5 and R6, for monitors provide more sophisticated tools like waveforms and false color, and you can also load lookup tables to evaluate exposure more accurately.
But what if you don’t own a monitor? Or are purposely shooting without one? Without support for displaying waveforms or false color on the R5 and R6, how do you get near-perfect exposure when shooting in Canon Log?
Here are some tips to help you nail exposure when shooting C-Log and C-Log 3 video on the R5 and R6.
Enabling Canon Log on the EOS R5 / R6
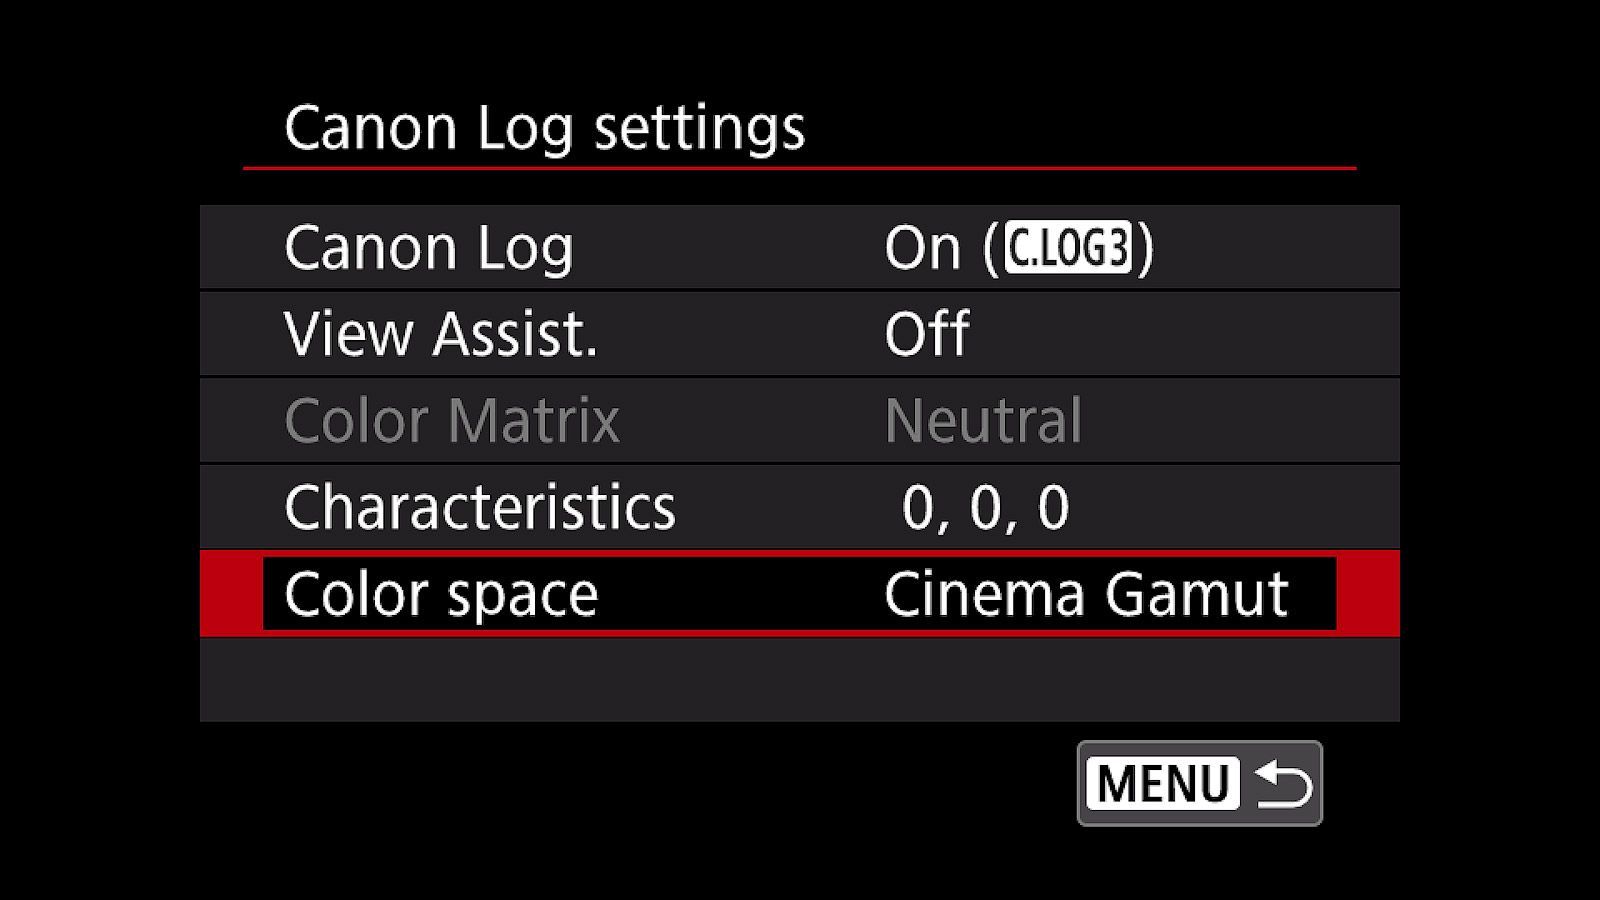
If you haven't done so already, the first step is enabling Canon Log on the R5 and R6. Both the R5 and the R6 support C-Log and C-Log 3, with color space options for BT.709, BT.2020, and Cinema Gamut (only in C-Log 3).
C-Log 3 / Cinema Gamut my preference when recording video internally because C-Log 3 retains more highlight detail (which is especially useful when filming outdoors), and Cinema Gamut is a much larger color space (which means the camera may capture the broadest range of possible colors).
Regular C-Log is a good option as well, and can actually perform better than C-Log 3 in dark scenes because it is less prone to noise to underexposed areas.
There is no right or wrong answer here. I'd recommend experimenting with both to see which you prefer most.
Setting ISO, shutter speed and aperture
With Canon Log enabled, the next step is manually setting camera exposure using ISO, aperture and shutter speed.
The optimum ISO for C-Log 3 is 800 and 400 for C-Log. These are the base ISO values recommended by Canon. You may set ISO to a higher value if need be (eg, your shot is very dark), but for less noise and optimum image quality, it's better to shoot using base ISO values.
(Tip: If using an R5 in very dark environments, try setting ISO to 3200 for decreased noise. Canon doesn't claim the R5 supports dual ISO, but results would indicate otherwise)
Video shutter speed is typically set to a fixed value of 1/(fps x 2). This is known as the "180 degree shutter rule", and is popular to use because it creates more natural looking motion blur with moving subjects. I typically set my R5 and R6 to 23.98fps with a matching shutter speed of 1/50 second.
With ISO and shutter speed set to fixed values, I then open or close my aperture (and optionally mount neutral density filters) until the image is properly exposed. But how do we know when that's true? How can we tell looking at the flat, gray preview on the back of the camera whether our exposure settings are correct?
To find out, we use zebras.
Using zebras to visualize exposure
Zebras are available in both the Canon R5 and R6, and as the name implies, they look like striped zebra patterns in the camera’s live preview. The patterns appear when an area's brightness falls within a specified IRE scale range between 0 and 100% (with 0% representing pure black and 100% pure white).
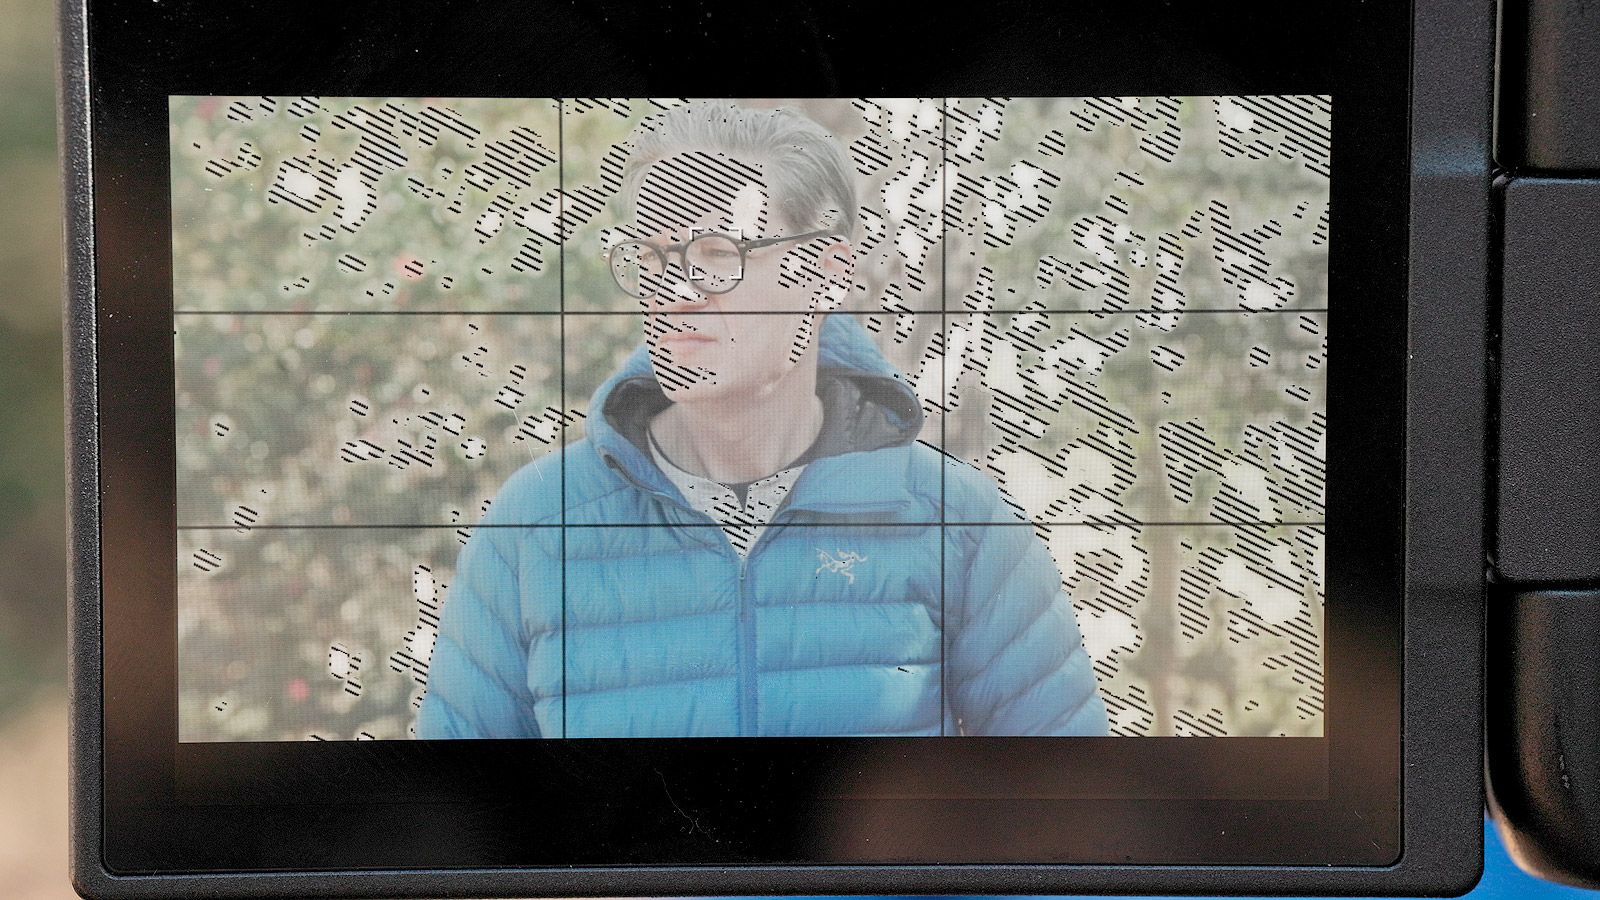
For example, as illustrated in the image above, when zebras are set to 50 +/- 5%, a pattern appears in the live preview over all areas with brightness value between 45 and 55% IRE.
Cool, right?
But for zebras to help us achieve proper exposure, we need to tell it what to target.
Setting Zebras for skin tone
When a person is the most important subject in a video, skin tone typically takes priority. Everything else is secondary. The "best" IRE value for skin depends on how bright or dark the subject's skin is and/or what a videographer prefers to use creatively.
For me and my videos, I typically aim for 70% IRE skin tone in my finished, color graded videos. That's the value where I believe my skin looks the most natural. Not too bright, not too dark.
With 70% IRE as my target, I may then work backwards to find the ideal IRE value in Canon Log. We need to use a lower IRE value because Canon Log is intentionally flat, gray and compressed. That lower value should ideally stretch to the target IRE value when the Log footage is converted to Rec.709. For me and my skin tone, that lower IRE value is around 55% in Canon Log.
(I figured this out purely through experimentation, but generally speaking you can expect Log IRE values to be between 10-15% lower than target IRE values in Rec.709).
So, knowing that 55% is the IRE value I need in Log (to get 70% IRE for my skin when converted to Rec.709), I may assign 55% to Zebra 1 level in the Zebra settings menu (see below).
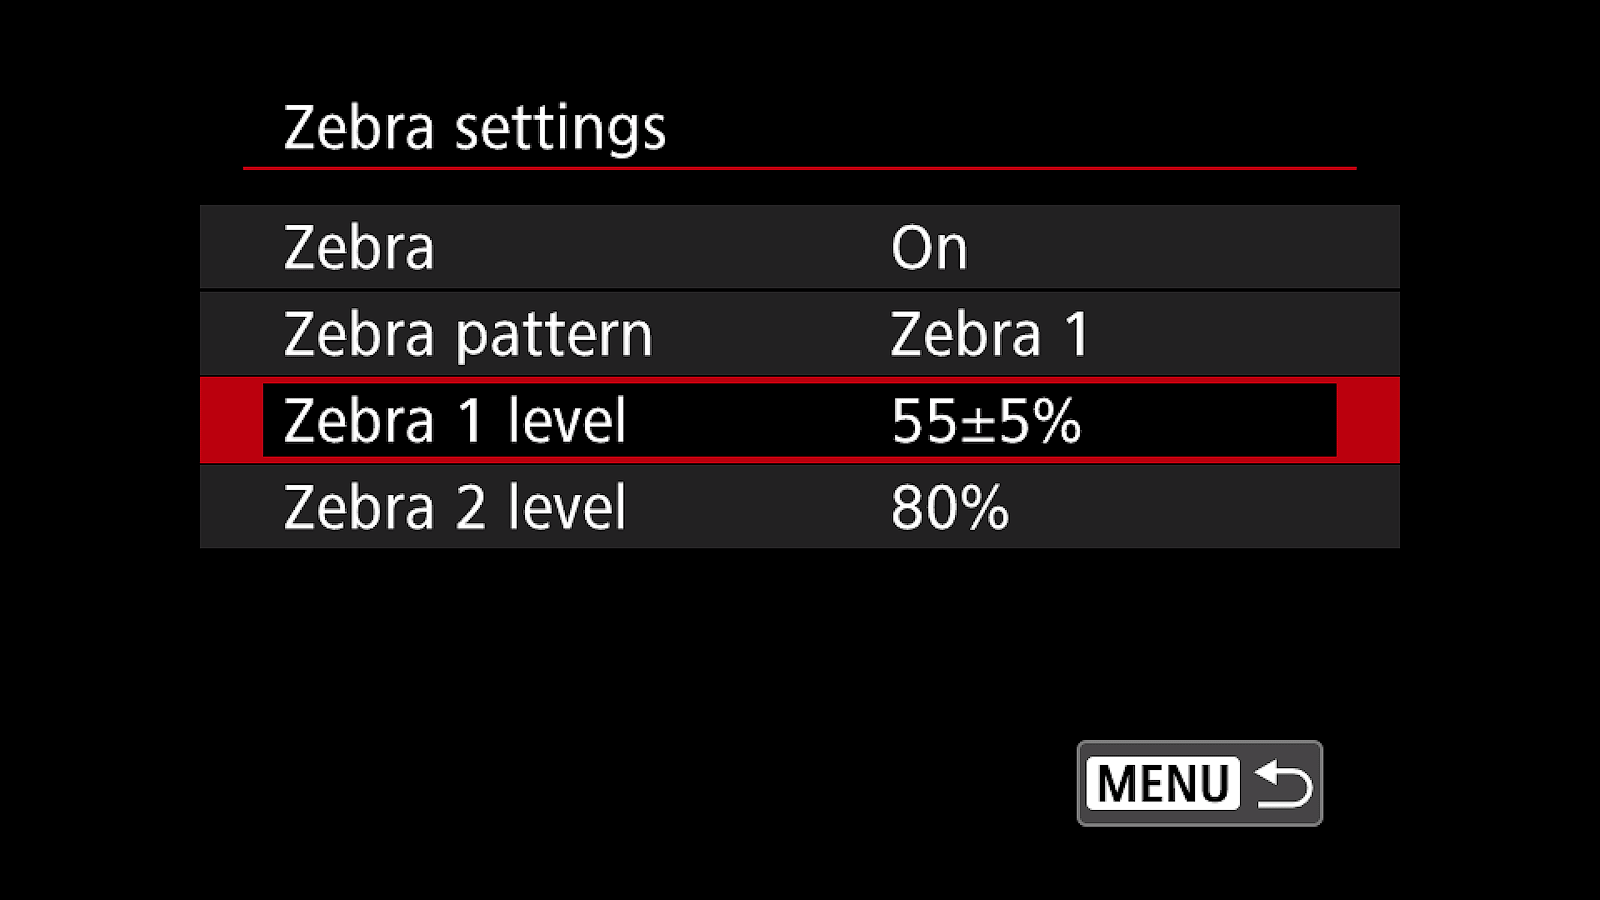
Now with zebras enabled (Zebra set to On, as shown above), I then adjust exposure while keeping an eye on the Log image in my live preview. When I see a left-slanting zebra pattern over my face, I know the image has been properly exposed and optimized for my skin tone.
But what about shots without a person as the main subject? Shots where overall exposure is more important than skin tone? For that we need general purpose IRE values that will work well with any scene or subject.
Setting Zebras for general use
In my experience, the best IRE value for general purpose video is at or just above middle gray. If you're not familiar with middle gray, it's simply the halfway point between pure black (at 0% IRE) and pure white (at 100%) IRE. Every camera has a different middle gray value when shooting in Log, but according to Canon, 35% IRE is ideal on the R5 and R6.
So for general purpose video, I set Zebra 1 level to 35% +/- 5%. This produces a left-slanting zebra pattern in the live preview over an area with a brightness value between 30 and 40%.

Some videographers prefer overexposing middle gray by one stop - a technique commonly called ETTR or “Expose to the Right” — to reduce noise and increase detail by pushing shadows closer towards the midtones. So if 35% feels a bit low when you look at your footage later, try bumping Zebra 1 level up to 40% or 45% IRE. This will help you expose a brighter image.
In practical use, simply adjust exposure until you see a left-slanting zebra pattern over the most important areas in your shot, and the resultant footage should be properly exposed.
Protecting the highlights
Whether you’re exposing for skin tone or middle gray, you may start to get concerned about highlights. For as you probably know, if a pixel gets too bright, detail may be lost.
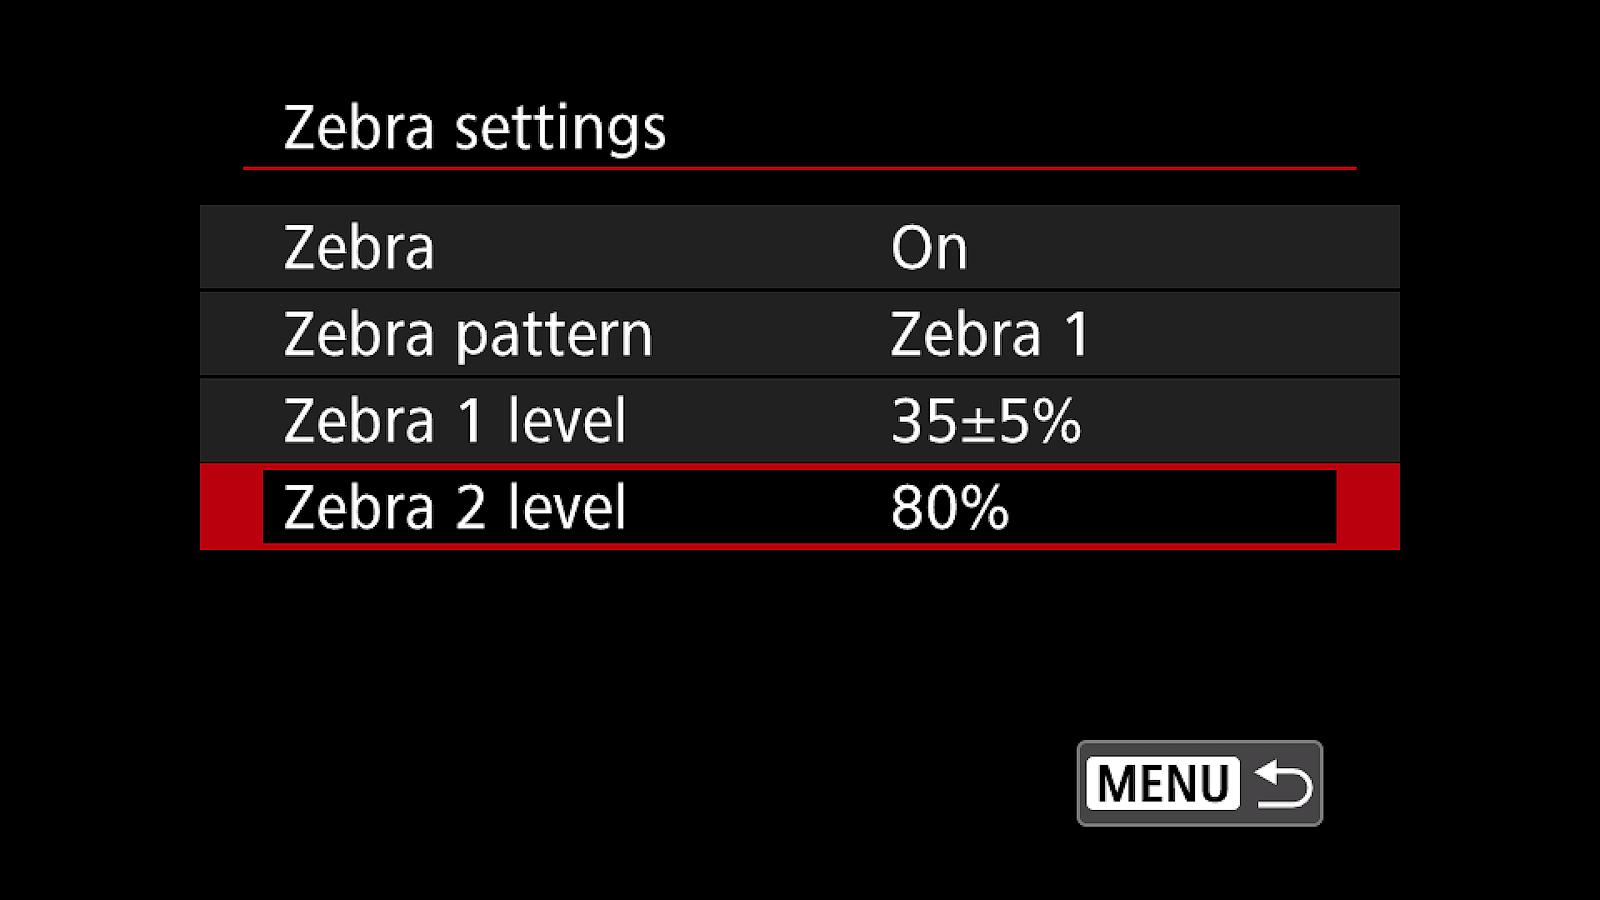
I use Zebra 2 level to keep an eye on highlights. Zebra 2 is a little different because (unlike Zebra 1) it does not use plus or minus 5%. Zebra 2 instead displays a pattern at and above its assigned value.
For example, if I set Zebra 2 to 80%, the live preview would then show a right-slanting pattern over any area with an IRE value of 80% or higher. I picked 80% intentionally because 80% in Log transforms to ~90% IRE when converted to Rec.709. This means any highlights at or below 80% in my Log preview should not clip when the video is converted later to Rec.709.
Balancing Zebra 1 and 2
In practice, getting both Zebra 1 and 2 exactly where you want them can be easier said than done. Exposure is always a trade off, and it's up to you to decide which to prioritize.
For example, if the brightest area in your shot is a light source like the sun, a light bulb, or specular highlights of some kind, the viewer wouldn’t expect to see any detail there anyway. So in that situation, you may focus on getting the Zebra 1 just right. If the highlights do contain valuable information, then it may be better to reduce exposure until Zebra 2 is no longer visible, then bump exposure back up a little.
Generally speaking, the main goal is getting Zebra 1 to appear in the live preview on top of whatever is most important in your shot. As long as you prioritize Zebra 1, your video will be better exposed than it would be otherwise.
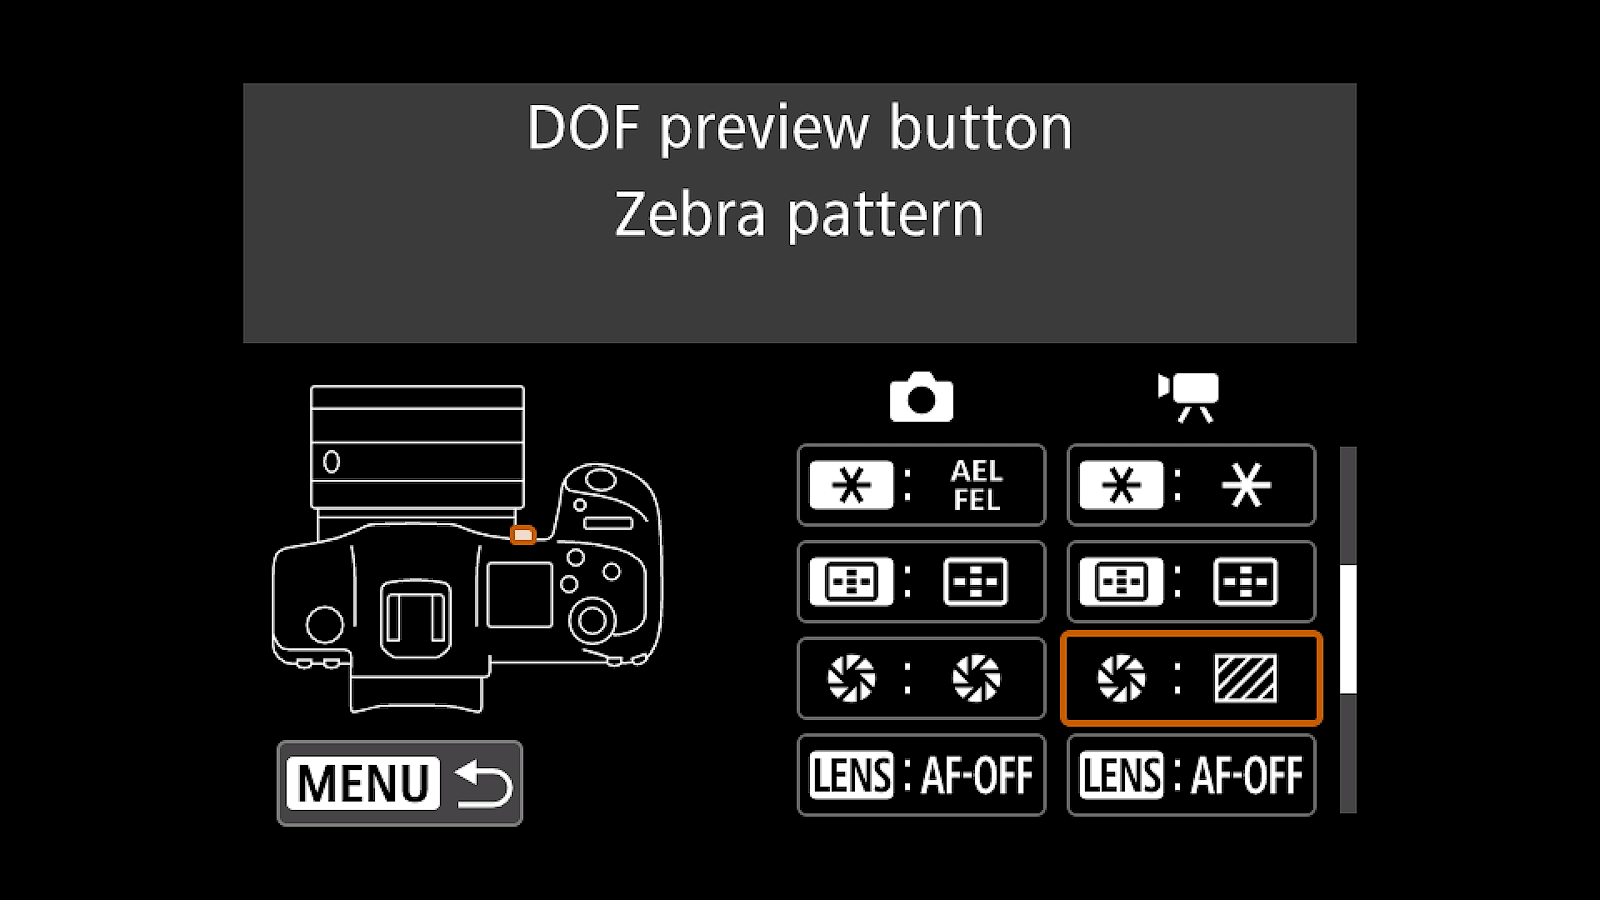
Quickly enabling/disabling zebras
Enabling and disabling zebras through the menu is slow and cumbersome, but thankfully there's a way to speed this up by assigning zebras to a button on the camera body. You may do that through the Customize buttons menu, shown below.
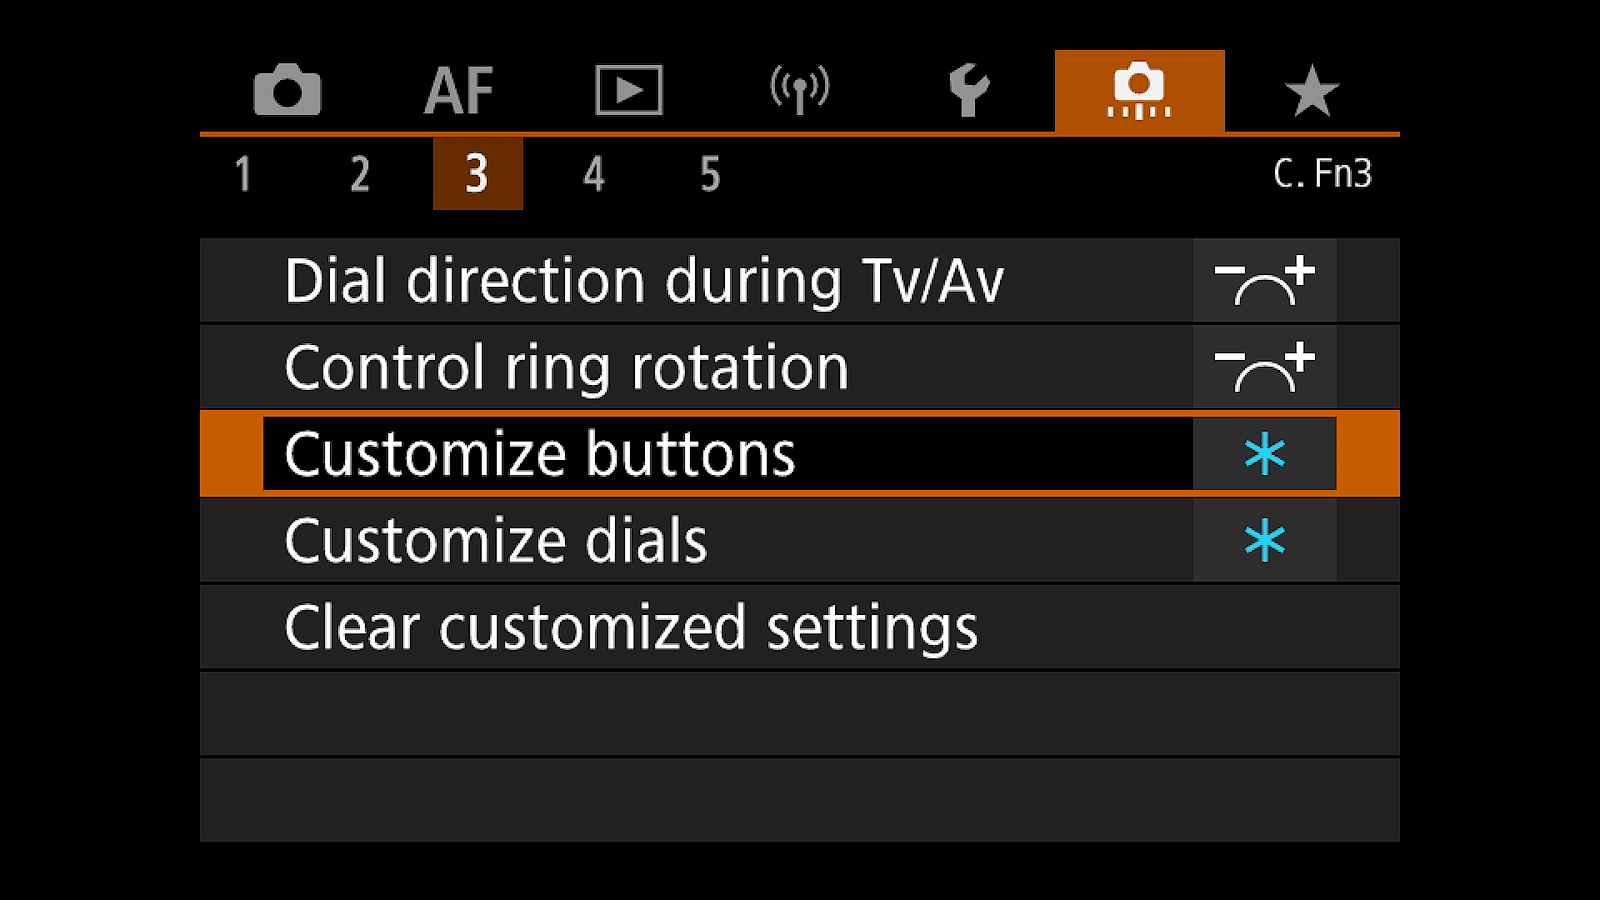
What I recommend doing is picking a button you rarely use. On my EOS R5 and R6, that button is depth-of-field preview. I never use it when shooting video, and it's also on the front of the camera which makes enabling and disabling zebras fast and easy when standing in front of the camera looking at the live preview.
Additional tips for the EOS R5
Another optimization tip (if you use the R5) is to take advantage of its custom video modes. The R6 unfortunately has only one video mode, but the R5 supports three, and each mode can be assigned its own custom zebra level values.
For example, you could have custom video mode 1 setup with zebras prioritizing skin tone, and custom video mode 2 prioritizing middle gray, plus other video settings you want to use.
What if you get exposure settings wrong?
In my experience, even when being super careful using zebras, footage can sometimes turn out a little brighter or darker than expected. And that’s okay because the goal here isn’t perfect exposure in every shot, but rather getting exposure close enough to perfect to require only small changes thereafter when color grading.
If this is something you find yourself spending quite a bit of time doing, I created a pack of Exposure Correction LUTs designed for the R5 and R6 that accurately adjust exposure when C-Log and C-Log 3 footage is converted to Rec.709. I always use these to quickly achieve a consistent exposure baseline for all my footage before doing any additional color grading.
Final thoughts
Even though the R5 and R6 don’t support waveforms or false color, it is possible using zebras to more accurately evaluate exposure and get it near perfect, in-camera, every time you record video.
And the good news is — if you learned something new from this article — that knowledge can now be applied to reading IRE values on waveforms and false color modes using external monitors or cinema cameras, for all of the same principles apply.