10 beginner landscape photography mistakes
Collection of hard lessons, mistakes, and bad investments I wish I had known earlier
Like anything, photography is a journey. A craft, like any other, learned by doing, making mistakes, and capturing loads of throwaway images. Landscape photography in particular may seem simple and straightforward on its surface, yet as anyone knows who's tried their hand at creating images of the natural world, it can challenging. I've been trying my hand at it for a while now, and have learned a number of things along the way I wish I'd known earlier.
Mistake #1: Too close and too wide
Tell me if this sounds familiar. You see a subject that captures your attention, decide to take a photo, and walk right up to it. Stand directly in front of it. Smartphones with their wide angle lenses have trained many of us to do this. When I first started taking landscape images, I preferred wide and ultra wide angle focal lengths because they fit more of the environment into an image. It was closer to what I was seeing with my eyes.
But eventually, I began to notice how stretched and distorted those wide angle focal lengths were making my images. How unnatural they looked. I'd look at photography books from the masters and question why my images didn't feel like theirs. Why their images resonated with me. Granted, light, subject, and composition are all possible reasons, but their focal lengths were mostly standard, not ultra-wide.
Walking right up to a subject is also problematic in outdoor and landscape photography because it can create footprints in dirt, mud, and sand. Sometimes those blemishes can be fixed using Photoshop or other tools, but other times the damage is too great and impossible to fix naturally. Always better to keep your distance and shoot your way in.
My advice? If you need to use a wide focal length (e.g., 24mm or wider) to get the composition the want, try also backing and zooming in. Back up about ten feet or so, then zoom using 35, 45, 50mm or more. This will capture nearly the same field of view - the same amount of information - in your image as shooting wide angle, but without the unnatural distortion around the edges of the frame.
Mistake #2: More is better
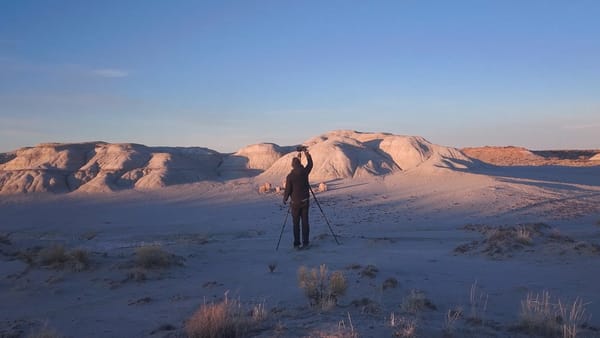
This is similar to the aforementioned "back up, zoom in" tip, but specific to image composition. Anyone who has traveled and tried their hand at landscape photography has had the experience of seeing a panoramic image with their eyes, then taking a wide photo to capture everything they see. To try and capture the scale and magnitude of the environment in its entirety.
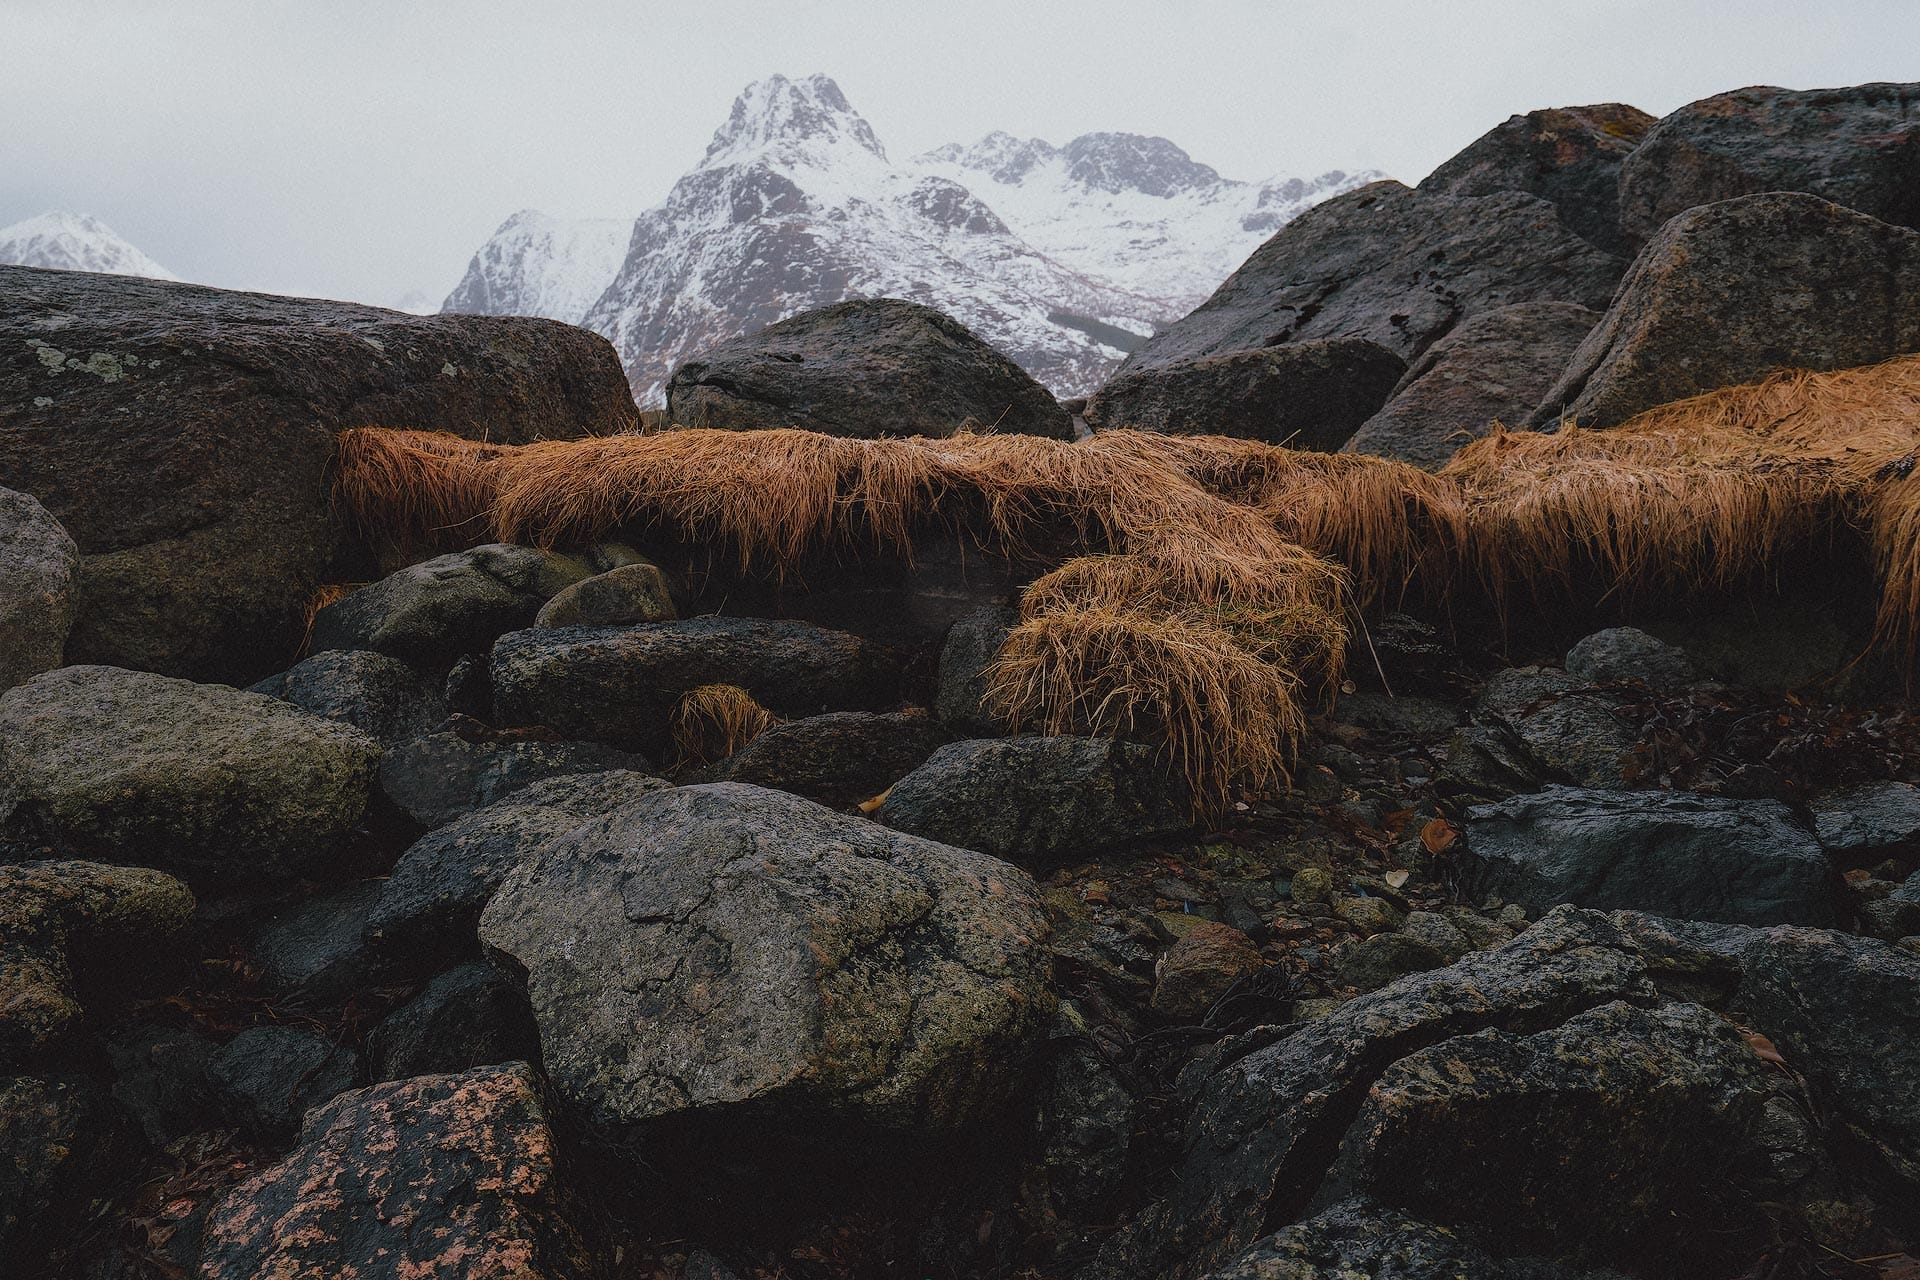
Sometimes this works out fine. But compositionally speaking, ultra wide angle images can often be more for the sake of more. Unless carefully composed and used with intention, wide angle shots can appear messy and careless. A cacophony of stuff competing for the viewer's attention, as illustrated in the image below. Yes, there are other problems including weak light and color, but compositionally speaking, notice how much unnecessary and redundant landscape there is around the left and right sides of the frame.
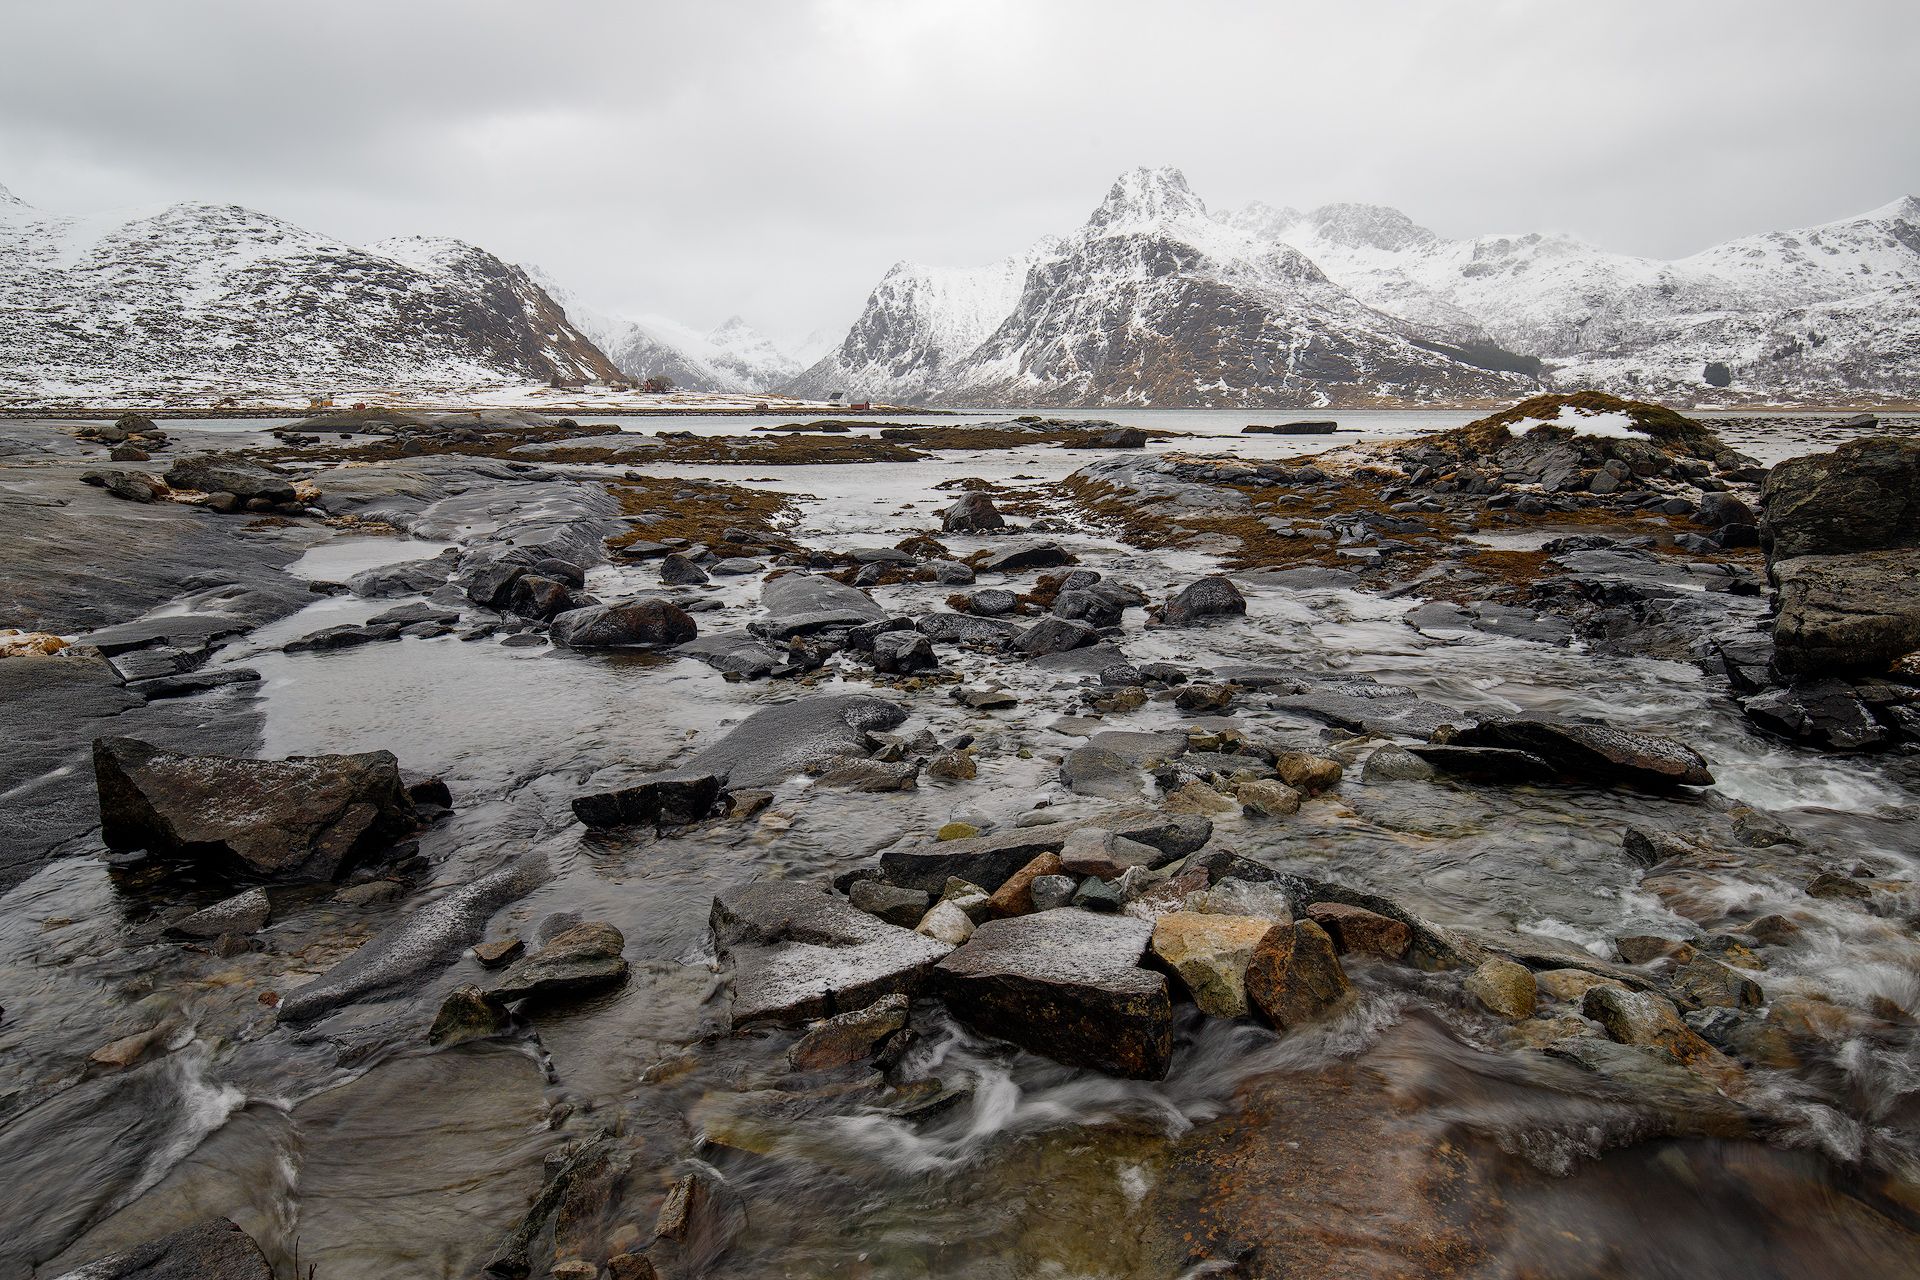
A few minutes after taking the image above, I got down into the water, changed my focal length, and tried to create more with less. Instead of merely observing from a distance, I engaged directly with the scene. My goal was to capture only the essential elements needed for the viewer to sense the cold rocks, damp ground, and the towering mountain in the background.
My advice? When creating landscape images, always consider how a composition can be simplified. What's important, and what's redundant. What the real essence of a subject is. What makes it interesting. Sometimes you can't see this until after the fact when cropping, but it's better to practice seeing this way in the field when shooting.
Mistake #3: Prime lenses are best
This isn't a hard and fast rule for all forms of photography, but I have found it to be especially true when shooting landscapes.
There are countless books, blog posts, and videos touting the superior optics and low light performance of "prime" lenses supporting a single focal length. I fell down the prime lens rabbit hole early on when I bought a couple of Sigma EF Art lenses (24mm and 35mm) plus an L-series Canon 50mm, thinking they would produce fantastic images.
Which they did...for everything but landscapes.
Prime lenses with large maximum apertures (eg, f/1.4, f/1.8) are wonderful for shooting portraits, video, and working in low-light environments, but landscape images are most often captured at around f/8, f/11 or thereabout for optimum sharpness and detail corner to corner and edge to edge. So it mostly doesn't matter what maximum aperture a lens has, especially when creating landscape images on a tripod.
Speaking of tripods, primes also force you to "zoom with your feet", and move your camera and tripod anytime you need to make adjustments to a composition. Variable zooms provide more compositional flexibility.
As long as you get a good, professional grade variable zoom (like the excellent Canon RF 24-70mm, or Fujifilm GF 32-64, two lenses I use all the time) image quality can be just as good as primes throughout their focal length range. Purists will always argue that primes have superior optics and performance, which can be true for other types of photography, but for landscapes, one or two quality variable zooms are all you may need.
My advice, don't waste money on prime lenses unless you have a clear and practical reason for doing so.
Mistake #4: Being impatient
When I first got into landscape photography, I'd take one, two, maybe three images of a subject, then move on. I wanted to fill up my SD cards with the greatest variety of images I could capture in the time I had.
I later realized I was doing too much. I was stretching myself thin, moving quickly from one subject or location to another, without allowing sufficient time for me to build awareness and understanding of what I was photographing. I was too excited and impatient, and felt like I needed to keep moving to be productive. In doing so, I often returned home with hundreds of images, many with sloppy compositions and technical errors.
I learned to slow down and take my time. Be patient, observe, and experiment with different compositions. This doesn't always work, for sometimes I return home with a hundred images of something I never should have bothered with in the first place. That can definitely happen too.
But more often than not, what frustrates me more are the images that could have been better had I slowed down and taken the time to really look at what was in front of me, catch my mistakes, and create the best possible image in the moment.
My advice? Before moving on from a subject or scene that captures your eye, take an extra five minutes and capture multiple versions of it. Zoom in, zoom out, back up, raise and lower your tripod, switch from portrait to landscape and vice verse, etc. You will likely find a better image that way.
Mistake #5: Always use a tripod
You may get the impression that landscape photographers always shoot with a tripod. And while that's generally true, especially when shooting long exposure images, working at twilight, and dealing with high wind, it's not always true. Many images can be just as easily captured handheld, with little-to-no difference in image quality.
This is especially true with today's modern, mirrorless cameras, for many now have IBIS (in-body image stabilization) which allow the camera to shoot acceptably sharp images at slower shutter speeds. Much different than the old days of DSLRs and lenses without stabilization.
Additionally, ISO performance is better today than ever before. With many cameras, elevated levels like ISO 800 or 1600 aren't as noisy as they were a decade or so ago. And even then, if you do get unwanted noise in your shot, you can easily and intelligently remove it using any of the excellent AI denoising software apps out there, including Adobe's own Denoise AI (built-in to Camera Raw, Lightroom and Lightroom Classic), as well as DxO PureRaw and Topaz Photo AI, both of which are exceptionally good at removing noise and retaining detail.
Tripods are also a pain - literally, at times - to hike with. They add extra weight to your camera bag.
I've also found that tripods can slow me down, creatively. They sometimes cause me to stay in one place, taking more or less the same image over and over again. What's better is freestyling with a camera handheld, experimenting with different focal lengths and positions before settling down and placing my tripod in the optimum position.
Mistake #6: Cheap tripods are fine
It's easy to believe tripods are all more or less the same. They all mount and stabilize a camera, and as long as an image is sharp and well composed, it doesn't matter whether a $50 or $1000 tripod was used...right?
It wasn't until my first true landscape photography experience in Iceland that I appreciated the difference. I traveled there carrying a budget travel tripod and ball head (cost me about $150). First day, I immediately ran into problems. My tripod would shake and rattle in the wind, vibrating the camera and causing soft, slightly blurred images.
Additionally, the legs on my budget tripod weren't long enough to raise my camera to eye-level, so I was constantly hunched over and straining my back. I also lost height when shooting on uneven terrain, where a couple of legs needed to be shorter for the tripod to stand upright and level. Which again, made composing my images difficult.
I love small, lightweight tripods as much as the next person when packing a bag and hiking, but when it comes time to take an image, you get what you pay for. Eventually I got a better tripod, and not only did it provide a more stable base for shooting long exposures, but also made composing my images more comfortable, and the longer legs worked better on uneven terrain.
Without question, tripods are an investment, and they can be quite expensive. But if you're investing hundreds or even thousands of dollars in a quality camera body and lens, you shouldn't prop them up using cheap, flimsy tripods. Quality tripods also typically last much longer and perform better over time.
Mistake #7: Should always bracket exposure (HDR)
I learned years ago that the best way to avoid clipping shadows and highlights, avoid noise, and expand the dynamic range of my digital camera was to create High Dynamic Range (HDR) images. Composite images created from two, three or more identical images with darker and brighter exposures.
No question about it, HDR definitely has its use cases, and can create cleaner images with less noise and better color, especially in high contrast outdoor scenes. It's especially easy to do when many modern digital cameras have built-in exposure bracketing modes, and memory cards are always getting bigger and cheaper.
But early on, I developed a bad habit of bracketing my exposure with every single image I captured, without questioning whether a single image would be sufficient. Then I would return home, import my images, and clog up my hard drives and Lightroom Catalog with far more images than necessary.
My advice? Check your camera's histogram when shooting. If you see clipping, or the entire tonal range is full, bracketing exposure would be a smart thing to do. If however you see a single "hump" of tones situated around the midtones, bracketing exposure will provide little if any benefit.
Mistake #8: Must travel abroad for great images
I'll admit, when I first started getting excited by landscapes, I wanted to shoot the most epic, dramatic landscapes on Earth. I mean, who wouldn't? That meant leaving my home country (United States) and flying to places like Iceland and Norway, both with horrendous exchange rates against the US dollar.
Don't get me wrong, those trips were wonderful, and I learned and experienced a great deal. I don't regret going. But in retrospect, when I look at images captured on those trips, I wasn't ready. I didn't have enough experience. I didn't have a clear point of view. I made numerous bad judgement calls with my compositions, focal lengths, and choice of subjects.
What I should have done was shoot more images in my home country. Most notably, the American West, an area so vast and varied it would take multiple lifetimes to experience and photograph it all. Pick up any Ansel Adams book, and you'll notice that almost all of his images were captured in California. Granted, California is really a country unto itself, with a wide array of subject matter to choose from, but you get my point.
In retrospect, I should have focused more time and attention closer to home, and saved my pennies for future, more exotic and expensive trips.
Mistake #9: Prioritizing subjects
I didn't appreciate the importance of light when I first got into landscape photography. My mind was wrapped around finding subjects and things to photograph, without worrying too much about light (for the latter was something I could not control). I attributed good light to good luck, and thought it was something that happened miraculously or by accident.
Eventually, I realized I had things backwards. Instead of hoping for good light, I should chase it instead. Pay attention to what is being illuminated, then find subjects and compositions within the light. Allow the light to guide my eye instead of leaving it up to chance.
I recently made a video about this, with example images, if you'd like to check it out:
Mistake #10: White balance should always be corrected
Every beginner photography book stresses the importance of adjusting white balance and eliminating unsightly color casts. I took this advice to heart by always carrying a white balance card in my wallet. I believed that color casts and tinted neutrals were both undesirable and unprofessional.
What I quickly realized, however, was that light is rarely neutral in landscape photography. And when it is, around midday, I'm usually not taking images outdoors anyway. Every other hour of the day, the light is always warmer or cooler, and changing the natural color temperature and tint of an outdoor image removes its character and authenticity.
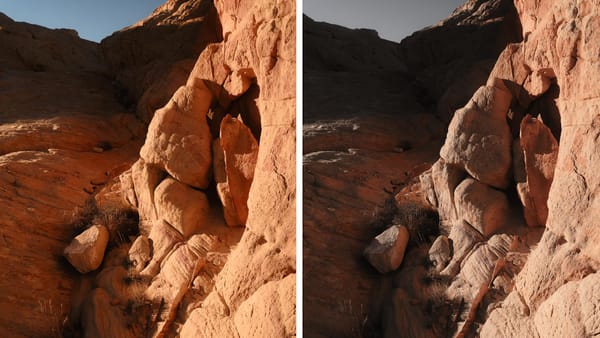
For example, the image below was captured at blue hour in the late evening using a fixed, in-camera color temperature of 5600 kelvin.

If we took this image and "corrected" the white balance to remove the color cast of blue hour and make neutrals actually neutral, it would look like this:
The latter image looks weird and unnaturally gray, as if it were shot at noon in the middle of the day. A classic example where it's more important for an edit to be "right" than "correct".
My advice? Try setting your camera's white balance to a fixed value of 5600 kelvin. That way, the natural and inherent color temperature and tint of the environment will be authentically captured, instead of letting the camera set its own white balance. You can change white balance however you want for creative purposes after the fact, but 5600 kelvin will provide a better baseline to work from.
Bonus tip: Shooting during family vacations
Whenever my family went on vacation, I always tried to fit landscape photography into our routine. I'd wake up before dawn, sneak out of our Airbnb or hotel, and return before anyone else was awake. By mid-afternoon, when everyone was fully rested and ready to go, I'd be tired, irritable about the "bad light," and in need of a nap. I’d try shooting again in the evening around sunset, but that always conflicted with dinner. Burning the candle at both ends caused unnecessary conflict and stress when I was supposed to be enjoying time off with my family.
Eventually, I realized (and more importantly my spouse understood) why it was necessary for me to travel alone (or with other photographers) when doing landscape photography. Family vacations are not the time. I still of course bring a camera with me wherever we go, and try to sneak in a few images here and there, but most of the time I'm creating images of my family.
Landscape photography is a passion, but it shouldn't get in the way of what's most important.