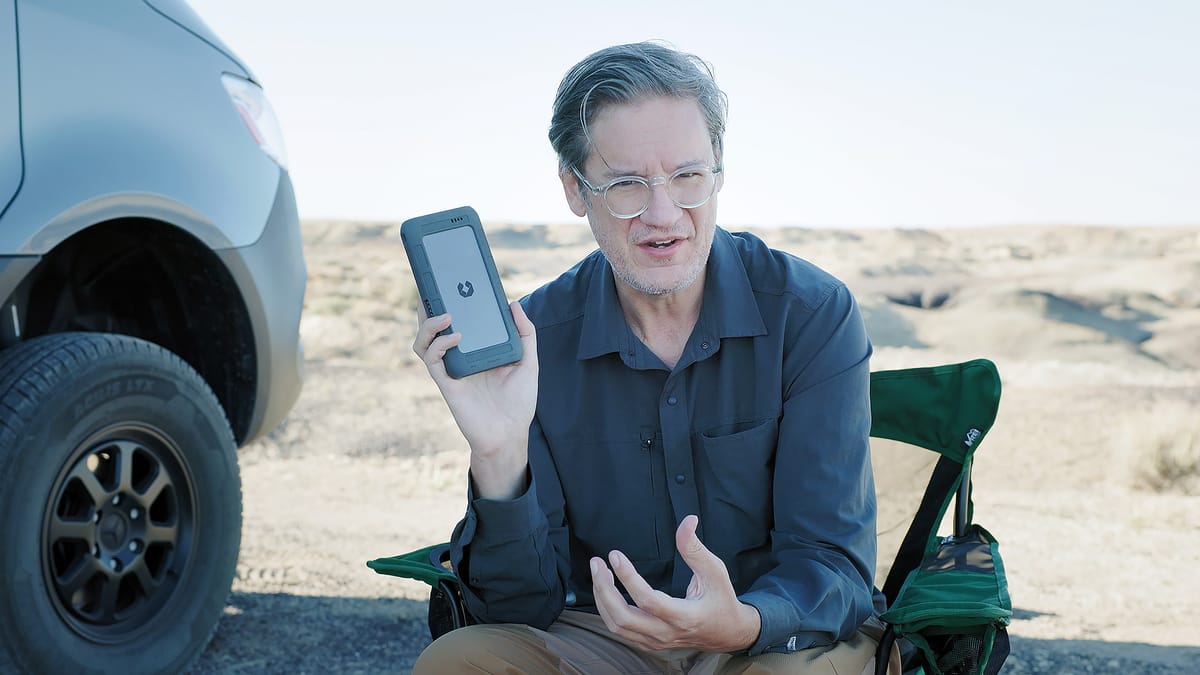
UnifyDrive UT2: The portable photo backup solution you’ve been waiting for?
Portable enclosure supporting dual SSDs, RAID 1, automated backups from SD and CFExpress cards, Wi-FI hotspot, media streaming, and more.
Traveling with SD and CFExpress cards can be fraught with risks. Cards may fail, break, get lost, or be accidentally formatted and erased in camera. That’s why it’s essential that photographers and videographers create at least one backup of their photos and videos while on the road.
Enter the UnifyDrive UT2—a portable NAS with dual, internal SSDs that provides one-touch backup for SD and CFExpress cards. With no computer needed, you simply insert a card, press a button, and everything is securely copied to the UT2 for safekeeping.
But the UT2 is more than a backup device. It's also a full-fledged portable NAS, offering features like RAID 1 support, password protection, user accounts, media streaming, and even Wi-Fi hotspot capabilities.
At the time of this review, the UT2 is being introduced for $399 through a crowdfunded project on Kickstarter. I've been using and testing a near-final UT2 for the past few weeks, and have some opinions to share about its features, usability, and overall value.
UT2 Enclosure
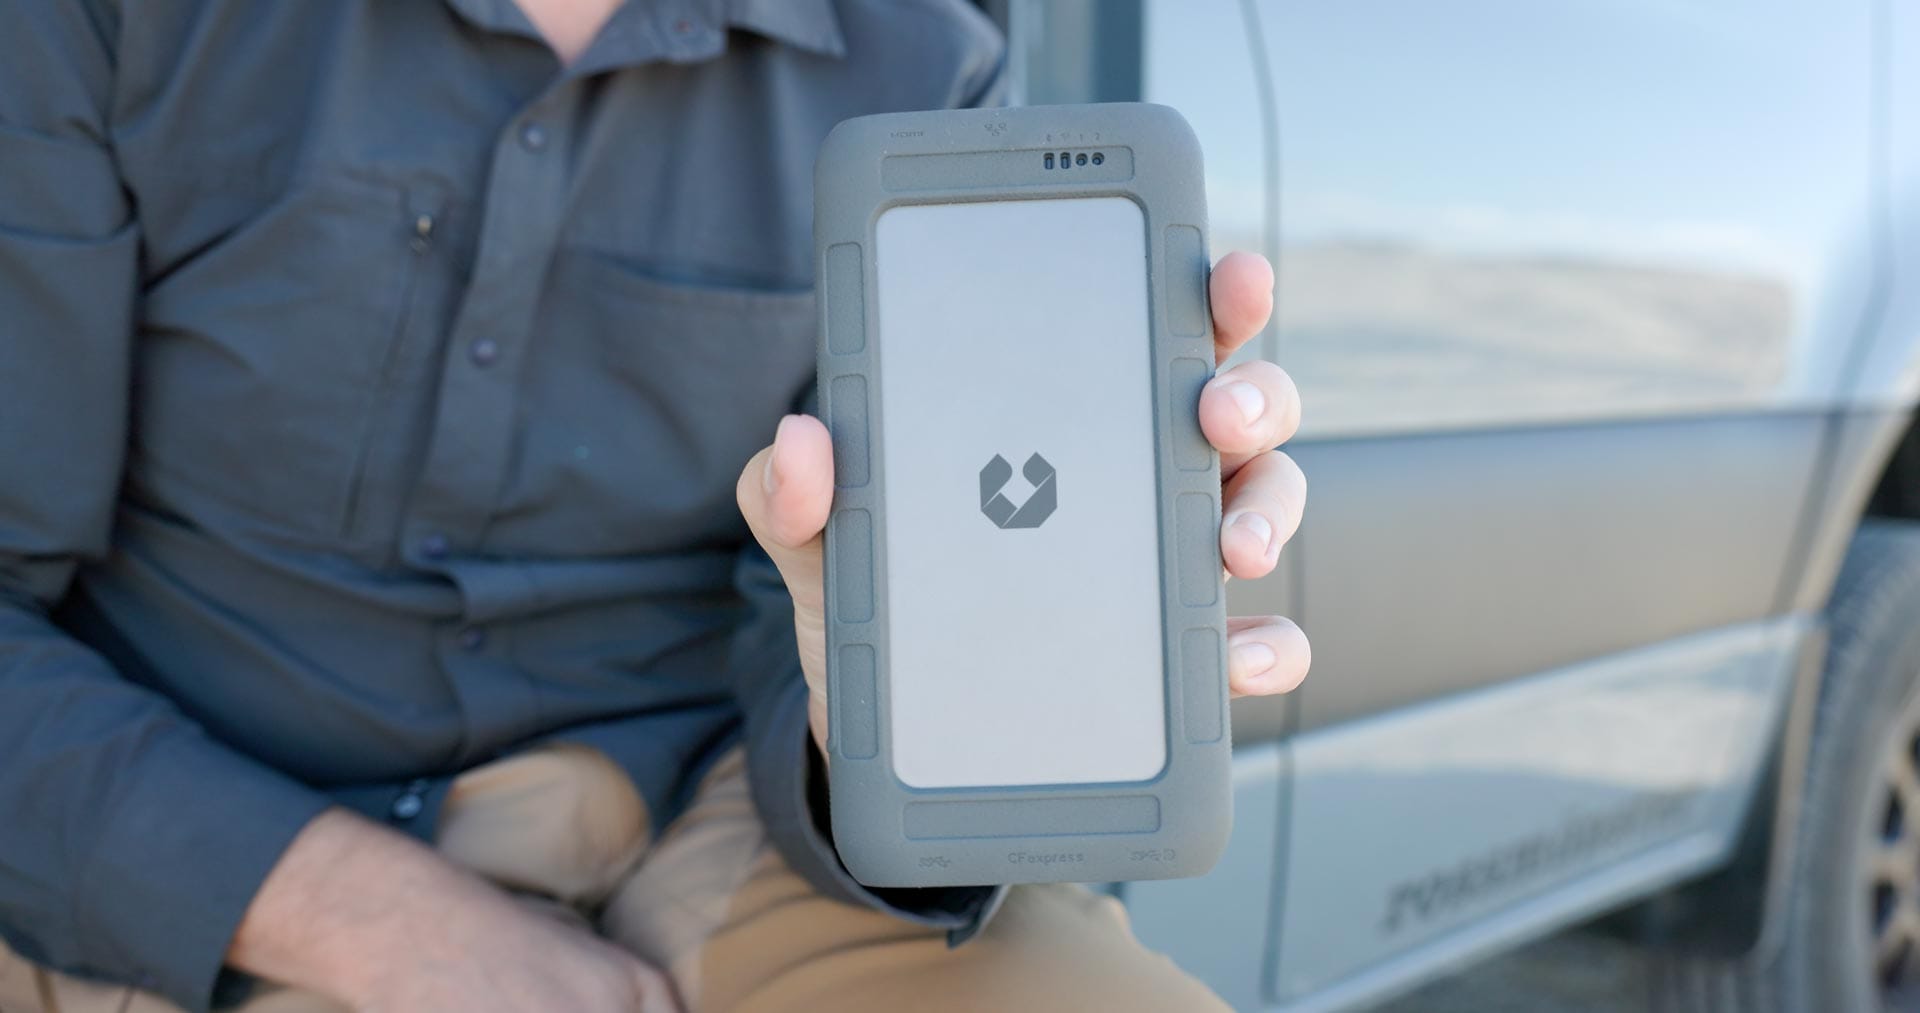
The UT2 is a little larger, thicker and heavier than an iPhone Pro Max. The outside is constructed of aluminum, with a removable silicon case designed that helps prevent bumps and scratches when traveling. With two SSDs installed, the device weighs approximately 0.8 pounds (371 grams).
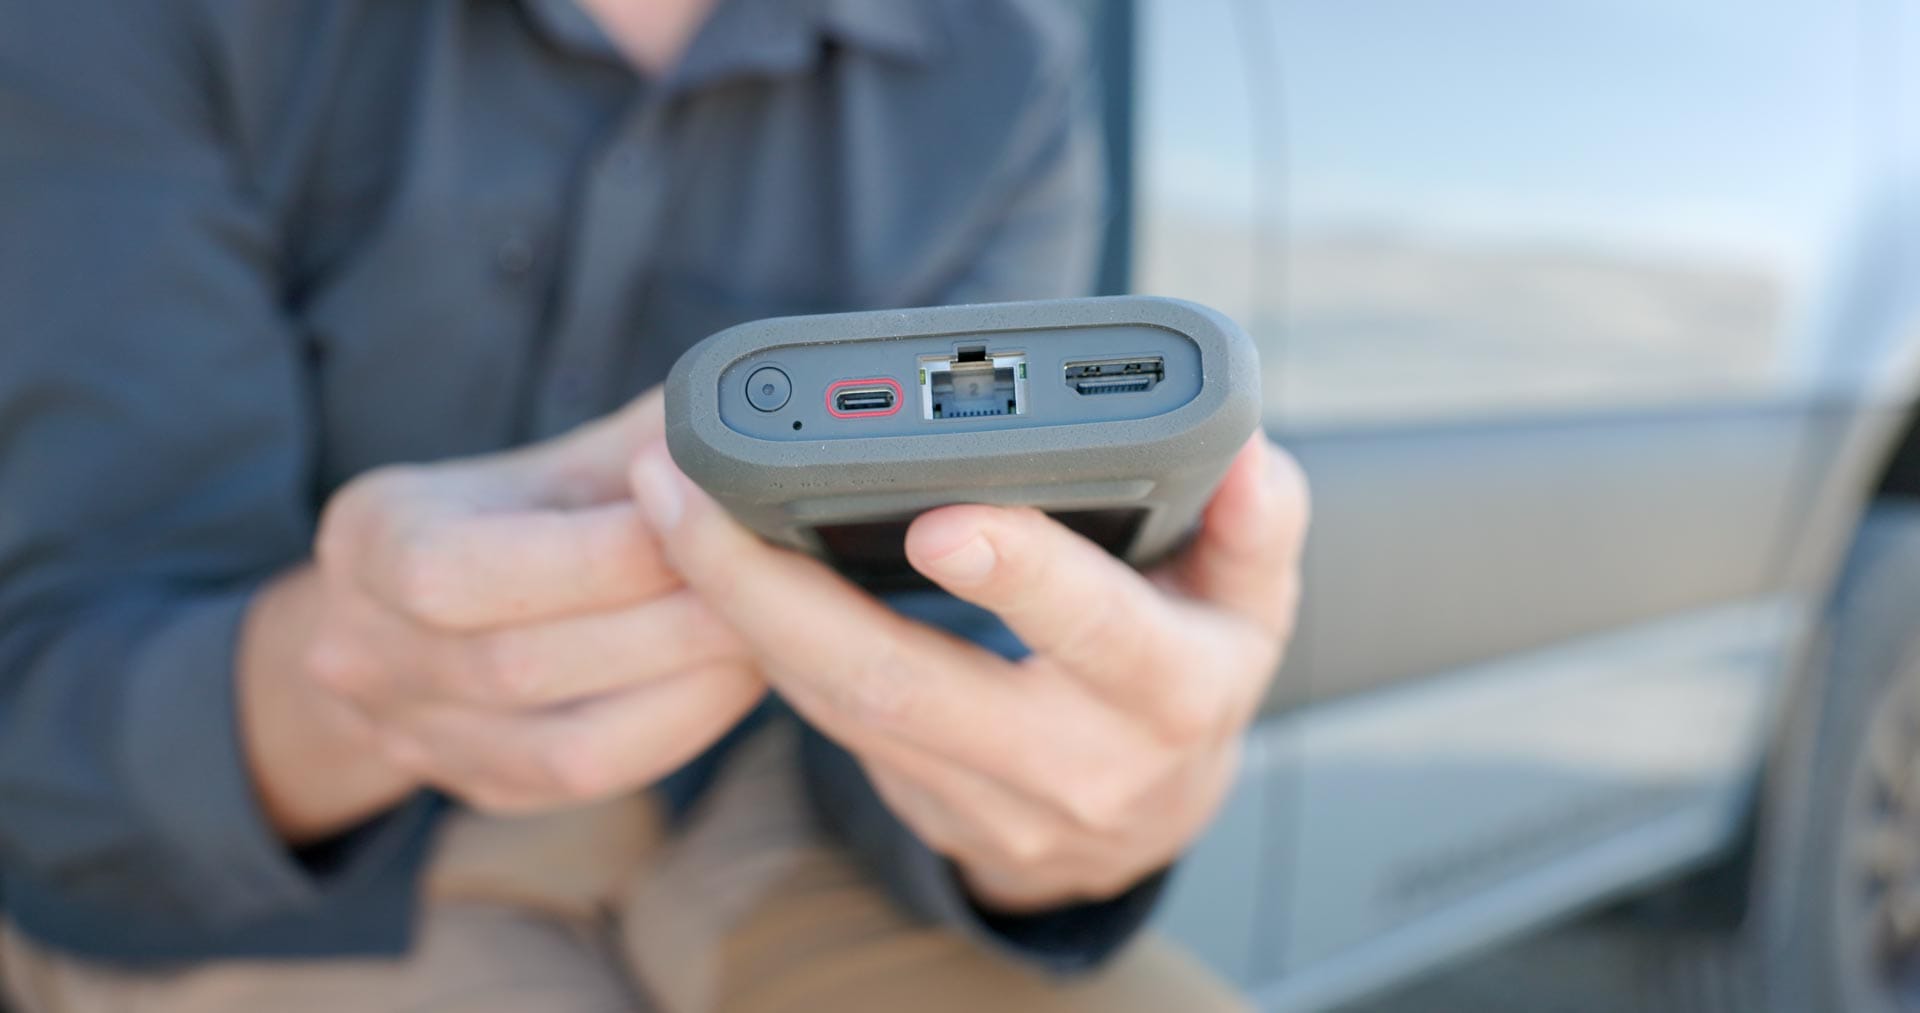
Across the top is a power button, a reset button, RJ-45 ethernet port, a 9V/12V USB-C PD port, plus an HDMI 2.1 video out port.
On the bottom is USB-A port, a USB-C port with DP (DisplayPort) support, a UHS-II SD card reader and CFExpress Type B reader (Type A adapter included). Both readers transfer data up to 312MB/s.

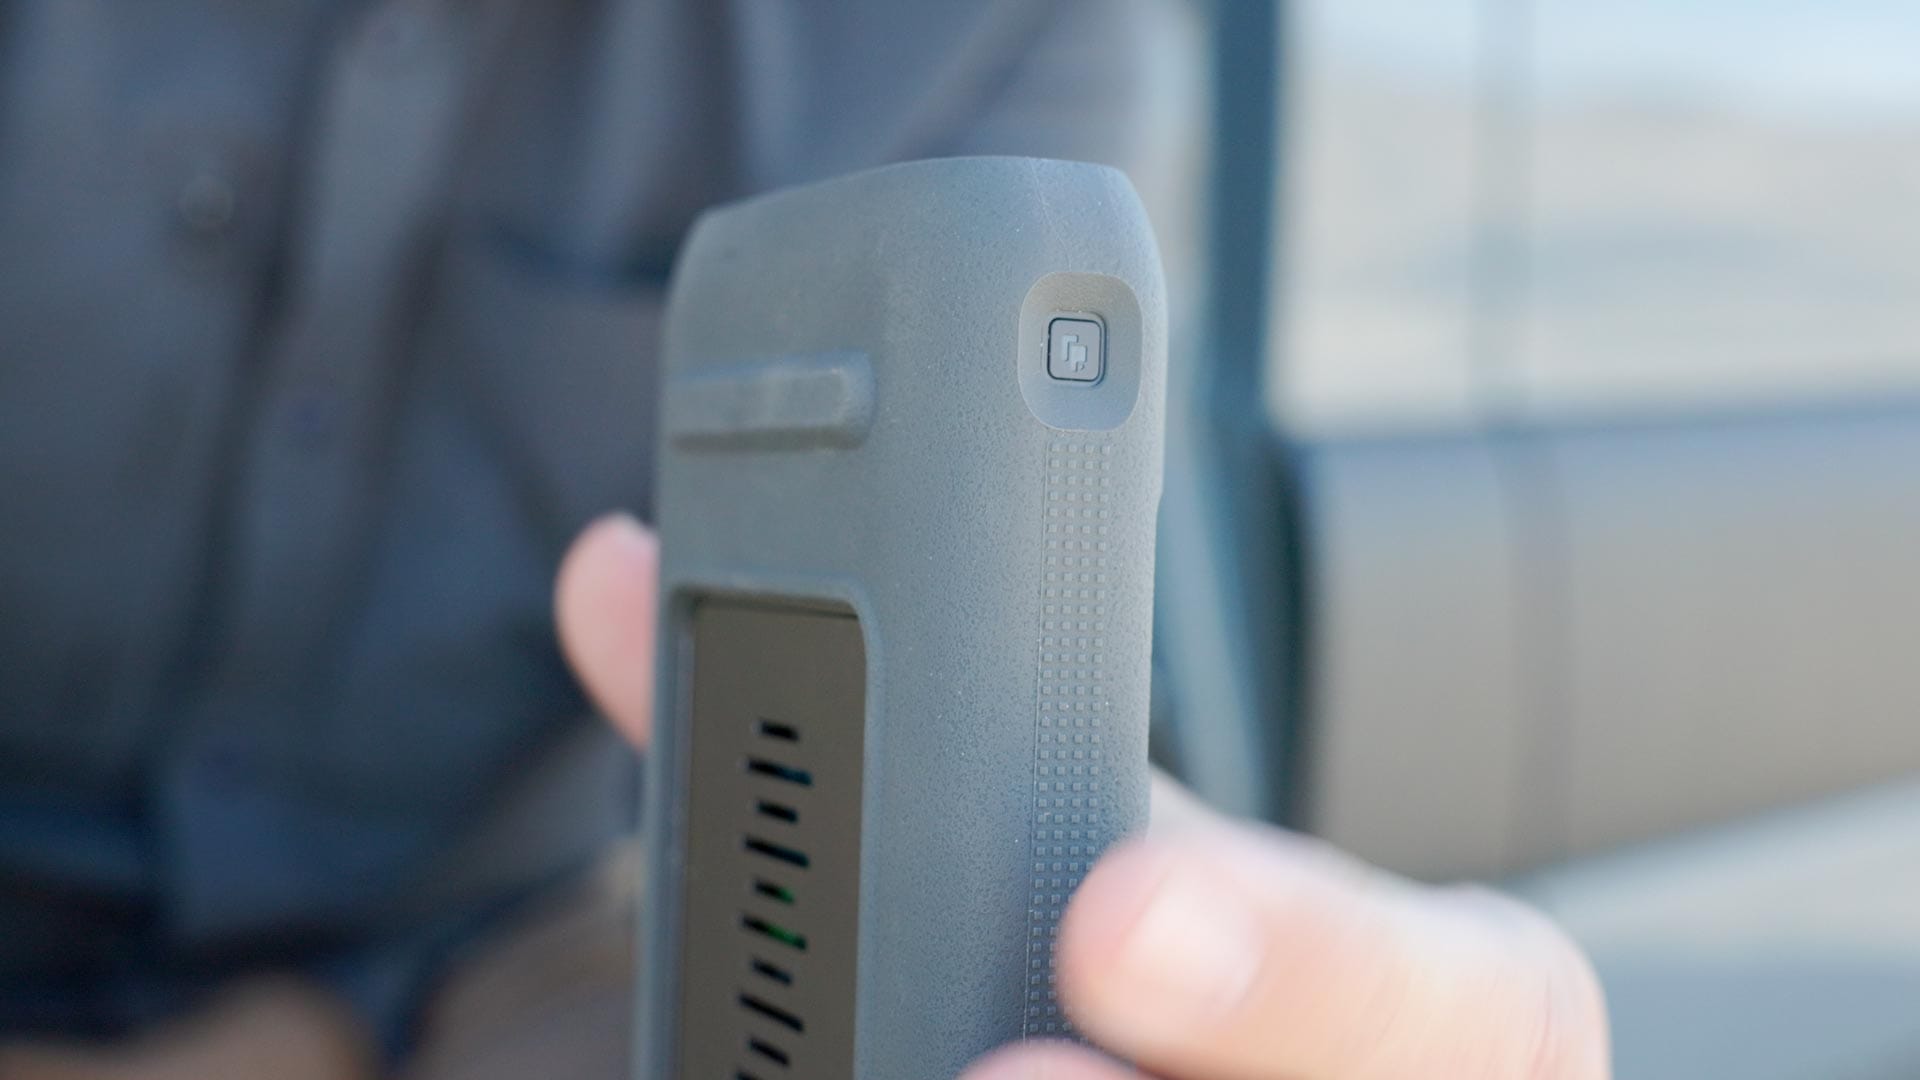
The top shoulders have two buttons, one on each side. One toggles between Wi-Fi 6 for internet access and AP mode for accessing data without an internet connection, the other initiates SD and CFExpress card backups (image below).
Top/front are four indicator lights: two for SSD status, one for Bluetooth status, and the fourth for WiFi/Hotspot status. Each light displays green, red or yellow, plus different blinking speeds to let you know what's going on (see the manual for the full list of states).
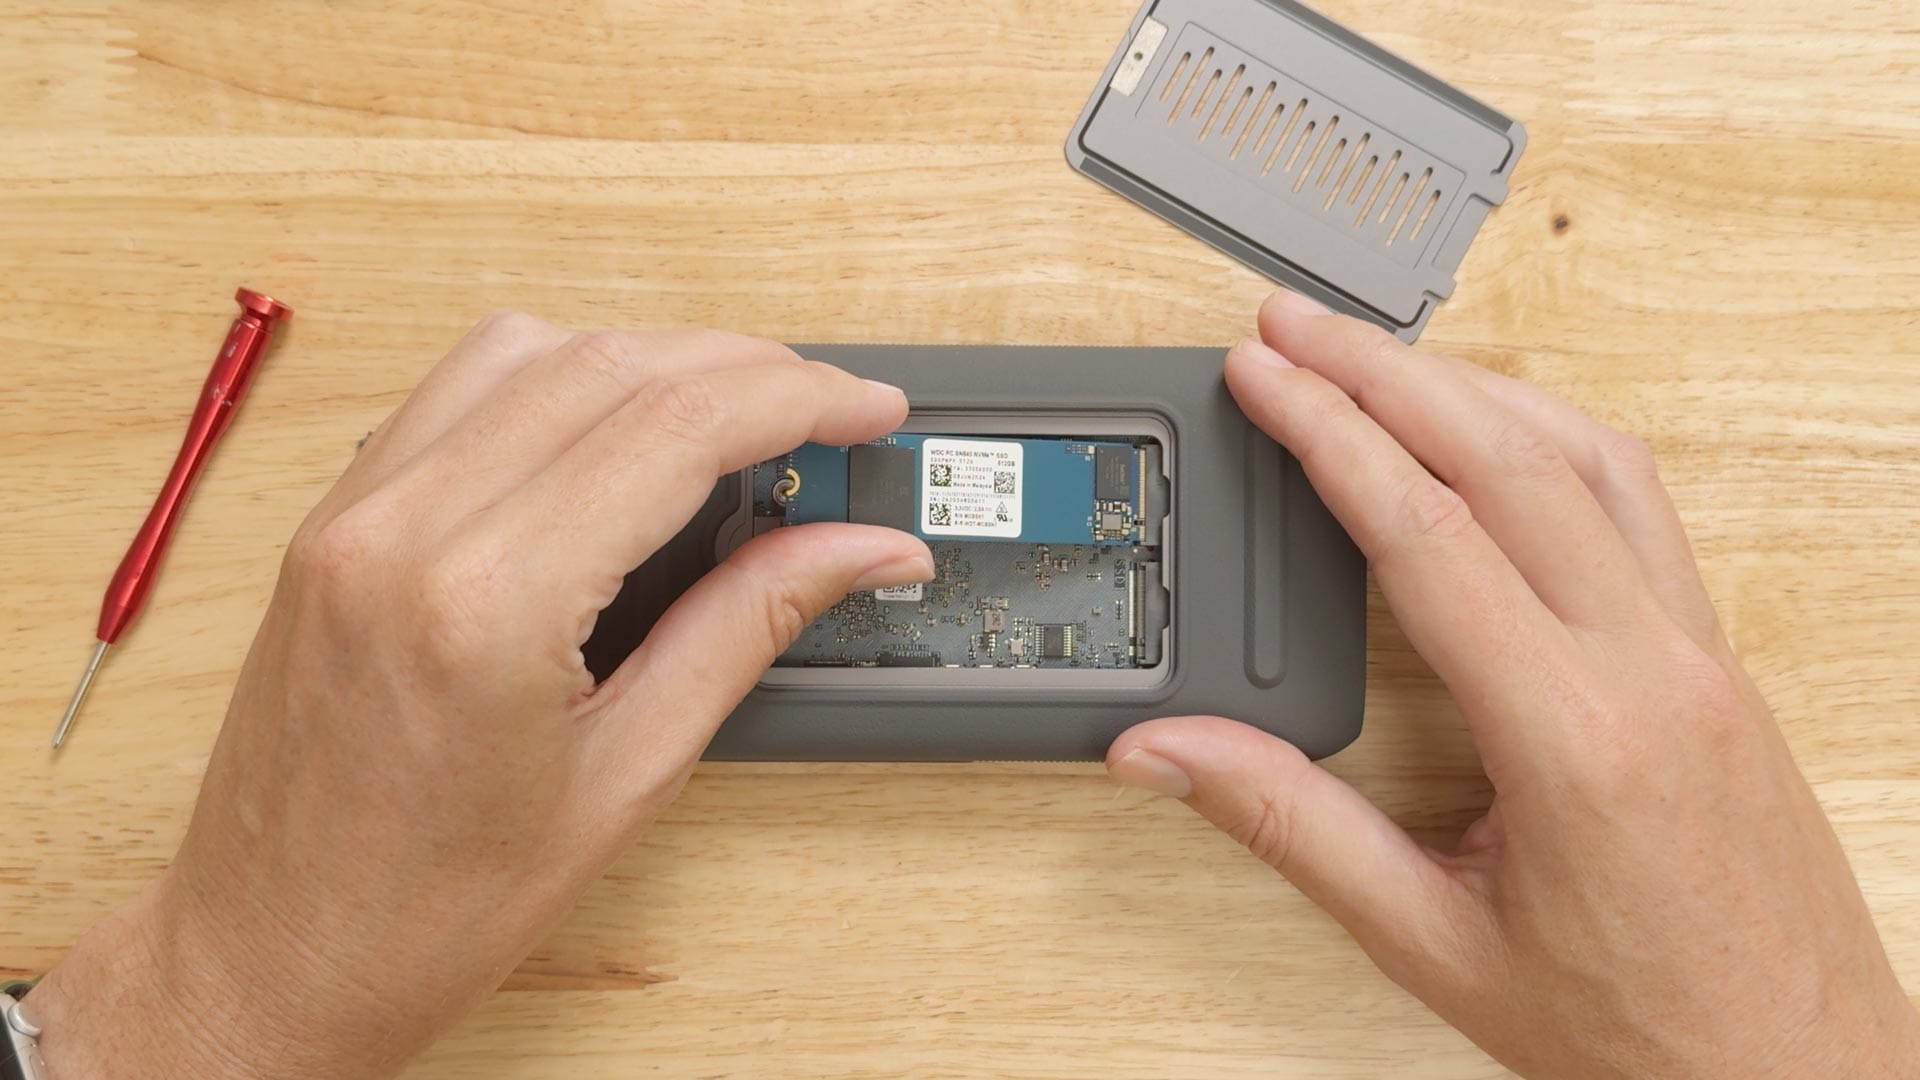
Installing and formatting SSDs
The UnifyDrive UT2 allows users to install their own SSDs. This is one of my favorite features of the device, for it allows users to choose whatever brand and capacity suits their needs. The UT2 uses two NVME M.2 2280 PCIe 3.0 SSDs (PCIe 4.0 or "Gen 4" SSDs are not supported at the time of this review), and maximum capacity is 16 TB (meaning, two 8 TB SSDs). For this review, I'm using two 1TB Western Digital SSDs.
SSDs are installed through the back of the UT2 underneath a ventilated aluminum plate secured by a small Phillips screw. Simply remove the screw, lift the back plate with a fingernail, then push the right side of each SSD into the reader at an angle. You should feel the SSD insert into the slot. Secure their left sides with the two screws provided with the UnifyDrive. Finish by replacing the back plate and screw.
Powering the UT2
The UT2 is powered through a 9V/12V PD USB-C port (the one outlined in red). The device comes with a USB-C cable and PD wall plug, but it may also be connected to a portable power bank, generator, or other power sources.
The UT2 can also be powered using an internal, rechargeable lithium battery that provides approximately 30 minutes of runtime. If the internal battery falls below 15%, the UT2 will automatically start a safe shutdown procedure. The company refers to this battery as a "UPS" (Uninterrupted Power Supply), perhaps to clarify that the battery is mainly intended for backup during a power outage, not as a primary power source.
Connecting and configuring the UT2
The UT2 is setup and configured using the UnifyDrive mobile app for iOS and Android or the desktop client for macOS and Windows. The UT2 broadcasts its own Wi-Fi network for the apps to connect to. Once connected, you may then assign a Wi-Fi network to place the UT2 on the same network your devices use to access the internet.
When my UT2 was first connected, a lengthy firmware update process took place. Documentation said this process would take "up to 20 minutes, depending on network conditions". Mine took at least that long.
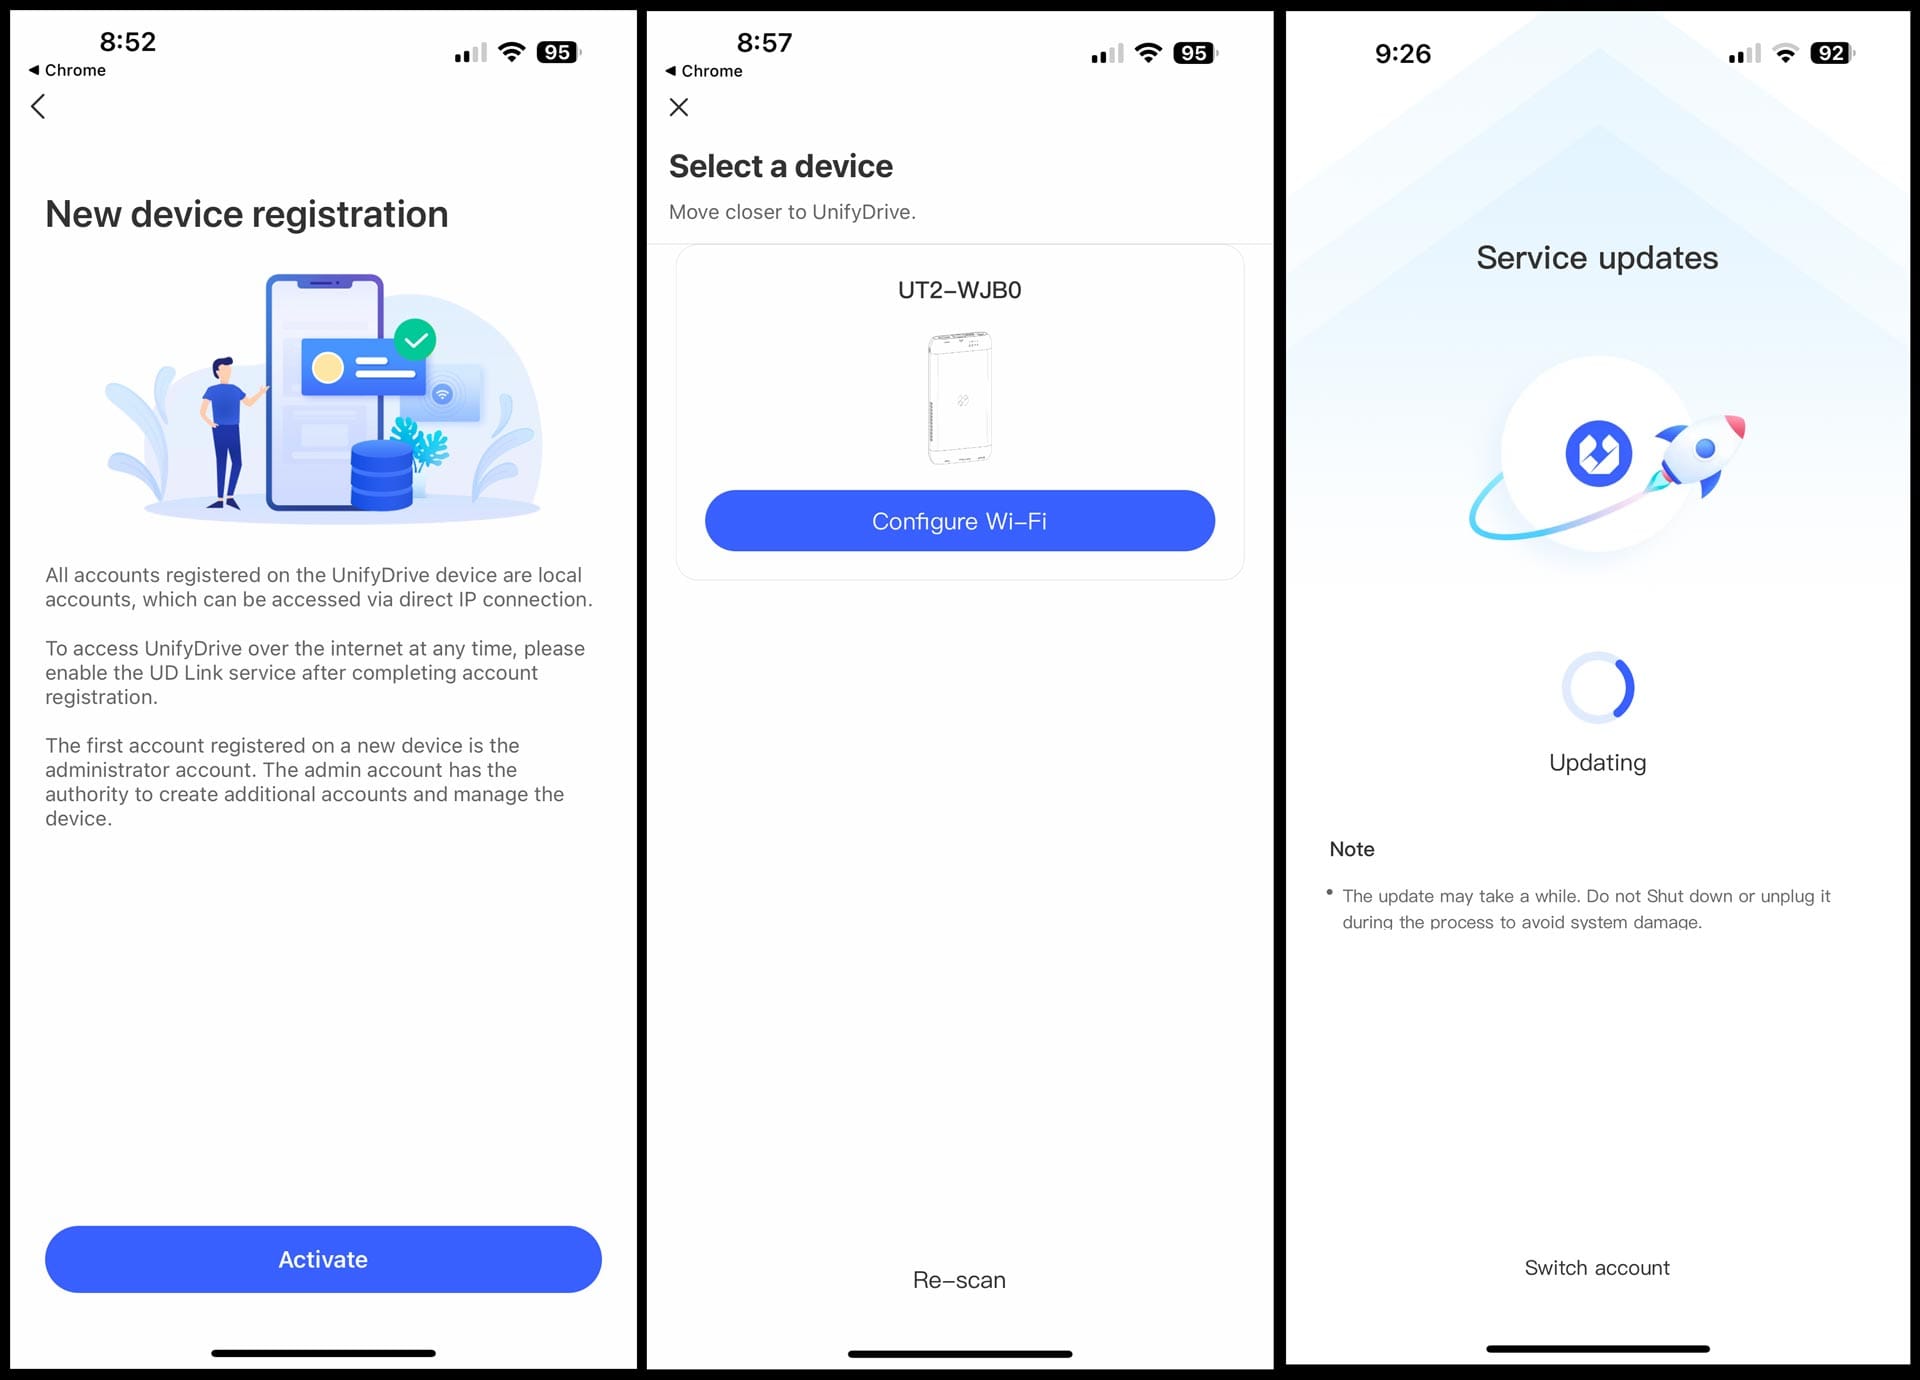
When service updates are complete, you return to the beginning and create a user account. Multiple accounts are supported, with the first being administrator. This protects data against theft, so even if a UT2 were stolen, content stored on the managed volumes cannot not be accessed without credentials.
Formatting the SSDs
Next step is formatting the SSDs installed earlier. This process may be performed using the UnifyDrive mobile or desktop application. Formatting options include:
- Use the SSDs as two separate drives
- Combine the SSDs into a single RAID 1 volume
- Use UDR to selectively choose which data should be mirrored and protected across both SSDs
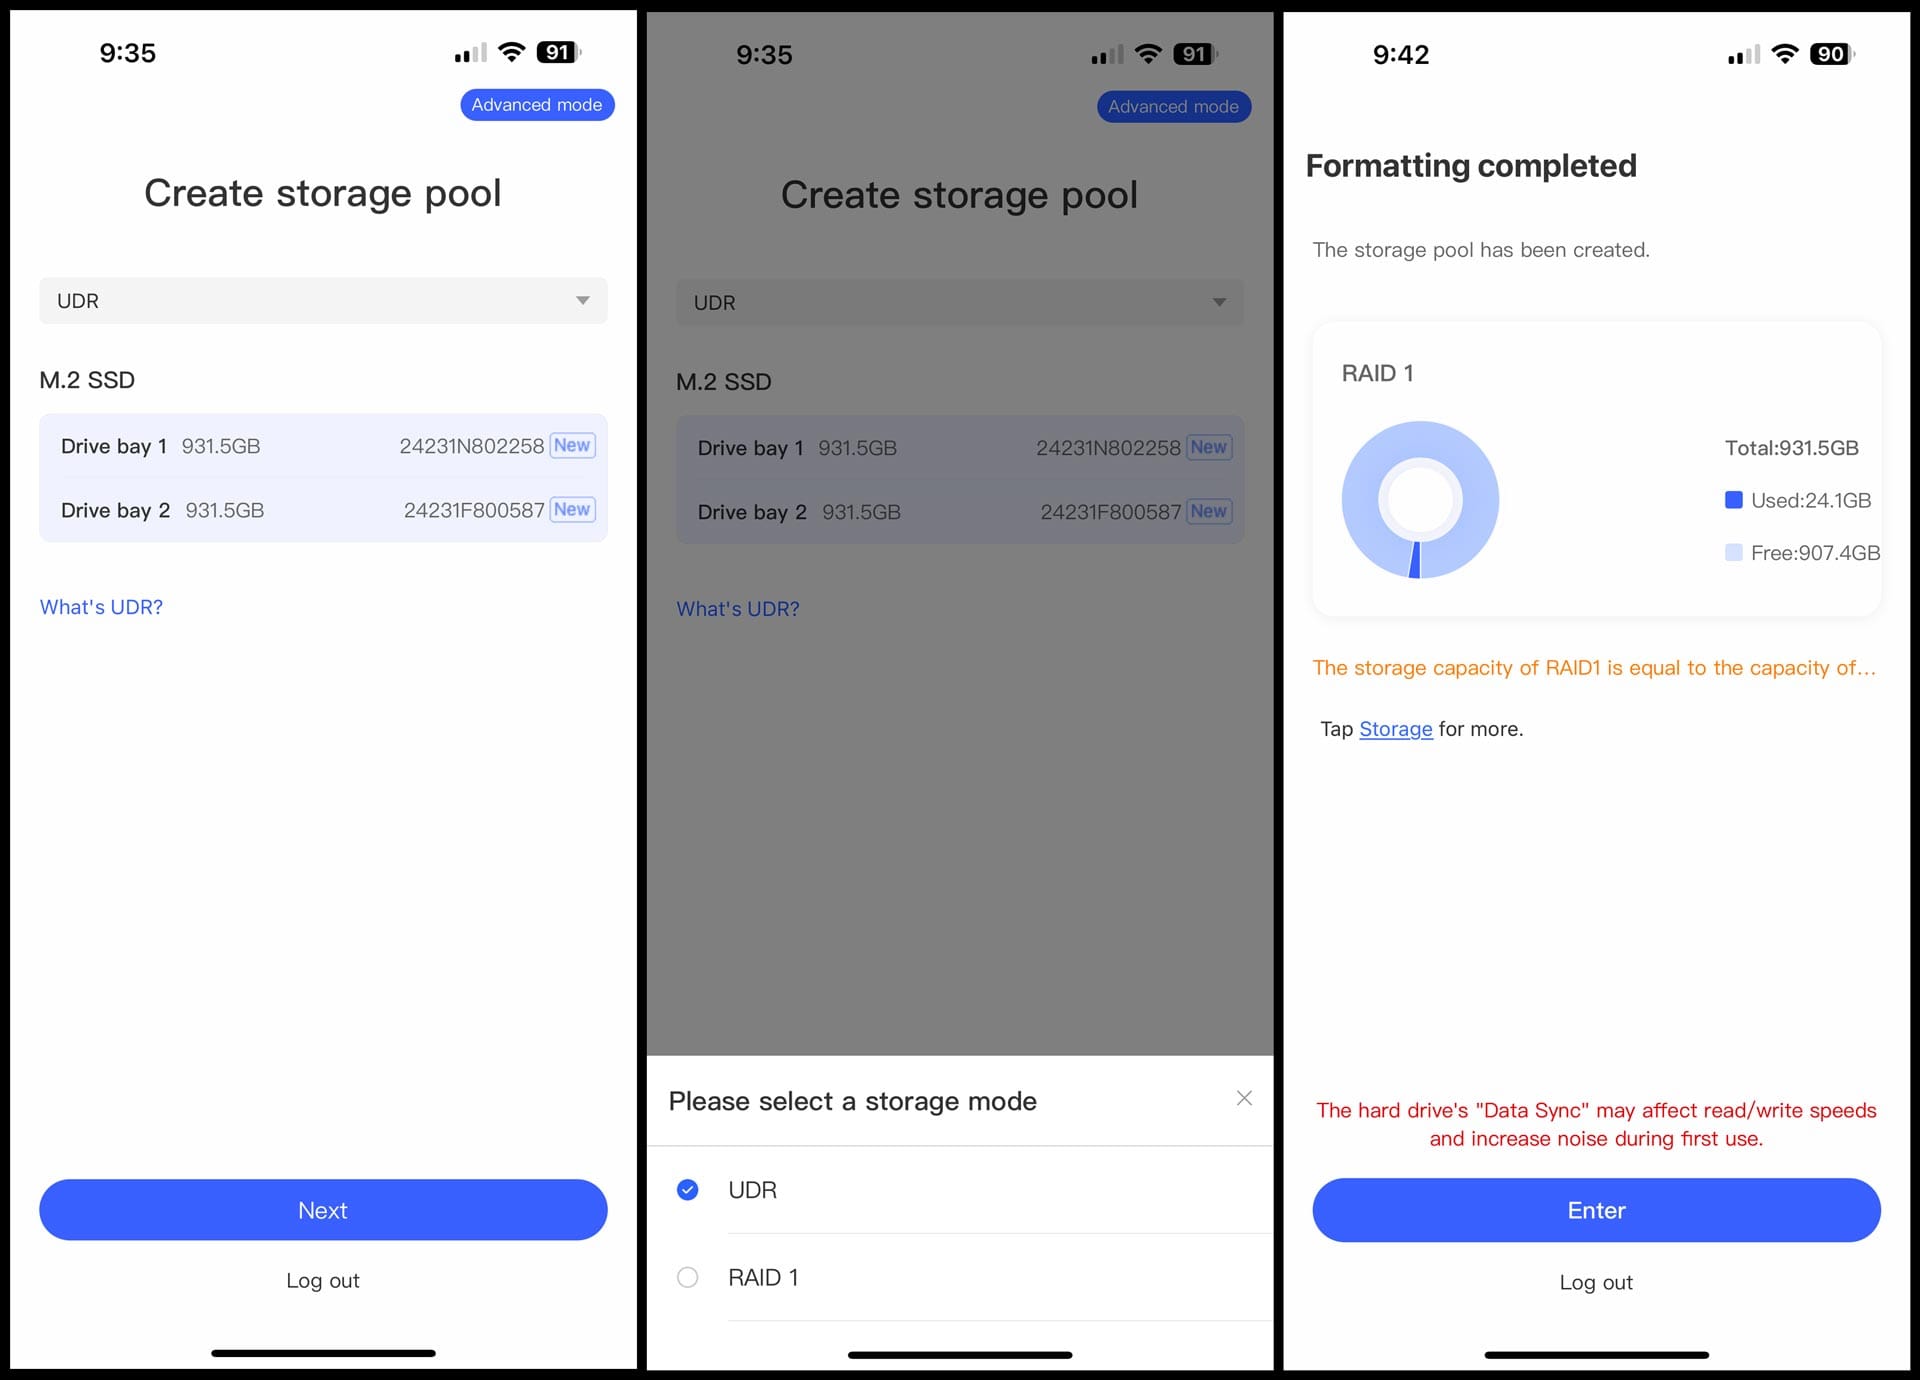
When formatted as RAID 1, the SSDs are combined into a single, protected volume. If one SSD were to fail or malfunction, no data would be lost. This works because the operating system automatically mirrors data between both SSDs, which is great, but does cut overall drive capacity in half. For example, two 1 TB SSDs formatted as RAID 1 will create 931.5GB of usable space.
UDR offers the added security of RAID 1, but allows the user the choose which folders should be mirrored. This can save quite a bit of drive space, but is less automated and simple in comparison.
If interested in using the UT2 like a normal external hard drive so files may be accessed without going through the UnifyDrive app, there is a configurable "Flash Drive" option. This carves out a user-defined amount of space that is separate from the volume managed by the UT2. For example, I can allocate 256GB for files I'm actively working on, sharing between computers, etc, then use the rest of the SSD space as a RAID 1 protected volume.
Writing and reading data on the UT2
Photos, videos, documents, and other file types may be saved to the UT2 using the UnifyDrive app for iOS, Android, macOS or Windows. This is to ensure files are encrypted and accessible only to registered users. The UnifyDrive desktop app is an operating system unto itself, with all the same file management tools provided by the macOS Finder and Windows File Explorer. The UnifyDrive mobile app provides similar functionality, but at the time of this review, is less feature complete when managing files stored on connected media cards and external drives.
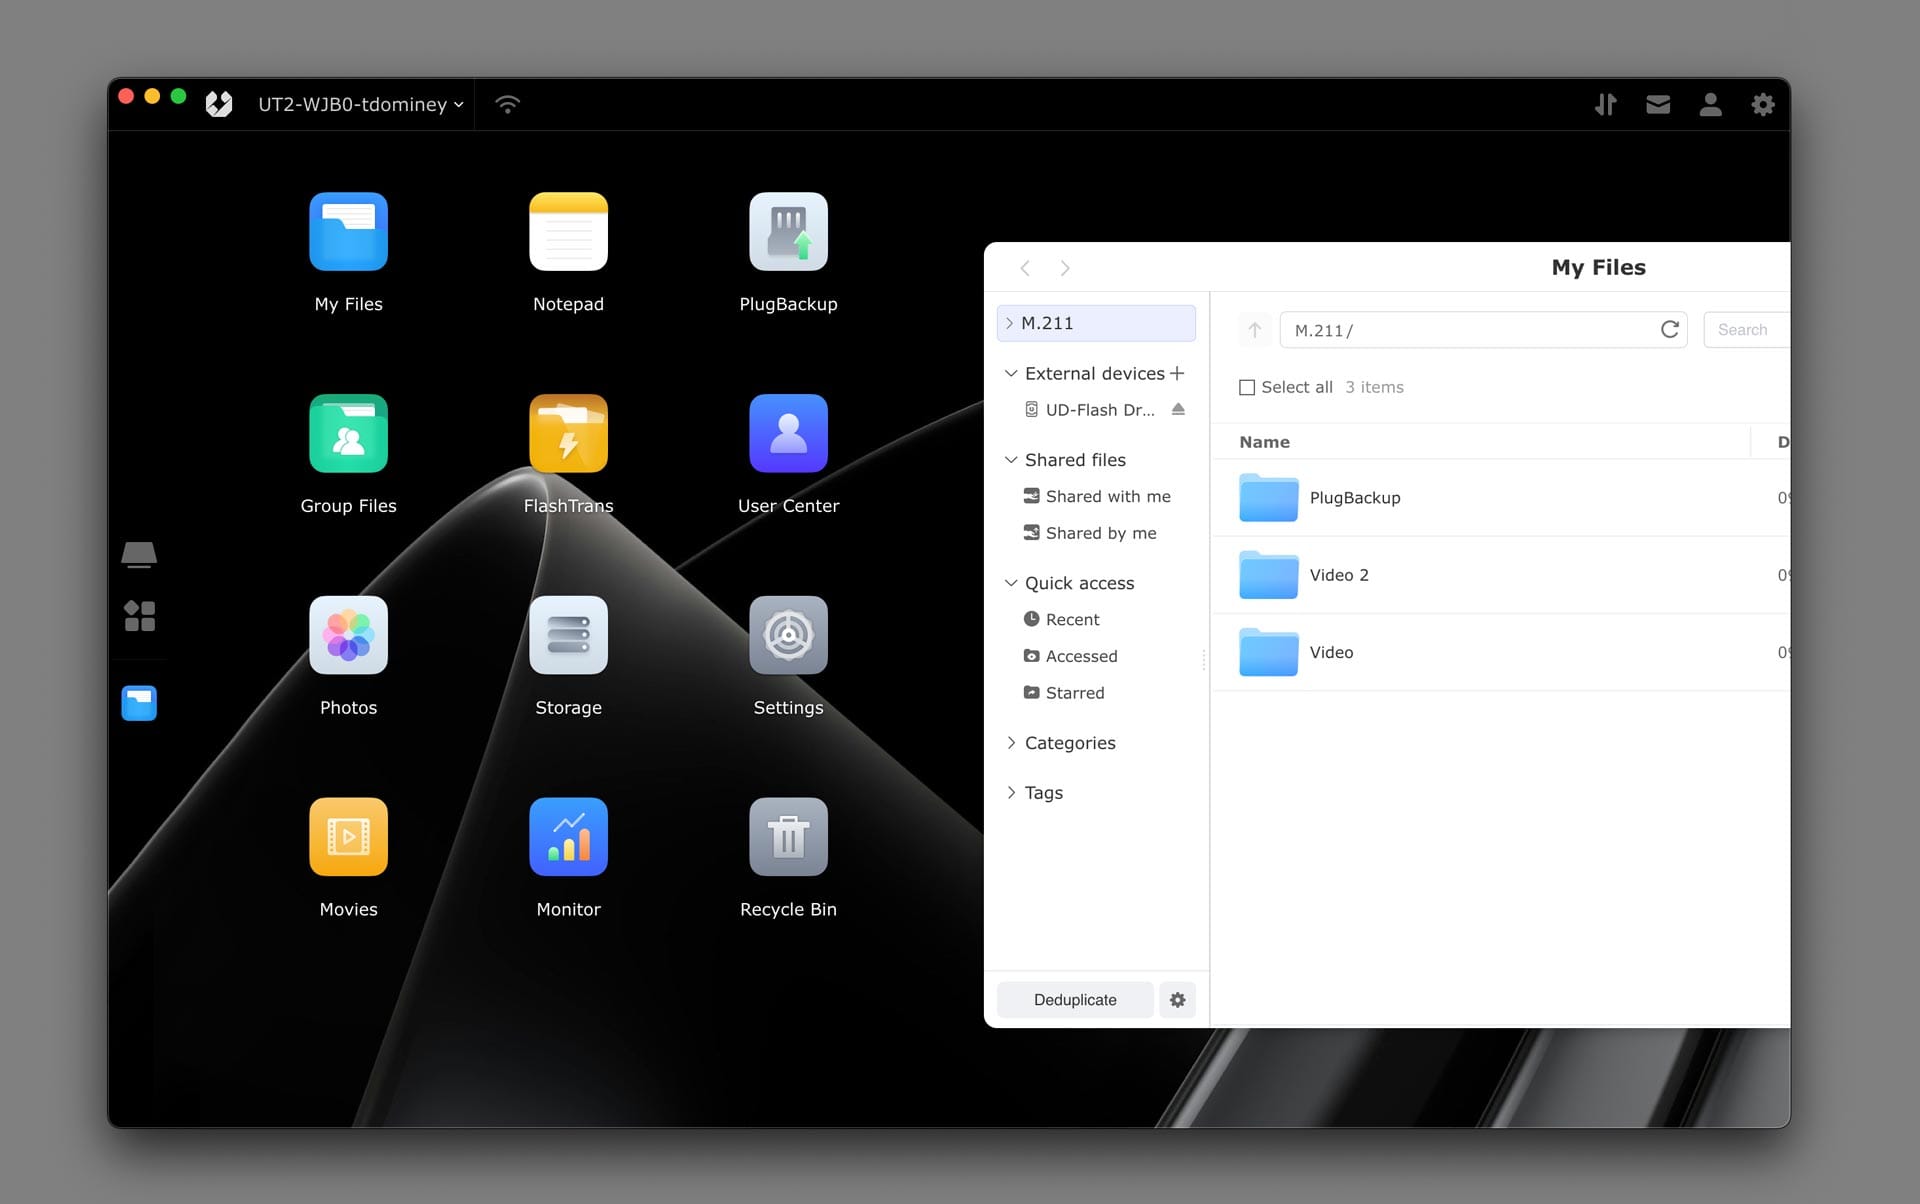
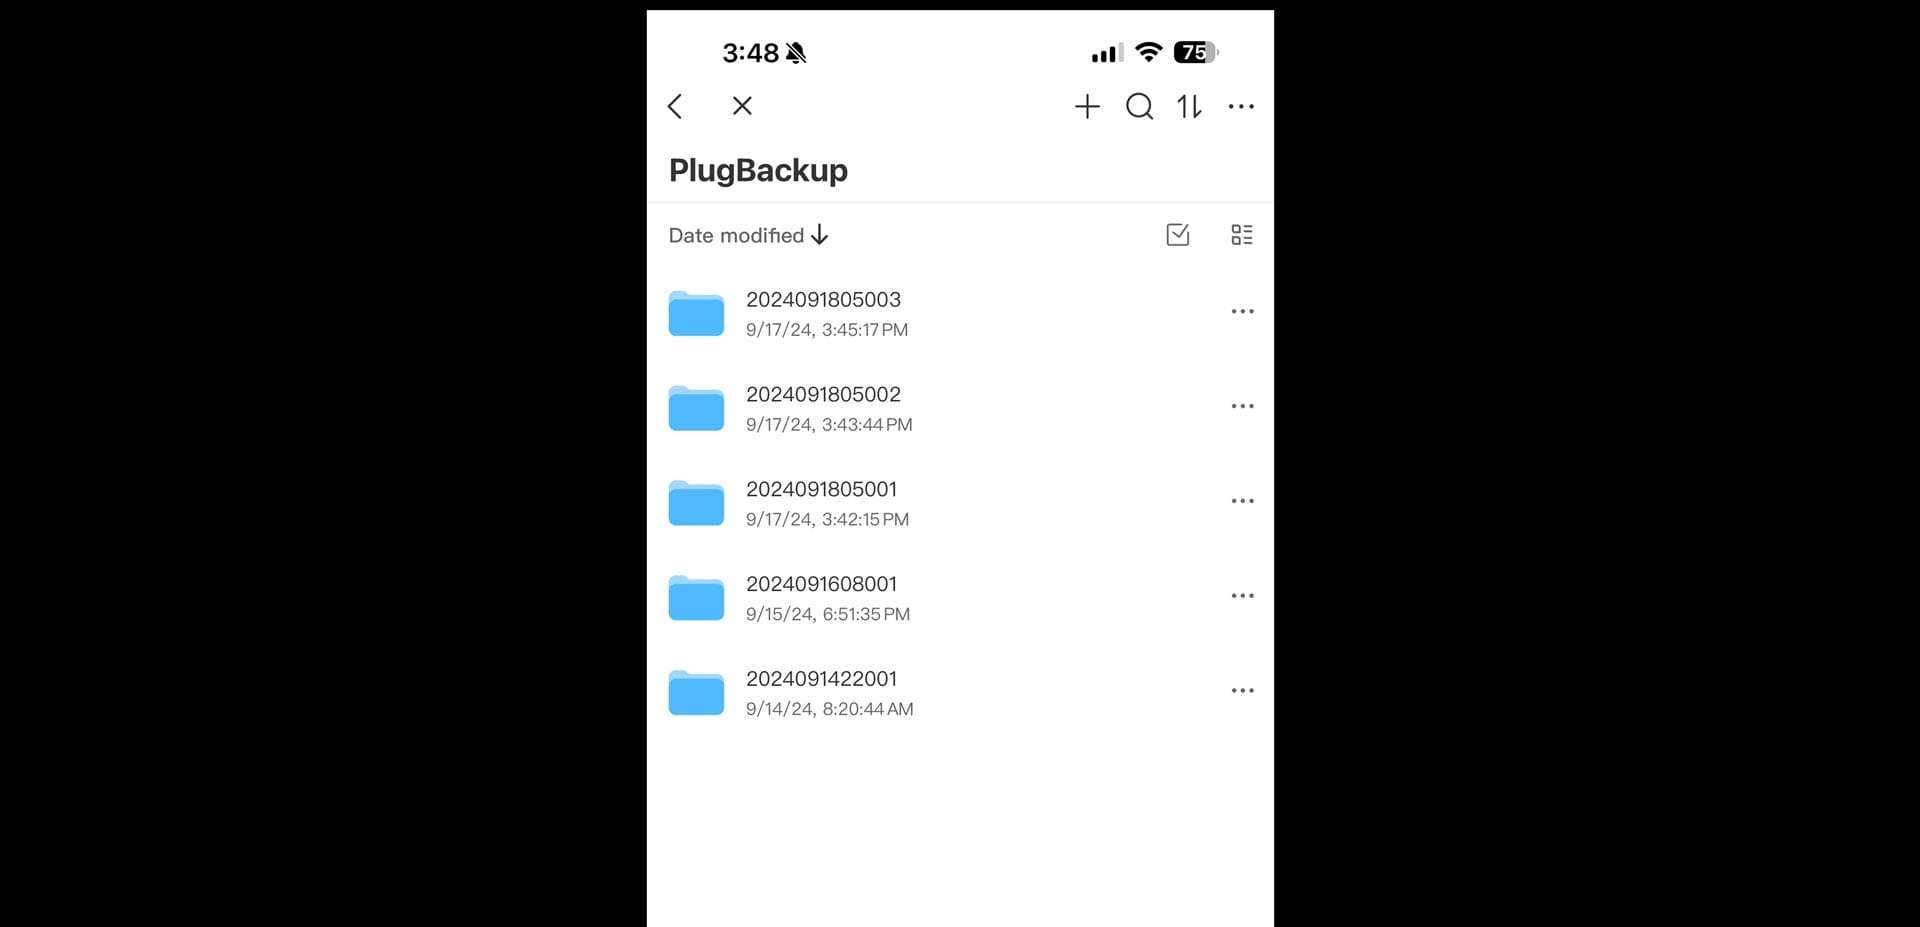
Data can also be imported and backed-up from SD and CFExpress cards using the UnifyDrive's "PlugBackup" app. This enables the import button on the side of the UT2. To backup an SD or CFExpress card, insert into the bottom of the UT2. If the UT2 recognizes a card and is able to mount it, it will beep once. Double press the backup button, the UT2 will then beep twice, and the backup process will begin. Files are copied to the root of the SSD volume by default, but you may change this to a specific folder in the PlugBackup settings, if interested.
Card backups are saved as individual, timestamped folders (see below). If you backup photos and/or videos from an SD card, place the card back in a camera, shoot more photos and videos, then backup the same SD card again, all files on the card will be backed up to a new, timestamped folder. Meaning, the UT2 does not keep track of which photos/videos have already been backed-up from media cards when using PlugBackup.
Testing RAID 1 failures on the UT2
To see how the UT2 would handle an SSD failure when formatted as RAID 1, I powered the UT2 off, removed one SSD (effectively emulating what would happen if an SSD failed to mount), then powered the device back on. The UnifyDrive mobile app noticed the missing SSD, and prompted me to replace it with another SSD of the same capacity, or force mount the single SSD to access its data.
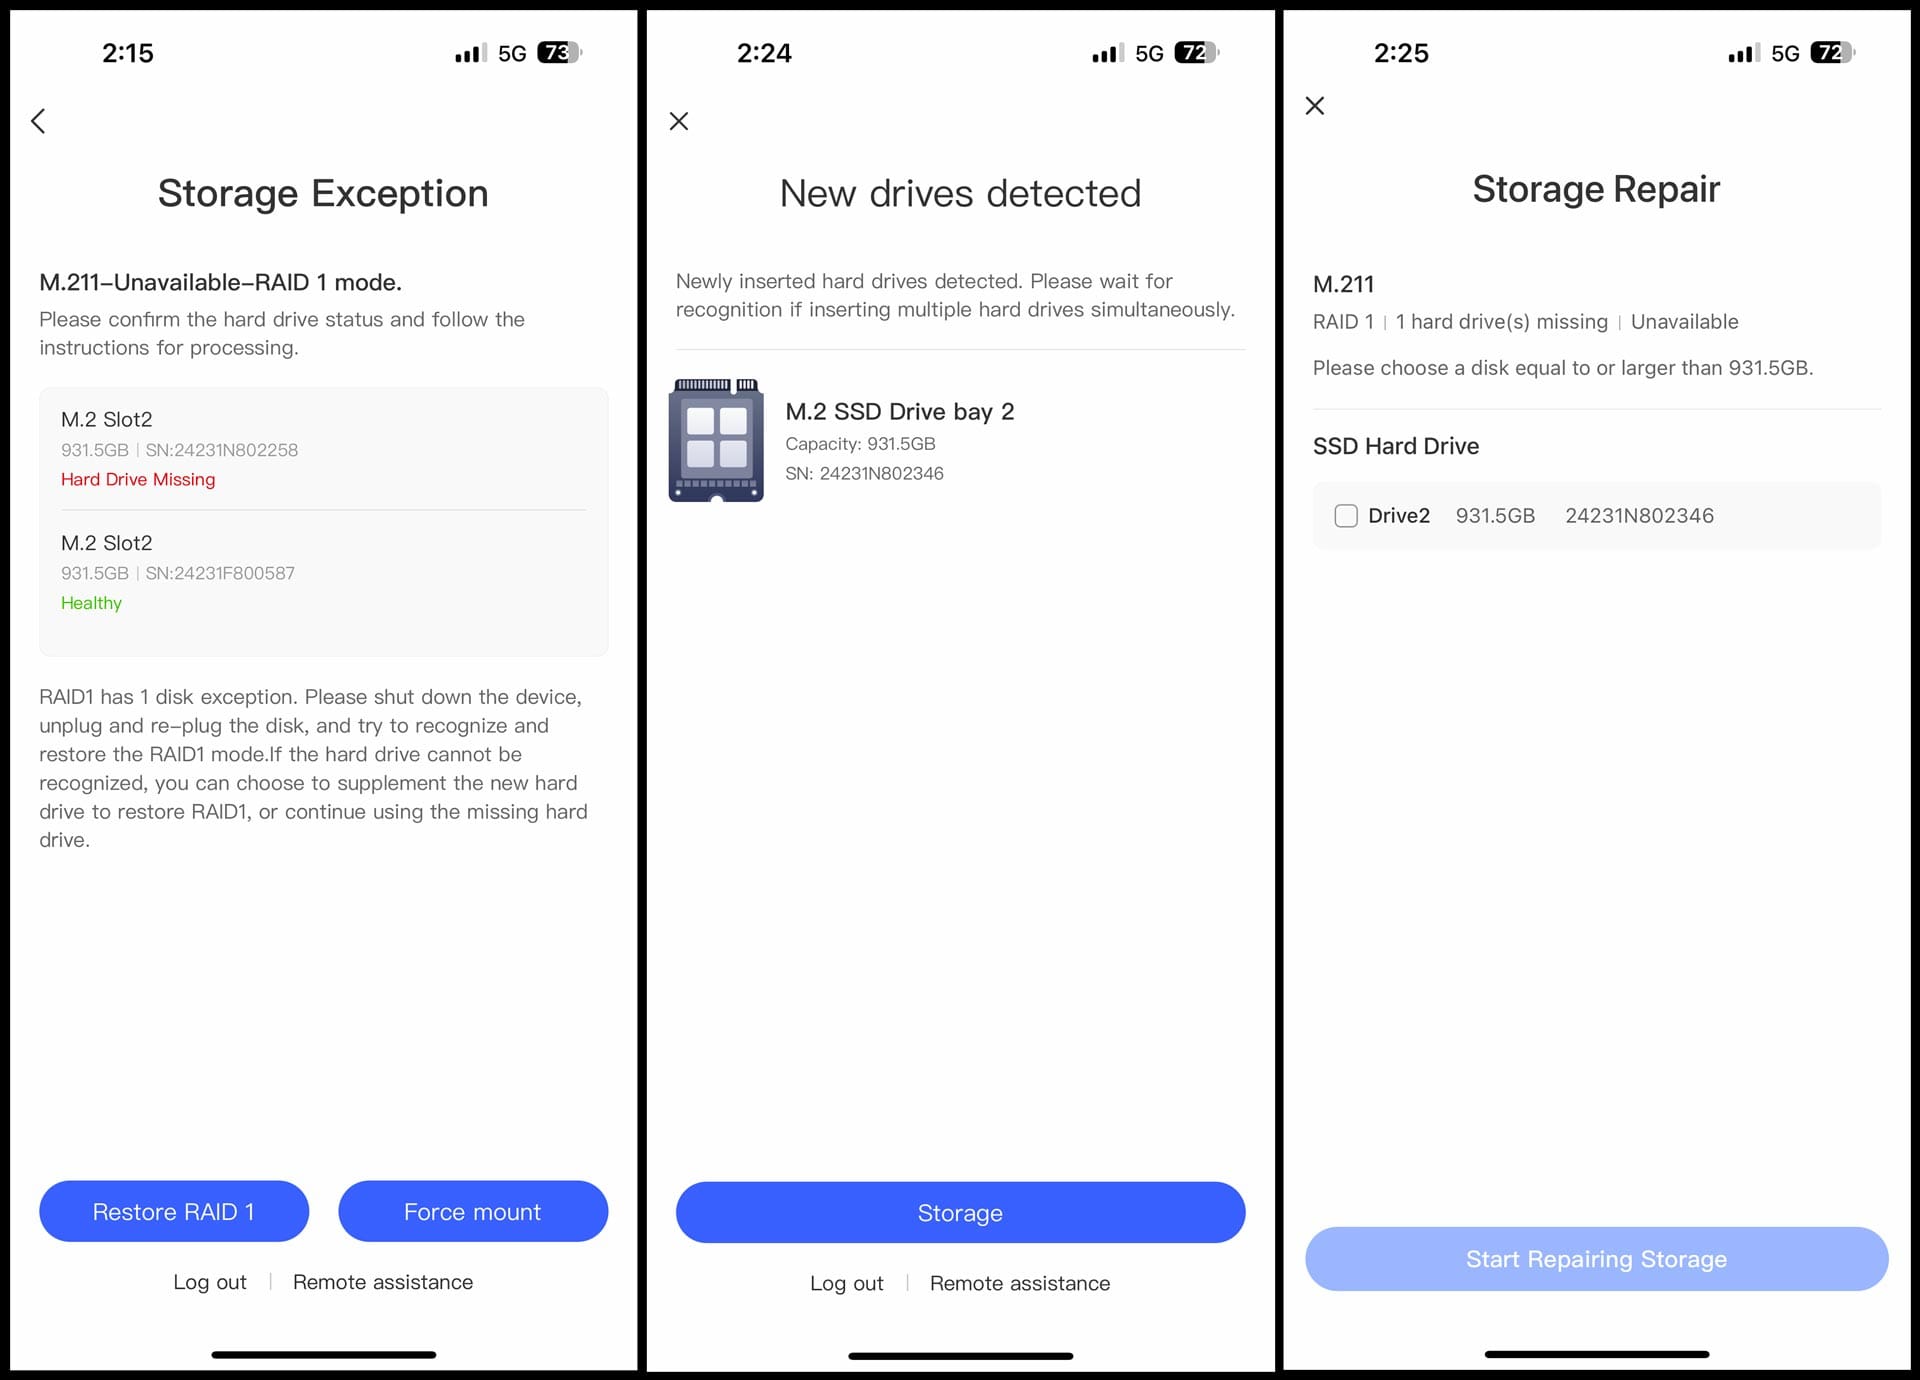
I chose the "Force mount" option. The single SSD mounted fine, and I was able to access all my backed-up data. I then powered the UT2 off, inserted a new, unformatted SSD of the same capacity (1TB), then powered the UT2 back on. This time the software recognized the new drive, formatted it, then restored my original RAID 1 volume by re-distributing data across both SSDs. This process took a few hours to complete, but in the end I was able to safely rebuild my original RAID 1 volume without data loss.
Creating a Wi-Fi hotspot with the UT2
The UT2 can function as a Wi-Fi hotspot. This allows other devices including phones, laptops, e-readers, gaming devices, etc to access the internet through a secure, private Wi-Fi network. This feature can be especially helpful when traveling and staying in hotels, Airbnbs, or other places where the Wi-Fi is weak, nonexistent, or costs extra to access. It can also provide better security than accessing public Wi-Fi networks.
To create an internet hotspot, plug the UT2 into a wired ethernet outlet (cable provided). Enable the WLAN hotspot option in the UnifyDrive Settings, then connect to the UT2's Wi-Fi network from your other devices.
Using the UT2 as a media server
With videos, photos and files saved to the UT2, the device may also be used as a portable media server. You do this by connecting a provided HDMI cable to the UT2's HDMI out port, then plugging the other end into a television, monitor, projector, etc. Technically, the USB-C port on the bottom can also output video, if HDMI isn't available.
UT2 can output video via HDMI up to 8K 60 frames per second (30 fps via USB-C). You would of course need an 8K compatible screen to take advantage of that resolution, so most users will likely output 4K, which works with the provided cables. If you need 8K resolution, you will need to purchase a separate HDMI cable that supports it.
Once connected, you may then use the UnifyDrive mobile app for basic playback and audio control. To navigate the directory and browse files on the device, you'll need to use the bundled Bluetooth remote control (which must be paired first before you use it). In my tests, the Bluetooth pairing worked fine. Effective range was also within the specified distance of 3 meters (~10 feet).
Usability issues and limitations with the UT2
Without question, the UT2 is a powerful device offering a wide array of features. Overall, I'm impressed with how polished and mature the hardware and software is this early in the product's life cycle. I'm especially happy and encouraged to see how well the device handles SSD failures. There are, however, some usability issues.
(FYI, I'll update this review if anything changes)
Not all SD and CFExpress cards are supported
This was the biggest problem I experienced with the UT2. I had no trouble backing-up media cards formatted by my Canon EOS R5, but I could not get SD cards formatted by my Fujifilm GFX 100S II to work. This leads me to believe media cards from other cameras could be affected as well. I've notified the UT2's development team of the issue, and they said they are looking into it.
Internal battery too weak for backups
While the UT2 does have an internal, rechargeable battery, the battery functions for only about 20 minutes before the device automatically powers itself off. For this reason, backups should only be performed when the UT2 is plugged into a wall outlet, power bank, or other power source. For traveling photographers and videographers, this means card backups cannot be performed on-the-go. So if you were hoping for an "off grid" battery powered device to backup camera data, the UT2 may be difficult to power.
Better transparency into the backup process
In the mobile app version I tested, there is no visual indicator for the PlugBackup feature. The UT2 hardware beeps twice at the beginning and three times at the end, but in-between there's no way follow progress. There is a "Task Center" interface that would appear to be an ideal place for this information, but at the time of this review does not pay attention to backups.
No support for third party cloud backup services
At the time of this review, the UT2 cannot backup data to third party cloud services (eg, Google Drive, Dropbox, OneDrive, etc). I've been informed by the company that cloud backups are in development and should roll out in the near future, but for now it's not possible. I'm looking forward to this feature, for it would provide near fool-proof security against data loss when traveling.
May have trouble with some hotel Wi-FI networks
If you stay in a hotel with a network that requires typing a room number and surname into a web browser to access, the UT2 will not be able to connect to that network and access the internet. I tried this during a hotel stay and could only connect to the UT2 using its AP mode.
No weather sealing or protection
The UT2 is not weather sealed or rugged enough for extended use outdoors. The device comes with a protective silicon case to help protect against dings, dents and scratches, but that's about it. Dirt, grit, sand, and moisture could easily get through the UT2's ventilated back panel and fry its internal components. For that reason, I would only use the UT2 indoors. If I were hiking and camping with the UT2, I'd absolutely store it in a sealed plastic bag or case for safekeeping.
May be too complex for some photographers
No question about it, the UT2 is a powerful device offering loads of functionality and use cases. If you're comfortable installing SSDs, configuring RAID volumes, and more or less know your way around Wi-Fi and Bluetooth networking, the UT2 should be straightforward to use. If however you're a non-technical photographer or videographer looking for a simple backup device to protect your media while traveling, the UT2 may feel too complex and cumbersome.
Final thoughts
At the end of the day, is the UnifyDrive UT2 a suitable laptop replacement when traveling? Does it simplify media card backups for traveling photographers and videographers? Yes, and no.
On the one hand, the UT2 is lighter, smaller and less cumbersome than packing a laptop plus external hard drives, cables, card readers, dongles, etc. The UT2 does the job of safely backing up media cards to a secure, protected RAID volume using whichever capacity SSDs you need (up to 16 TB total). That in an of itself is fantastic and may be reason enough to own one; even if you never touch its advanced networking and media streaming capabilities.
Whether the UT2 is right for you will depend on how you intend to use the device, and how cumbersome backing up data using a laptop is for you. I appreciate the speed and convenience of quick SD card backups at the touch of a button, but prefer using a laptop running an operating system I'm already familiar with.
Let's put it this way — If I were packing light for a photography trip, I'd leave my laptop at home and bring the UT2 to backup my photos and videos. If I were bringing a laptop with me, I'd bring external drives to backup my cards. There's little point in traveling with both a laptop and a UT2 only for card backups.
All that said, I'm impressed by how well designed and engineered the UT2 hardware and software is at this early stage, and very much look forward to seeing where the product from here.
The UnifyDrive UT2 is now accepting backers at an introductory price of $399 through a Kickstarter crowdfunding campaign. Note that like any crowdfunding campaign, always exercise caution, as there is no guarantee that the project will meet expectations or deliver on time.