A second monitor changes everything when editing photos and videos
A second display can transform your photo and video editing workflow, and Lightroom Classic and Photoshop both offer powerful ways to take advantage of one.
Recently I changed my desktop photo and video editing setup with a second monitor. I added the display for use as a reference monitor when editing video in DaVinci Resolve, but was pleasantly surprised by how much it improved my photo editing workflow as well, especially after trying to incorporate second screens before.
My desktop display setup
I have two 27" 4K displays made by BenQ. Both are hardware color calibrated, provide USB-C connectivity, and are capable of displaying a variety of color spaces including Adobe RGB (for photo editing) and Rec.709 (for video editing). Both displays are mounted (using their VESA mounts) to a vertical dual monitor stand. I was pleasantly surprised by how strong and sturdy the pole is, and how it creates more usable space on my desktop underneath.
The bottom display connects to an M2 Ultra Mac Studio via USB-C. The top display connects to the same Mac through two separate inputs: one USB-C cable connected to a CalDigit TS4 hub, and an HDMI connection routed through a Blackmagic UltraStudio Monitor 3G (which itself connects to the Mac via USB-C).
Here's an illustration to help visualize this setup:
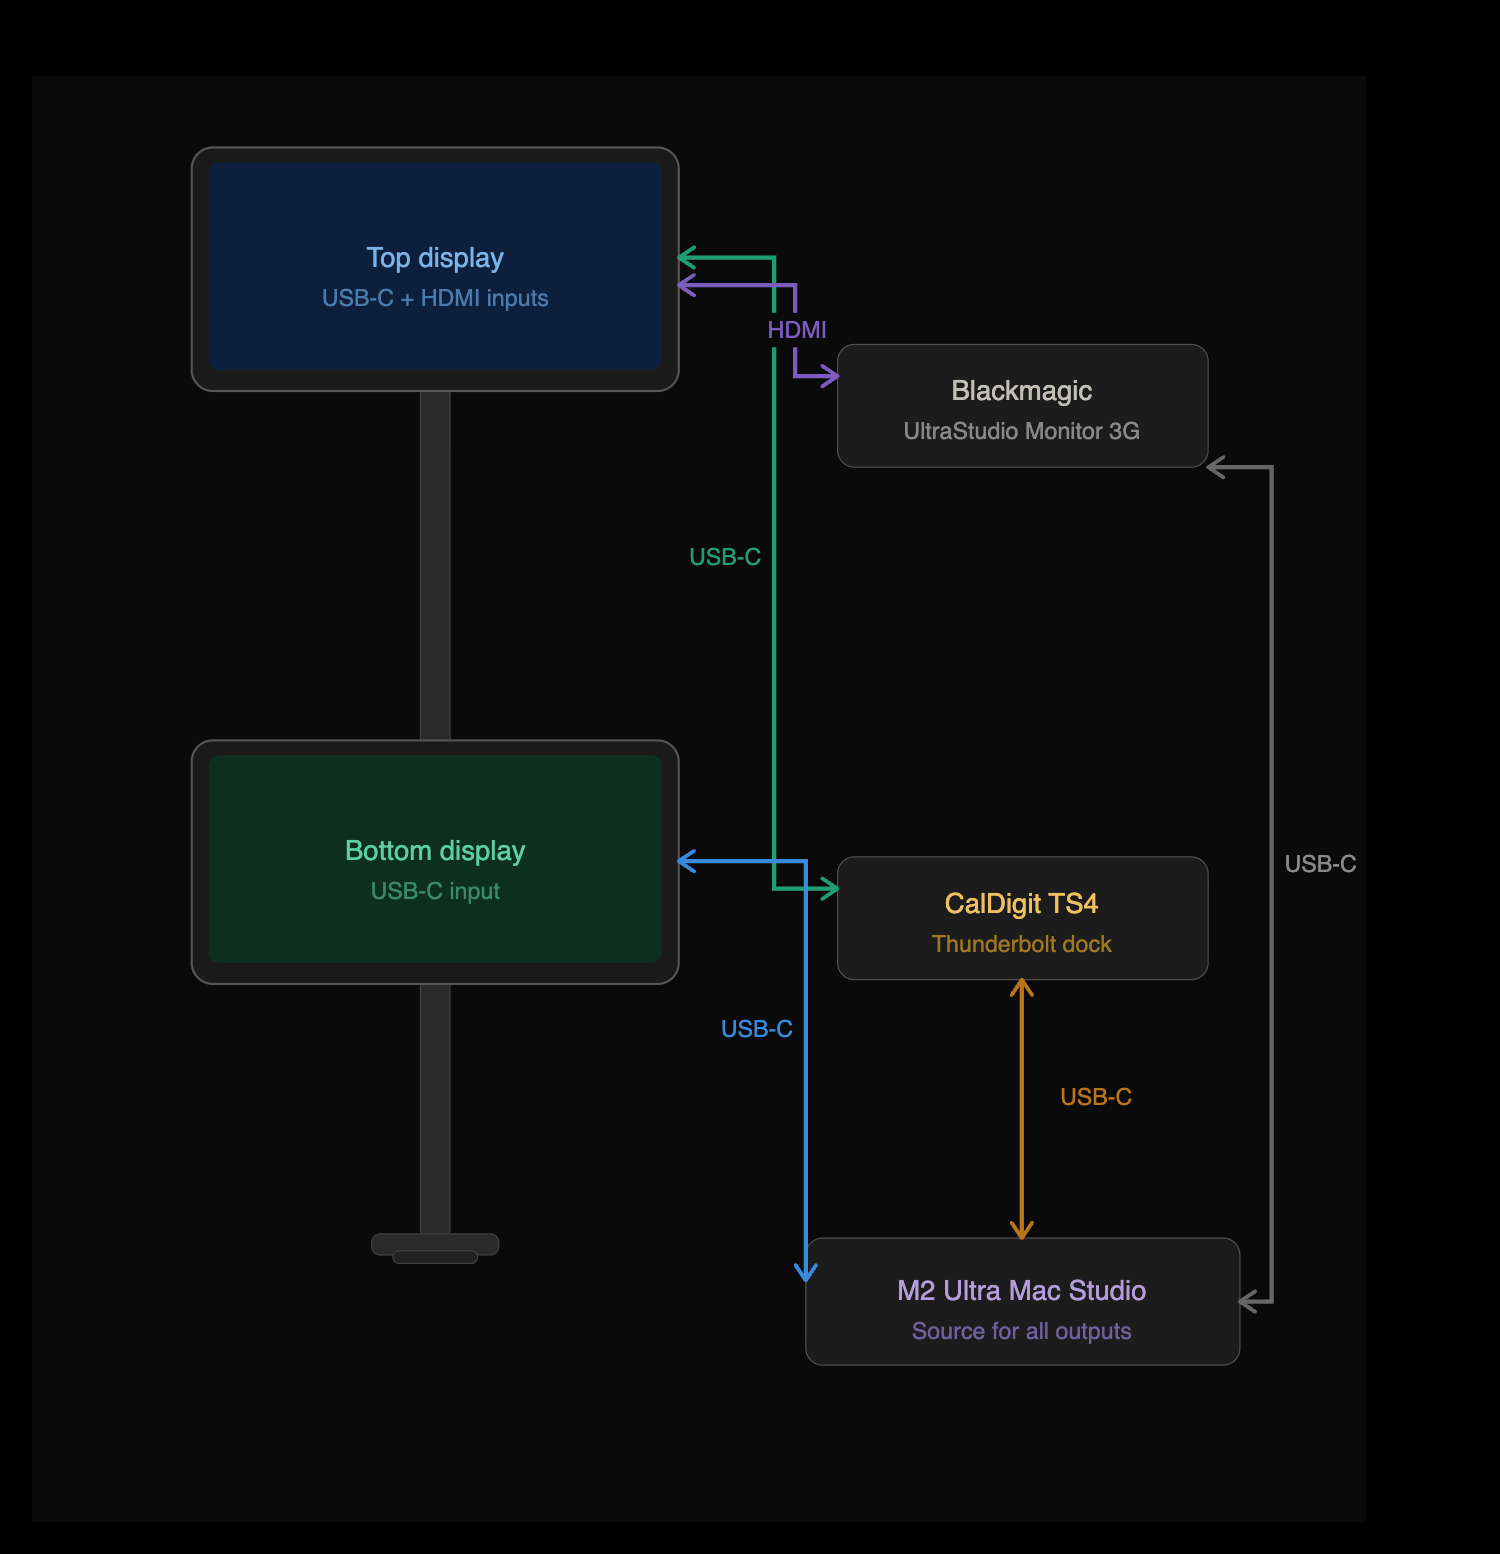
(Note: If your Mac or PC has two available USB-C ports, you don't need a separate doc/hub for this setup. I simply needed one because I ran out of ports.)
Using a second monitor with DaVinci Resolve
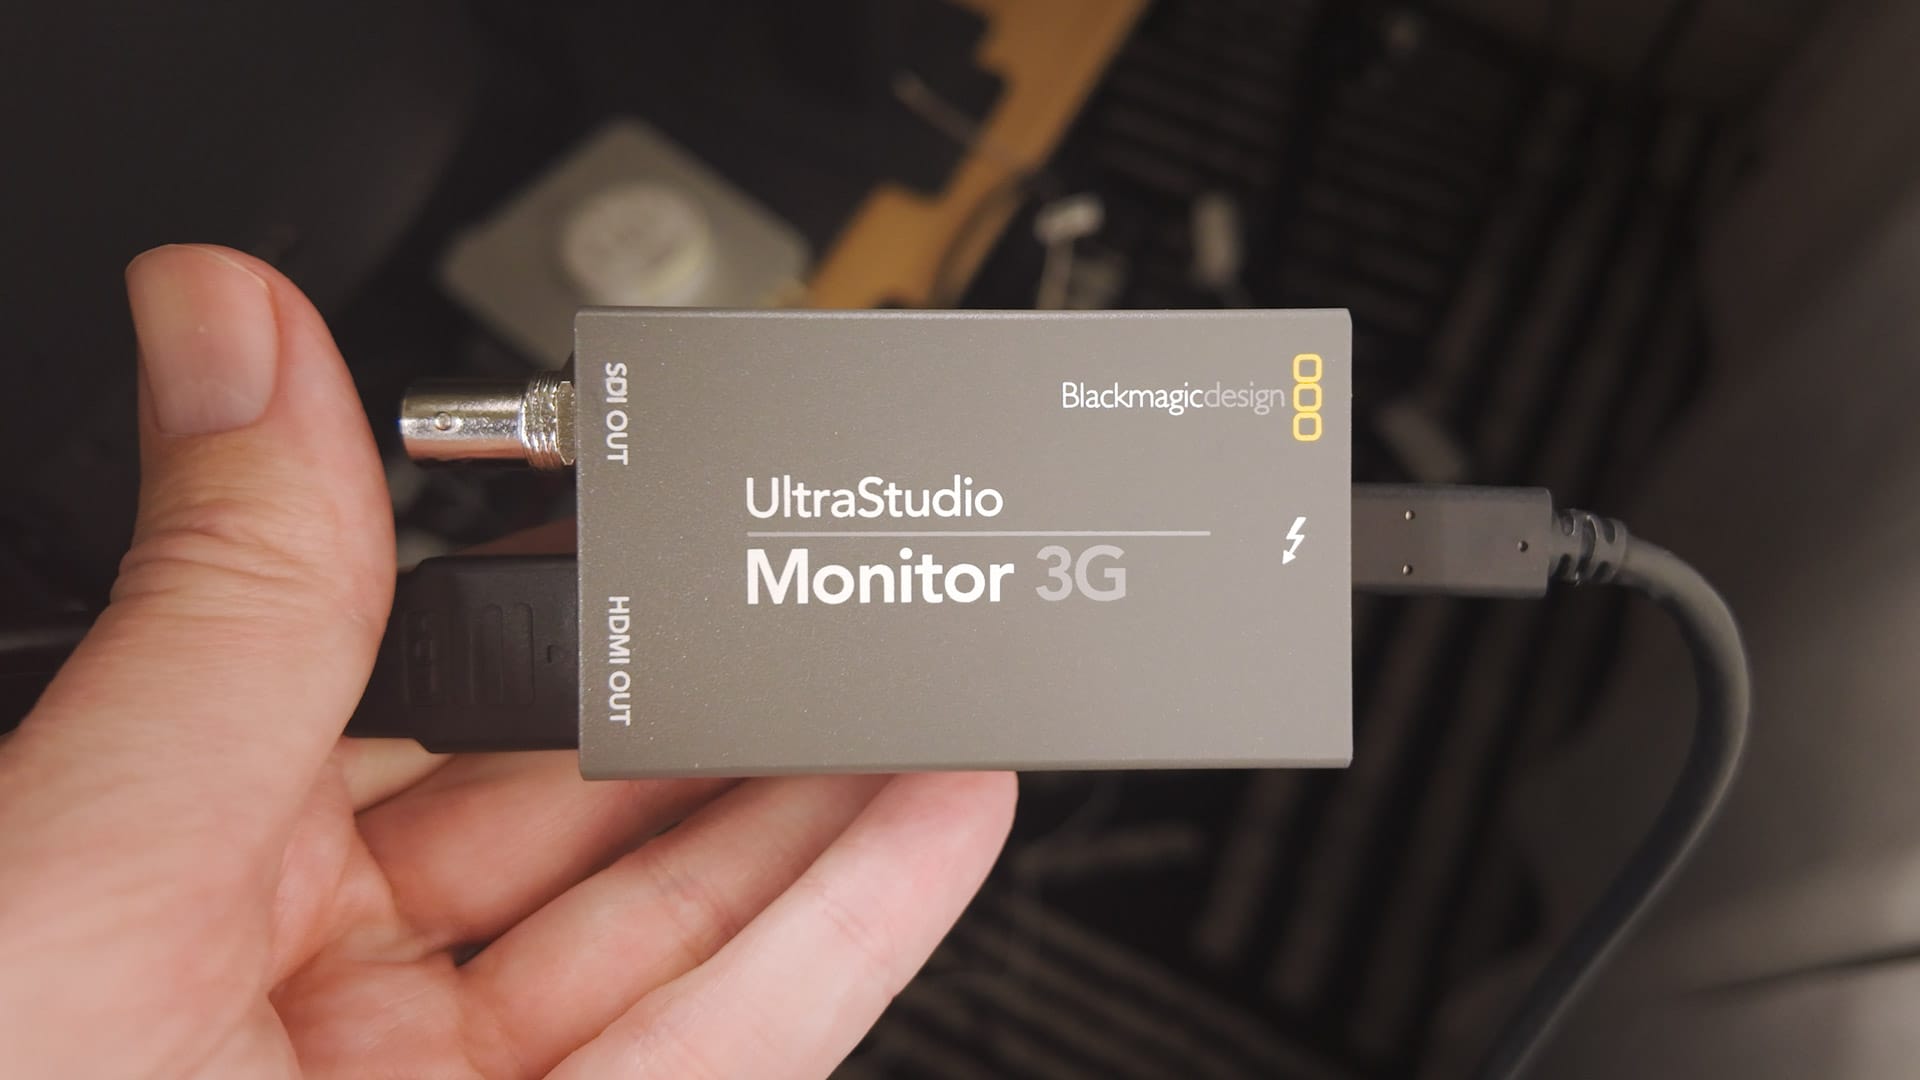
When editing video in DaVinci Resolve, I set the color mode of both displays to Rec.709, and switch the input of the top display to HDMI. The top display then receives a clean video feed directly from DaVinci Resolve through the UltraStudio Monitor 3G, bypassing color management in macOS.
With this video editing setup, I can see a full-screen, highly color accurate preview of the video I am editing at all times. The preview is accurate because the display not only uses the industry standard Rec.709 Gamma 2.4 color space, but because the footage does not pass through the macOS operating system.
Ideally, there should be little-to-no difference between the top and bottom display, but using the second display as a true reference monitor means I can be absolutely certain the colors, contrast, and other adjustments I make will be used in the final deliverable when exported.
Unfortunately, setting up the Monitor 3G took some effort, with macOS security settings being particularly troublesome. I had to explore every sub-section of my macOS privacy and security settings to enable all the various extensions the device added. There's also some setup and configuration that must be done within the Resolve app to output a properly scaled reference preview. Eventually, I figured everything out and got the Monitor 3G working properly, but the setup process was anything but straightforward.
Additionally, the Monitor 3G is limited to 1080p output, which explains its lower price tag compared to other, more expensive I/O devices made by the company. For me, this isn't a problem, for I only care about color and contrast, not detail, so 1080 is perfectly fine for me.
If purchasing a second monitor for use with this device, ideally, it should support Rec. 709. That is the industry standard color space for video, and what Resolve and the Monitor 3G are designed around. sRGB has a nearly identical color gamut and will work in a pinch, but Rec. 709 is the right choice for proper monitoring and grading work.
Using a second monitor with Lightroom Classic
When editing photos (or doing anything other than editing video), I set the color mode of both displays to Adobe RGB and switch the input of the top display to USB-C. When the top display input is set to USB-C, it functions as an extended display for macOS.
Adobe Lightroom Classic provides exceptional secondary display support (someone at Adobe must have been really passionate about it long ago). With a secondary display connected and functioning properly, open Lightroom Classic and navigate to Window > Secondary Display > Show to enable dual-screen functionality.
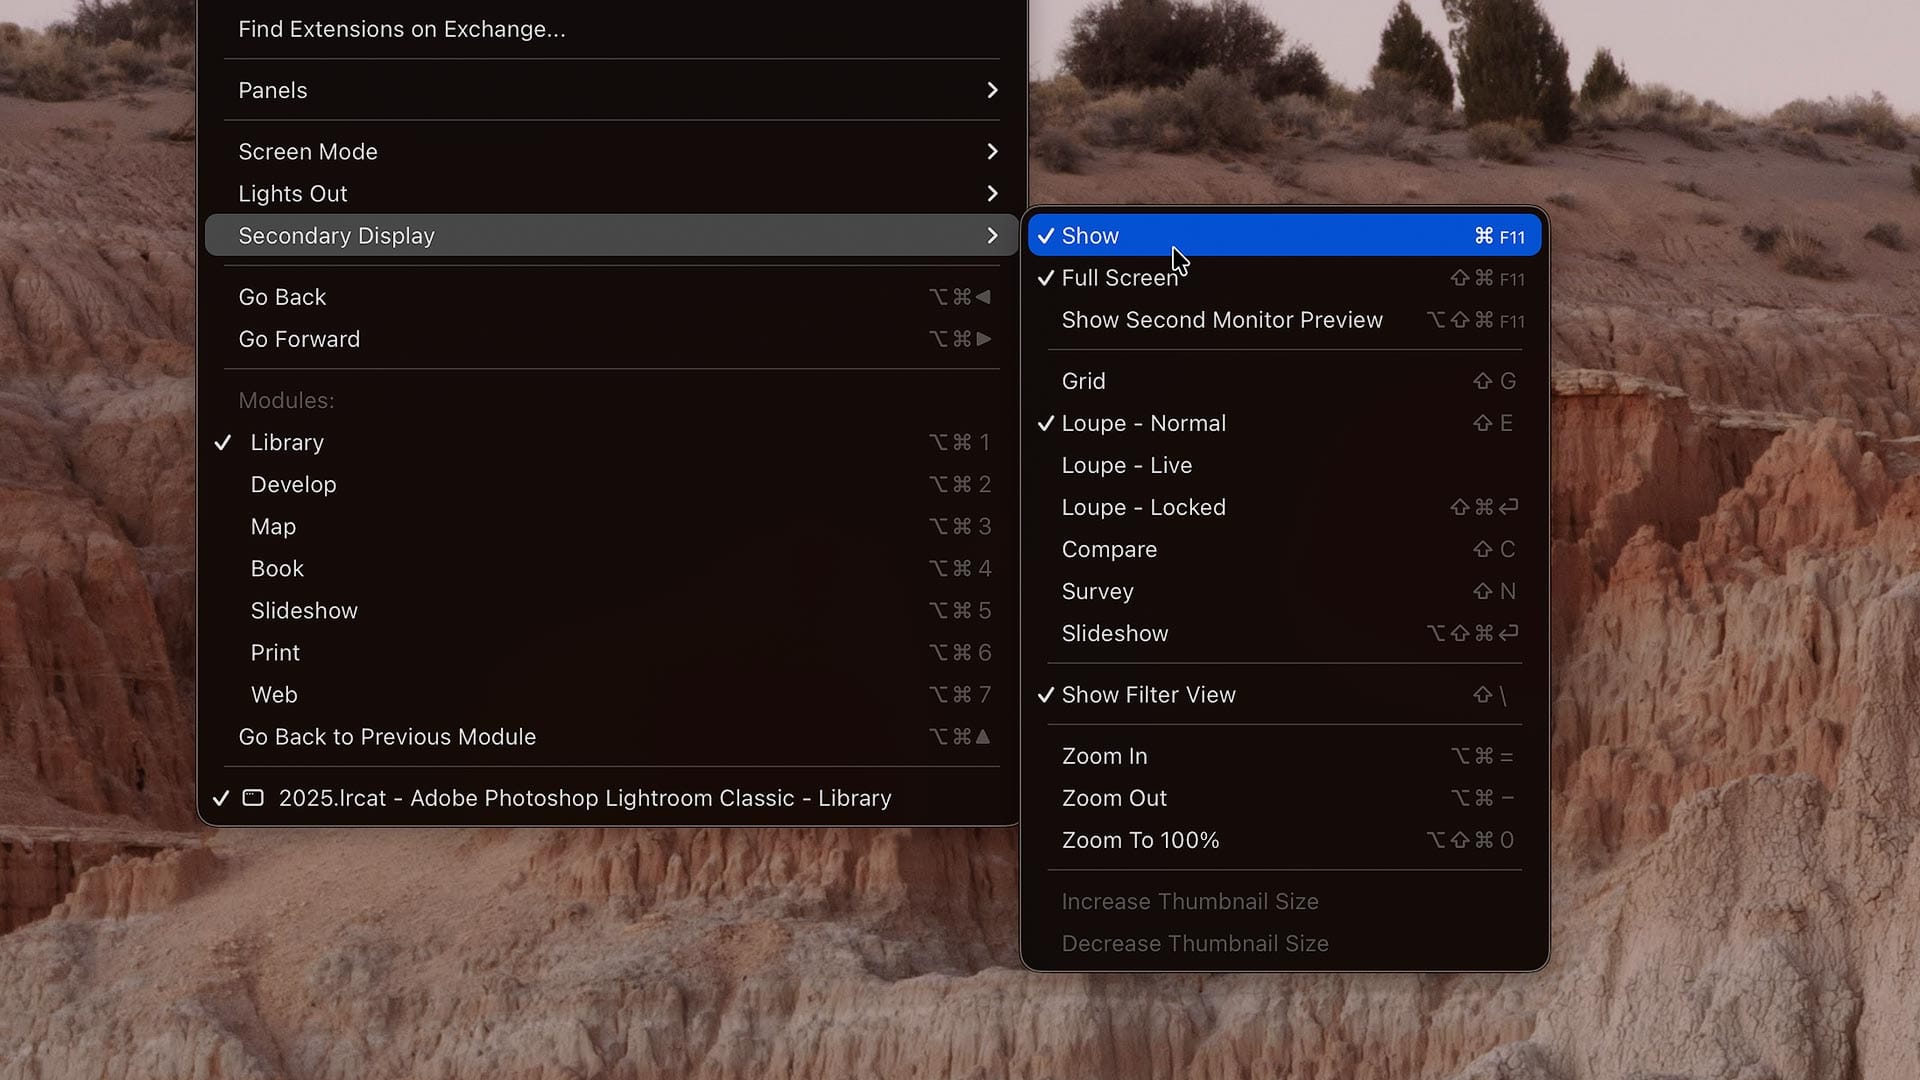
Lightroom Classic offers several secondary display modes:
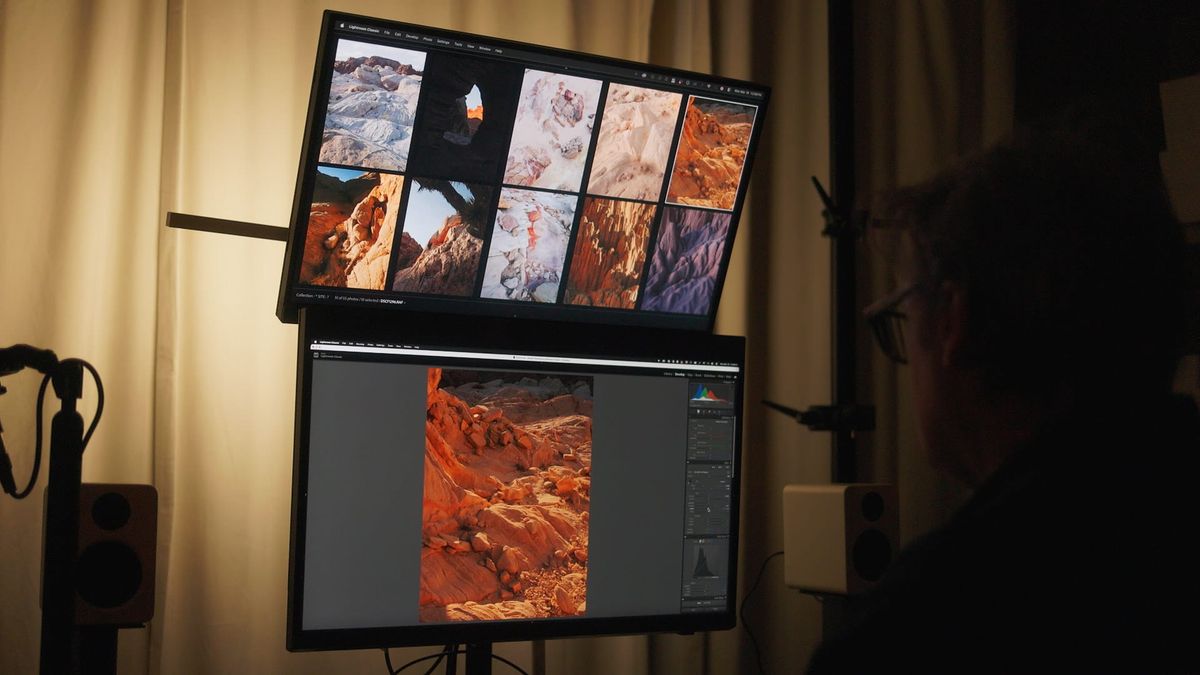
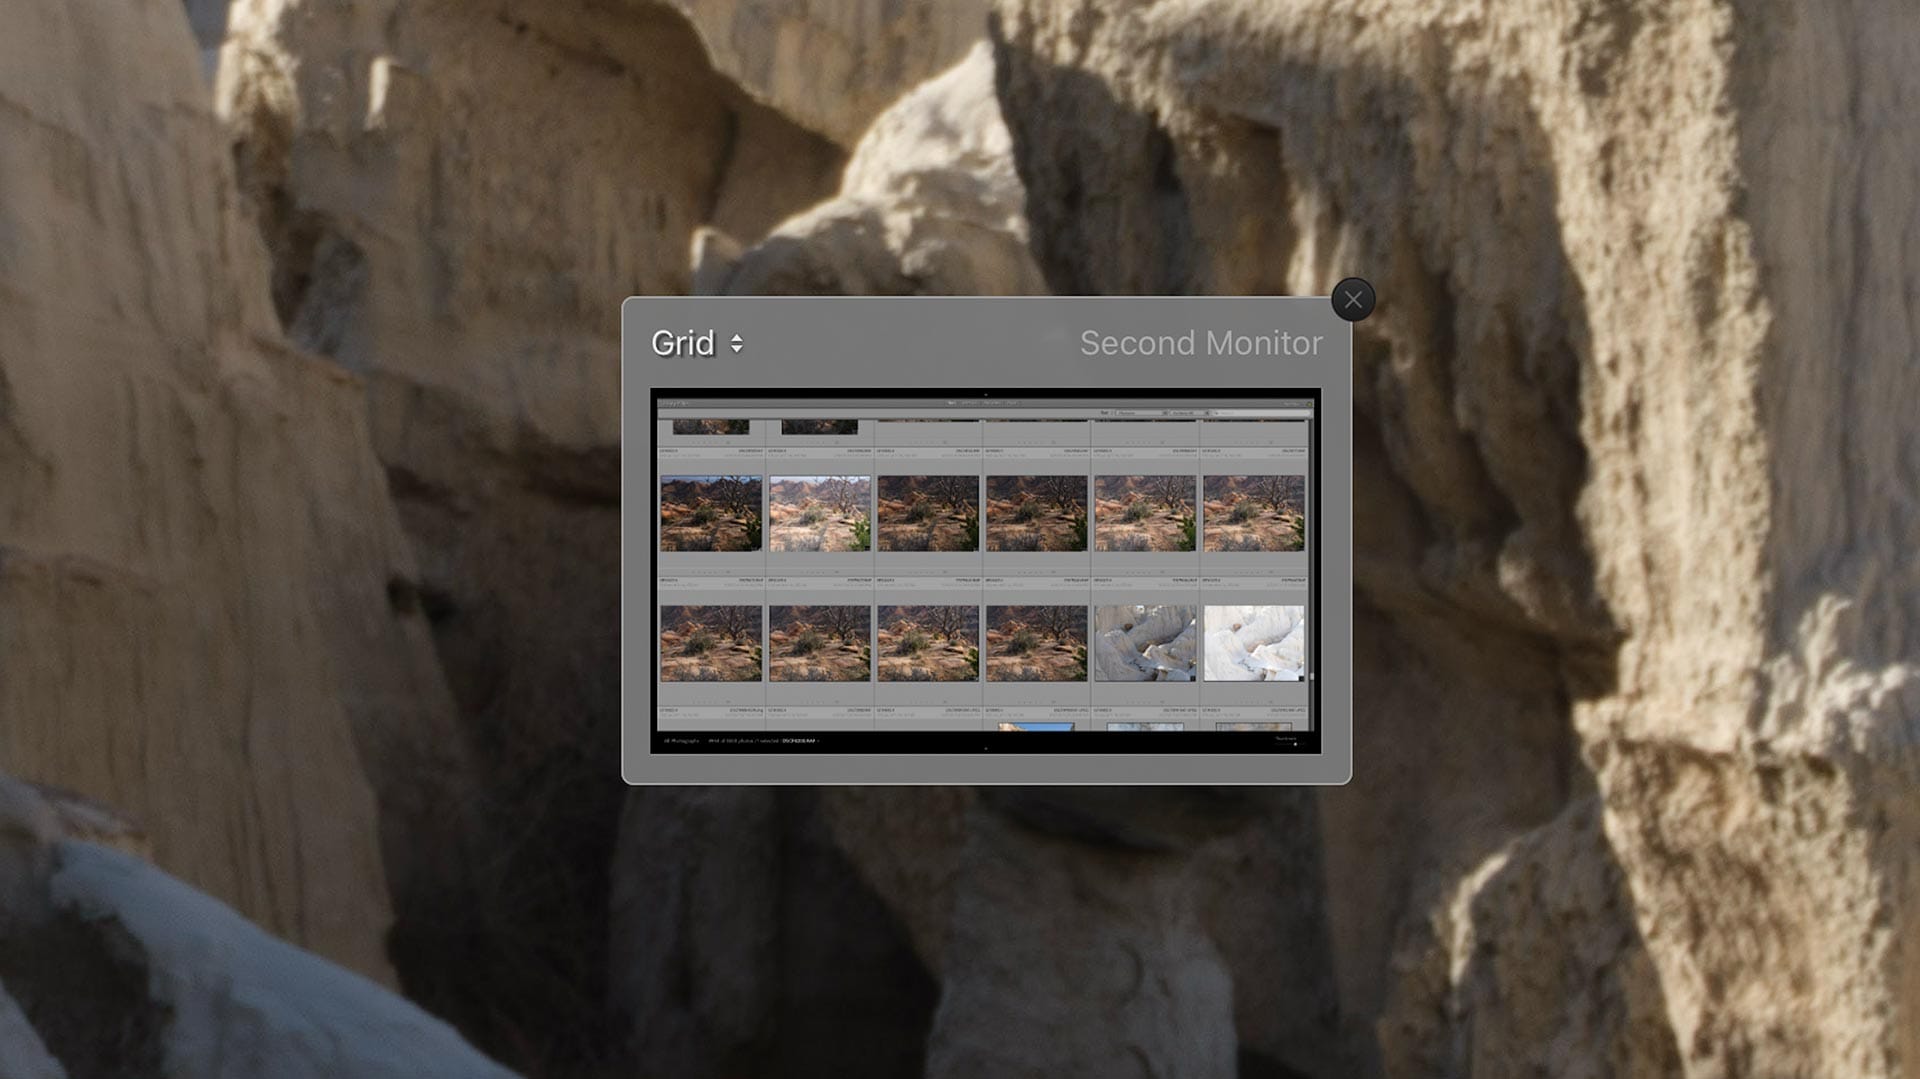
Grid – Shows a thumbnail grid of your catalog or active collection, mirroring or extending the Library module. Useful for browsing images on the second display while editing individual images on the primary.
Loupe – Normal – Displays a single image at your chosen zoom level. Great for reviewing a photo at full size while making adjustments on the primary display.
Loupe – Live – Similar to Normal, but updates in real time as you hover over thumbnails on the primary display. Helpful for quickly previewing images without clicking into them, or for zooming into specific areas of an image without having to do so manually on the primary display.
Loupe – Locked – Locks the secondary display to a specific image so it won't change as you navigate on the primary display. Useful when you want a consistent reference while browsing or comparing other images.
Compare – Shows two images side by side for direct comparison. Also supported on the primary display, but more useful with a second because images remain side-by-side while editing. Compare on the primary display does not support this when switching to the Develop view. Also ideal for picking between similar shots or editing one image while referencing another.
Survey – Similar to Compare, but displays all selected images simultaneously. This is my favorite mode for editing within the context of a collection, for it lets you ensure visual consistency across multiple images. You can also select any image in the Survey view and make Develop adjustments to it while viewing all related images on the secondary display.
Slideshow – Plays a slideshow of your selected images on the secondary display. This might be useful for client presentations or reviewing images in a clean, distraction-free format, but it's not a mode I ever use.
These modes can be activated three ways: through the Window > Secondary Display menu, via keyboard shortcuts listed in that same menu, or through the Second Monitor Preview widget. The widget (enabled via Window > Secondary Display > Show Monitor Preview) is a floating overlay on the primary display with a dropdown for selecting modes, though it doesn't support Loupe Live or Loupe Locked. I don't use this, but you might like it.
Cropping with a secondary display – One particularly useful workflow is cropping with the secondary display set to Loupe Normal, Compare, or Survey. While adjusting a crop in the Develop module, the secondary display shows a clean, live preview of the cropped result. This provides a much better sense of how an image will actually look when cropped compared to the noisier crop view on the primary display.
Using a second monitor with Adobe Photoshop
Photoshop's secondary display support is more limited than Lightroom's, but there are a few useful tricks worth knowing.
Panel and palette management – Move your panels and palettes to the secondary display for a clean, full-screen view of your image. Just drag any panel or panel group to the secondary display and arrange them however you like. If you come up with a layout that works, remember to save it through the Window > Workspace menu.
Live preview window – Go to Window > Arrange > New Window for [Document] and drag the new window to the secondary display. This creates a second, real-time view of the same document, useful for detailed work where you want to see the full image while zoomed in on the primary display.
Before/after comparisons – Duplicate an image (Image > Duplicate), then move the dupe to the secondary display. This provides a "before" image you can instantly reference while making edits on the primary display.
Navigator panel – A good option for detailed retouching work. Open it via Window > Navigator, drag it to the secondary display, resize it to fill the screen, and use the red rectangle to jump to any area of the image on the primary display without needing to constantly zoom in and out.
Reference images – To replicate something closer to Lightroom's Compare mode, open multiple documents or additional windows and arrange them on the secondary display. Note that macOS window snapping only works on the primary display, so for precise window sizing and placement, the free Rectangle app is a great solution. Could also open color palettes, mood boards, etc.
Layer management – For complex composites with many layers, expanding the Layers panel across the secondary display gives you much more room to work without constantly scrolling. This is one case where running the secondary display in portrait orientation is especially worthwhile. A tall, vertical panel can display dozens of layers at once, making it much easier to navigate and manage complex documents without losing track of your layer structure. Actions could be handy as well, if used frequently as part of your workflow.