How to create realistic lighting in Lightroom

In the world of cinematography there's a common lighting technique known as motivated lighting. It's a method where artificial lights augment, accentuate, or emulate the appearance of natural light. Here's an example borrowed from the excellent @filmlights Instagram account (give them a follow if you're into this kind of thing).
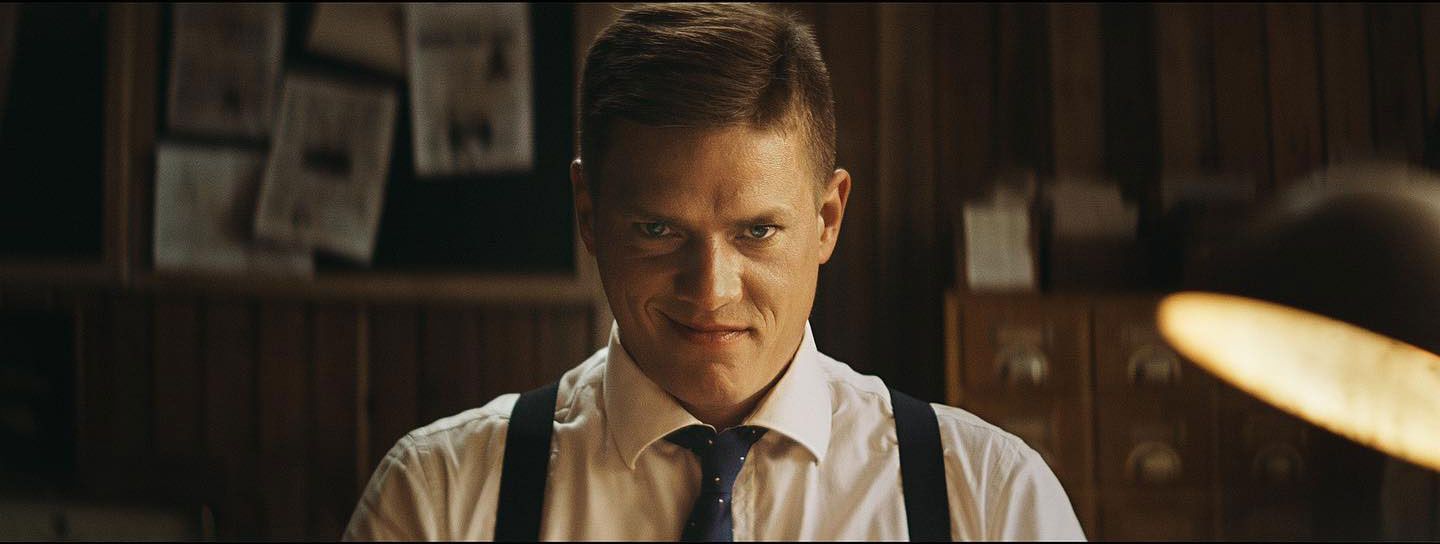
To the viewer, the actor in image above appears to be lit by the desk lamp on the right side of the frame. We believe this because of where the light is positioned and the hue of his illuminated skin. There is an implied connection between the two. The scene looks and feels believable, which keeps us (the viewer) immersed in the story.
But in the world of film, nothing is ever as it seems. Let's now zoom out and take a look at the behind-the-scenes.
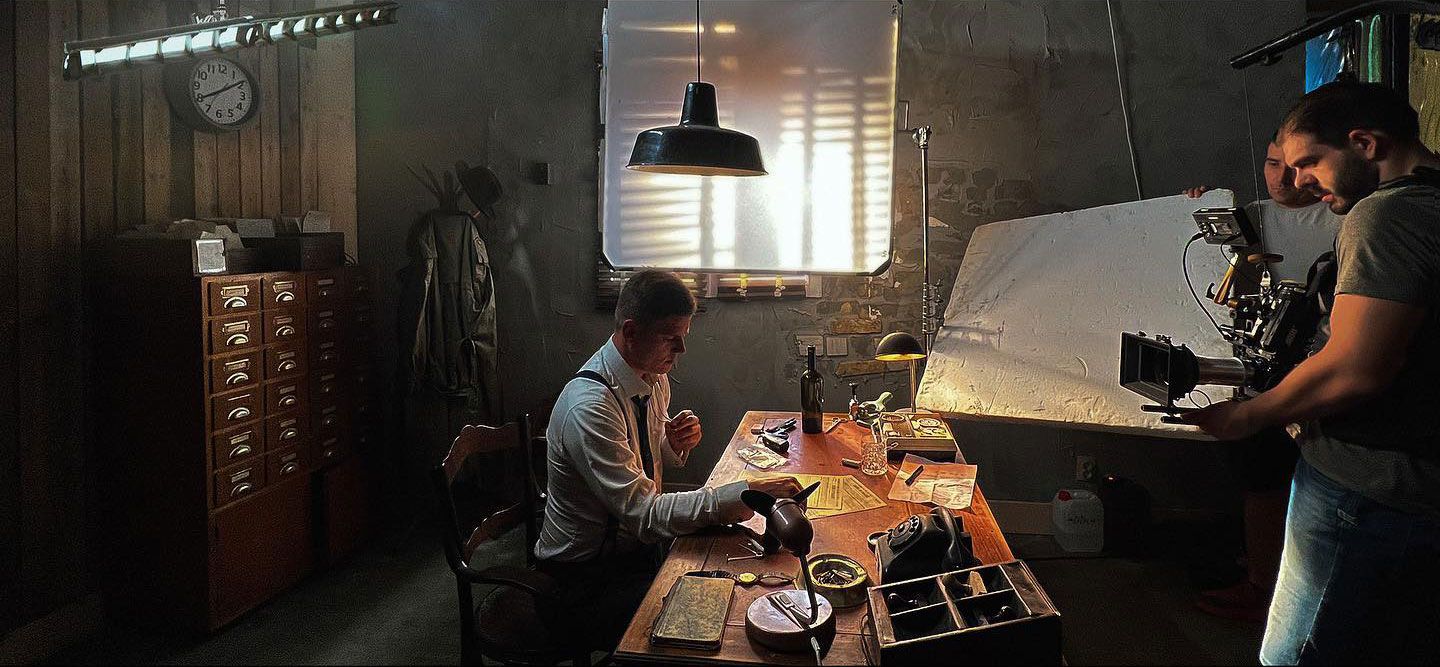
From this angle, we can see that the desk lamp is not illuminating the actor all on its own. The lamp's shade is facing downward, and its output is dim to keep the light from blowing out and clipping in camera (otherwise it would look like a white blob on screen). There's also an edge light behind and above the actor's head to help separate them from the dark background, plus a warm side light to the right with a gobo to create the appearance of a window. Finally, a hand-held bounce behind the desk lamp to help reflect some warm light back towards the actor.
The additional lights and bounces are motivated by the desk lamp. They are intentionally positioned and modified to create the impression of a man sitting in a dark office, illuminated only by a single, warm desk lamp.
Let's take a look at another example. In the shot below, we see two passengers flying in an airplane. We cannot see the light source, but assume the light streaming through the windows and illuminating the actor's faces must be coming from the sun because we have experience flying on airplanes. The audience understands the context.

But here again, we're tricked into thinking the environment is real. Here's how the shot was actually made.
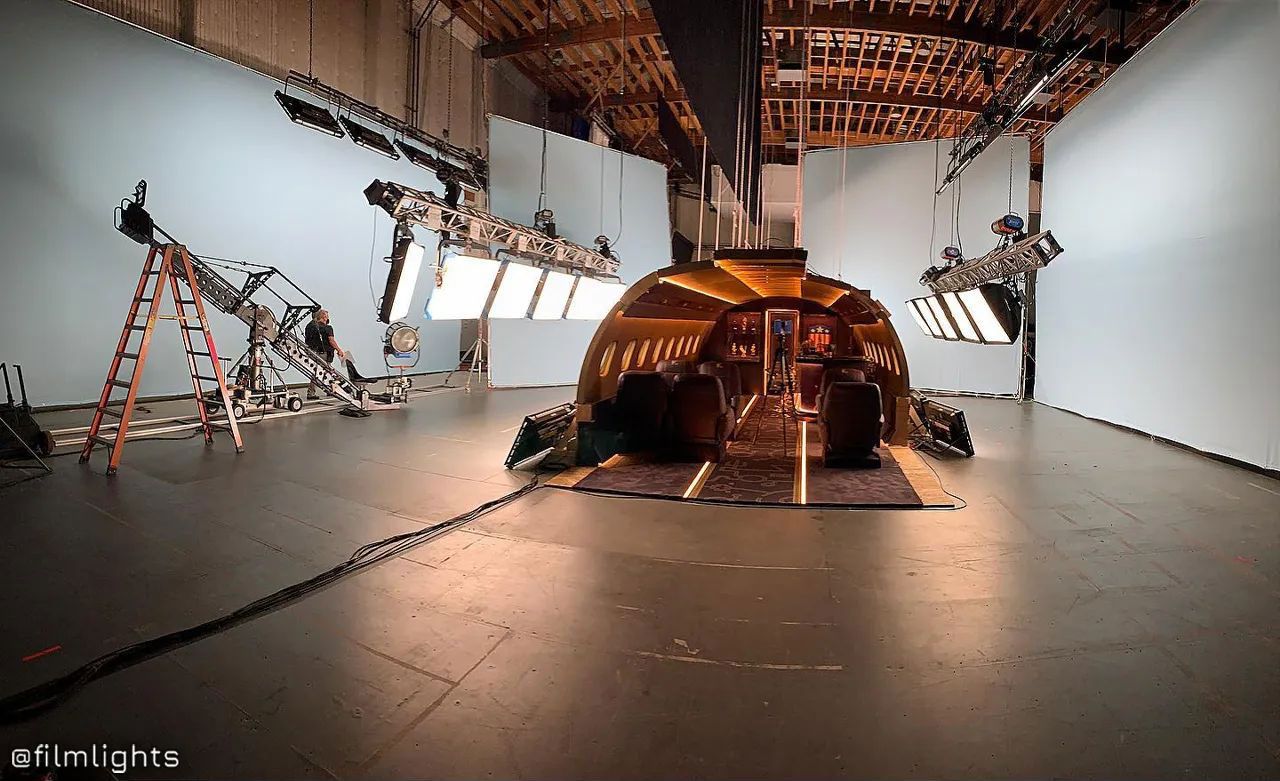
The actors aren't lit by sunlight, but two hanging rigs of LED panels; each matching the color temperature and brightness of daytime sunlight. This is an example of motivated lighting that emulates the appearance of natural light through artificial means.
In both of these examples, artificial lights were used to simulate natural light. And because the lights look and feel real to the audience, we don't question their authenticity. We aren't distracted by them. They blend invisibly into the image.
I can't light my outdoor images with truck loads of lights like Gregory Crewdson, but I can use the principle of motivated lighting to improve the realism of my photo editing and guide the dodging and burning process.
Using motivated lighting in landscape photography
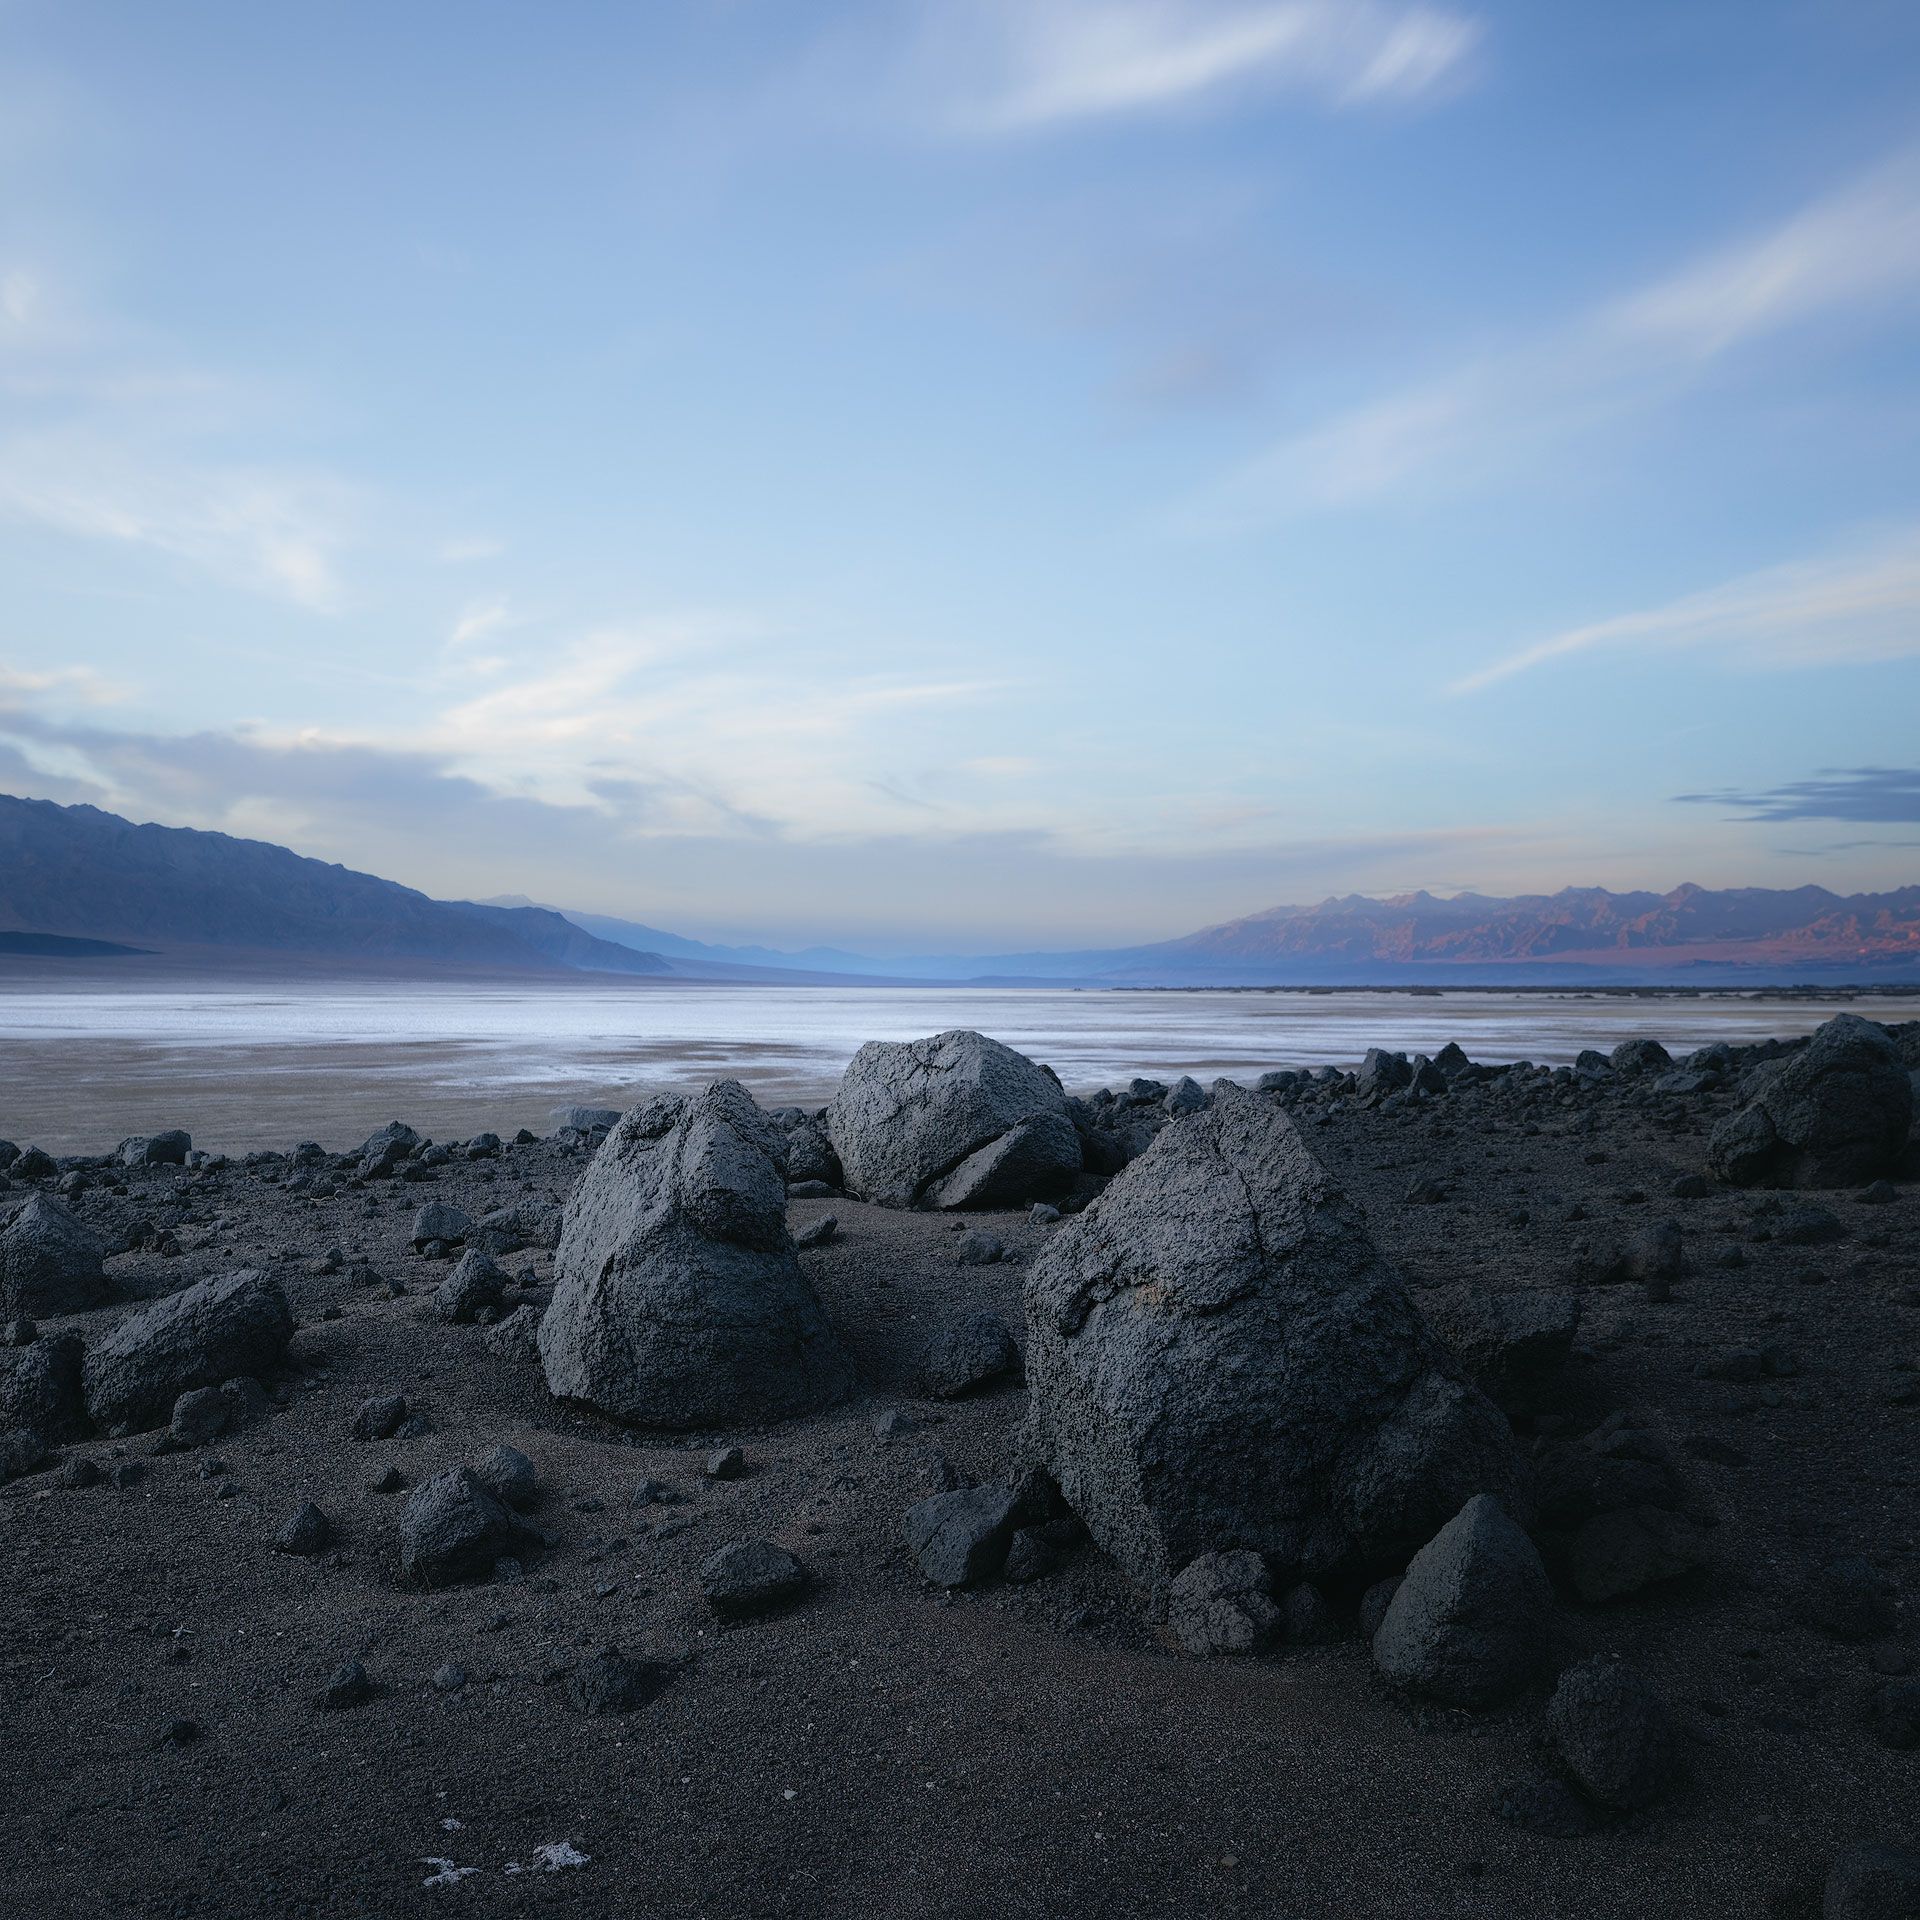
Here's an unfinished image of mine from Death Valley, California. The sun is settings low in the sky to the left of the rocks in the foreground, and is casting a soft left-to-right side light.
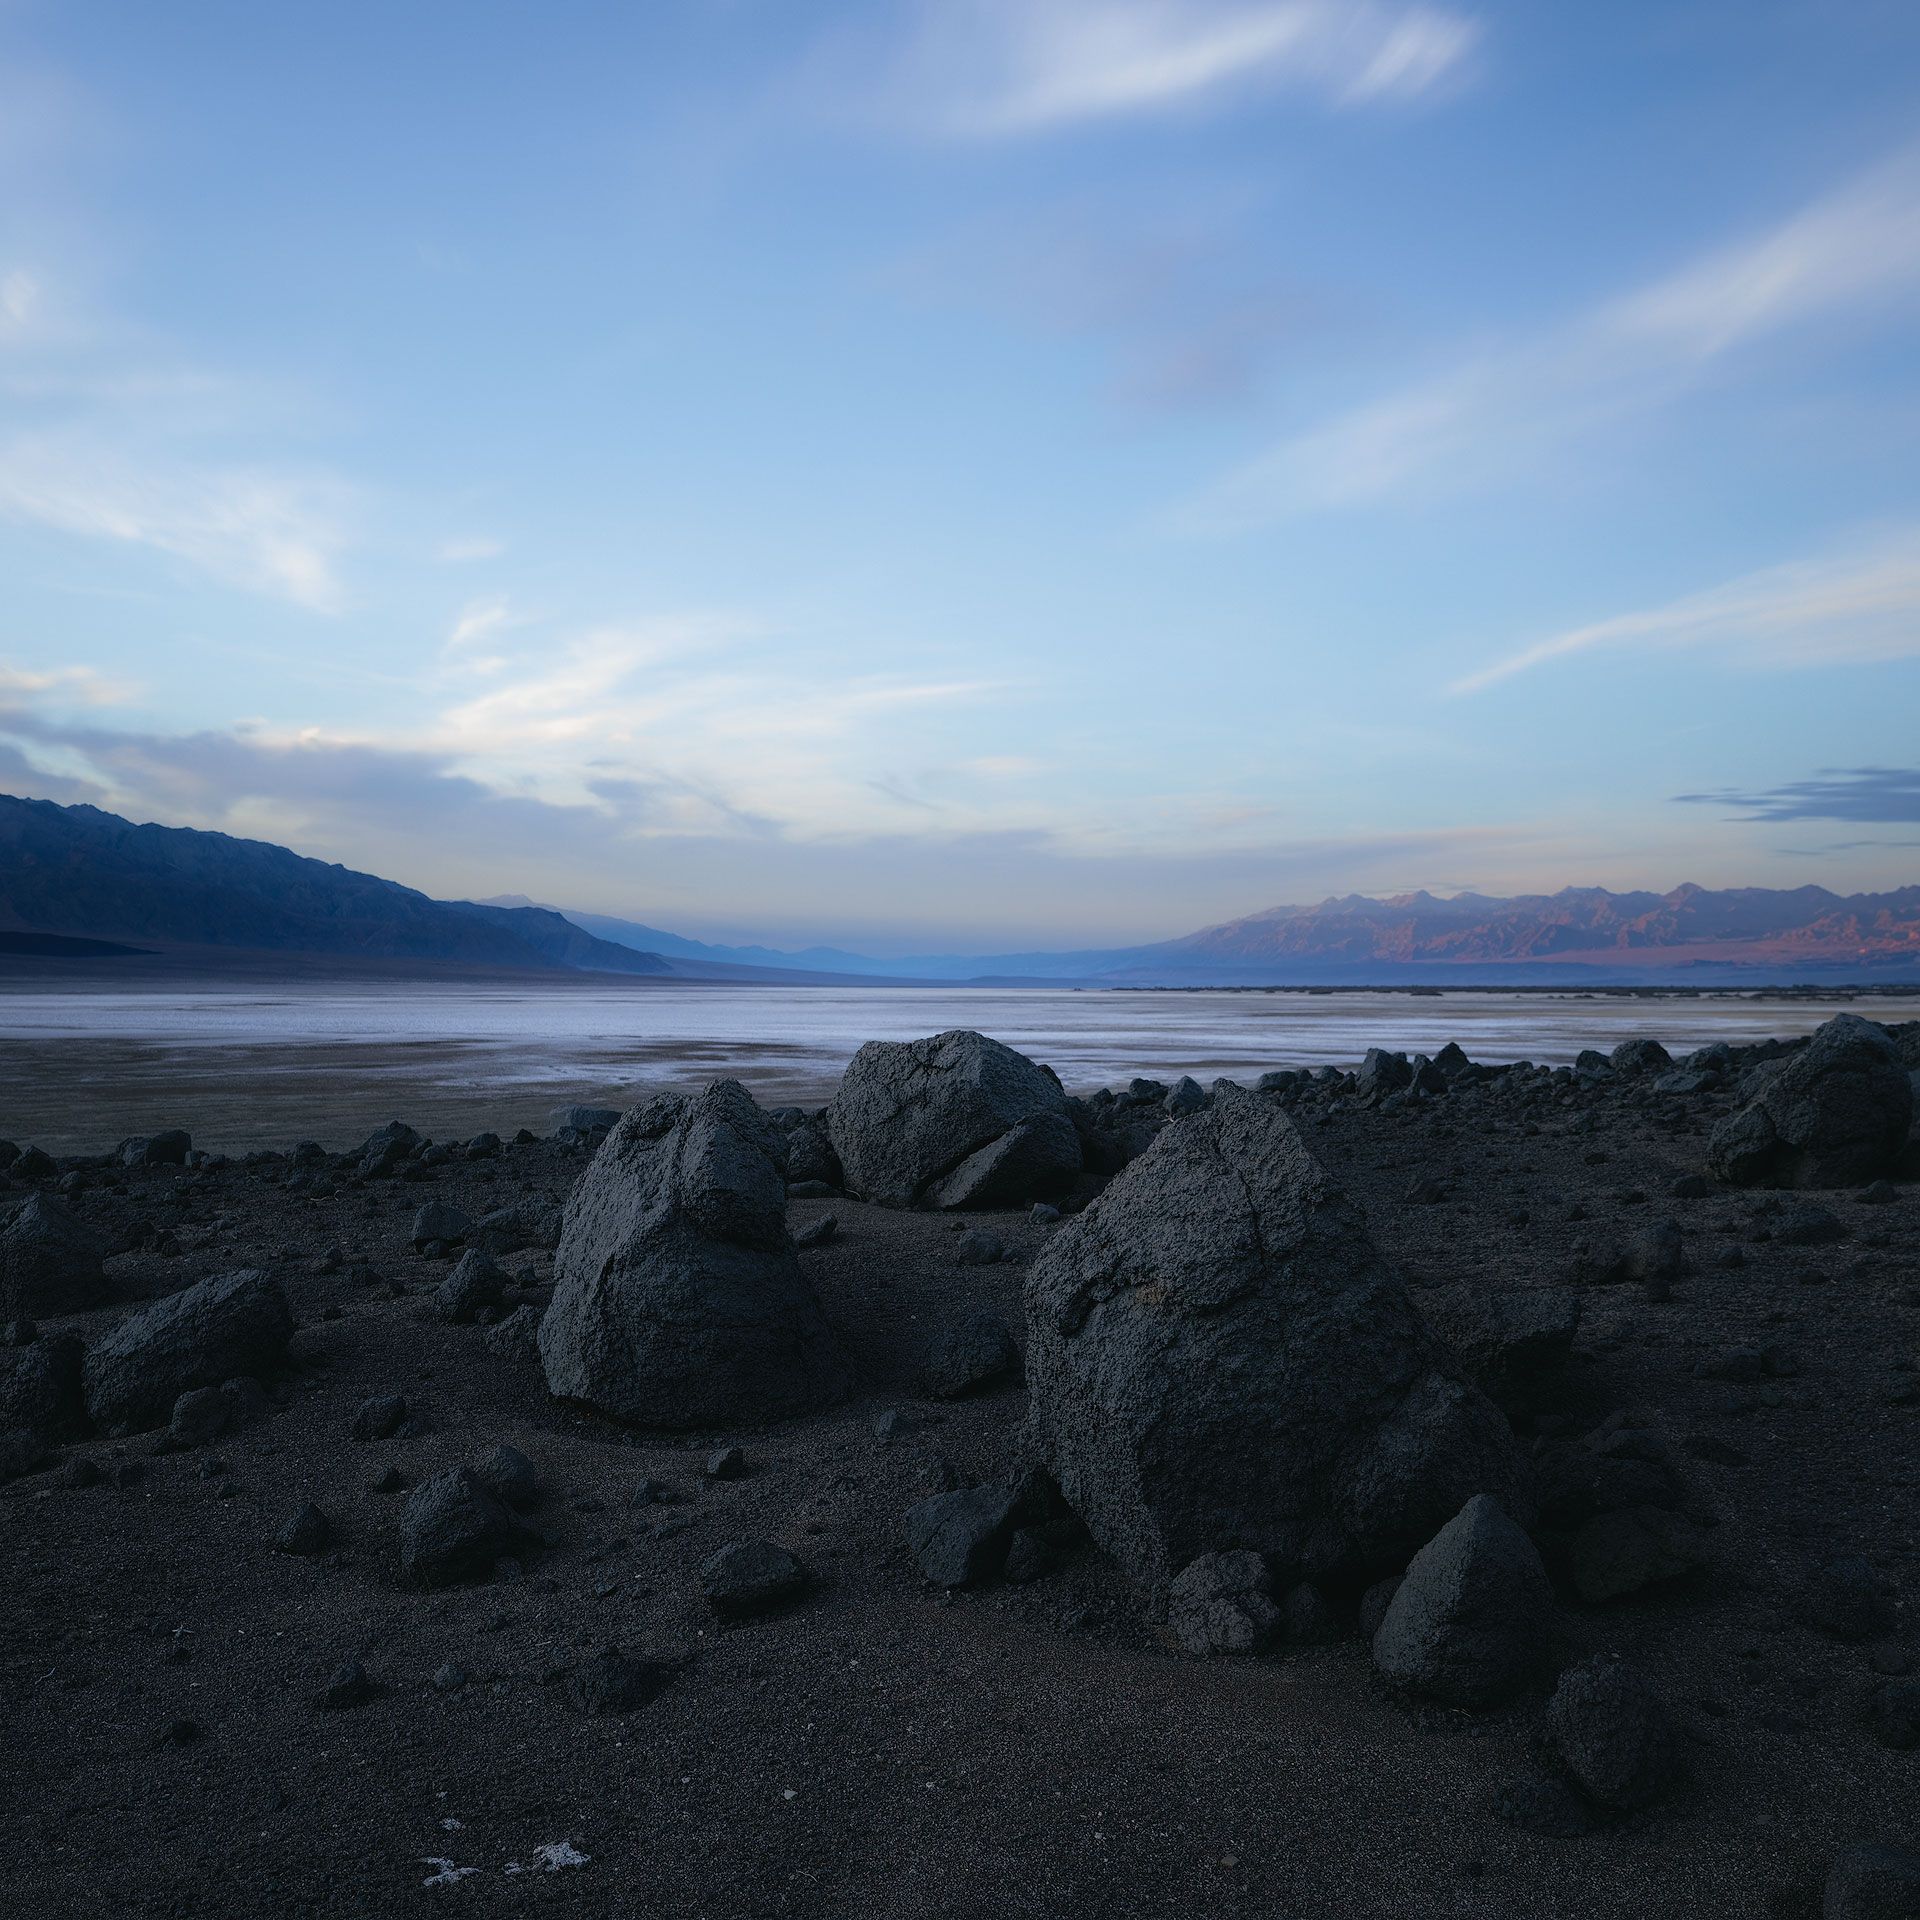
The foreground could use an overall exposure lift, but instead of applying a blanket exposure adjustment across the bottom third of the image, I will instead use motivated lighting to accentuate and emphasize the natural light already in the image. Like the film examples above, I want to maintain a semblance of reality and authenticity. I want to enhance what's already there, not introduce anything new that doesn't exist already.
To do that, I use Adobe Lightroom Classic and first add a linear gradient mask. The mask begins off-canvas at far left, is stretched across the image, and is angled to match the angle of sunlight. My intent here is to amplify the natural sunlight and create more atmosphere in the image. Generally speaking, the bigger the mask, the more natural an effect looks.
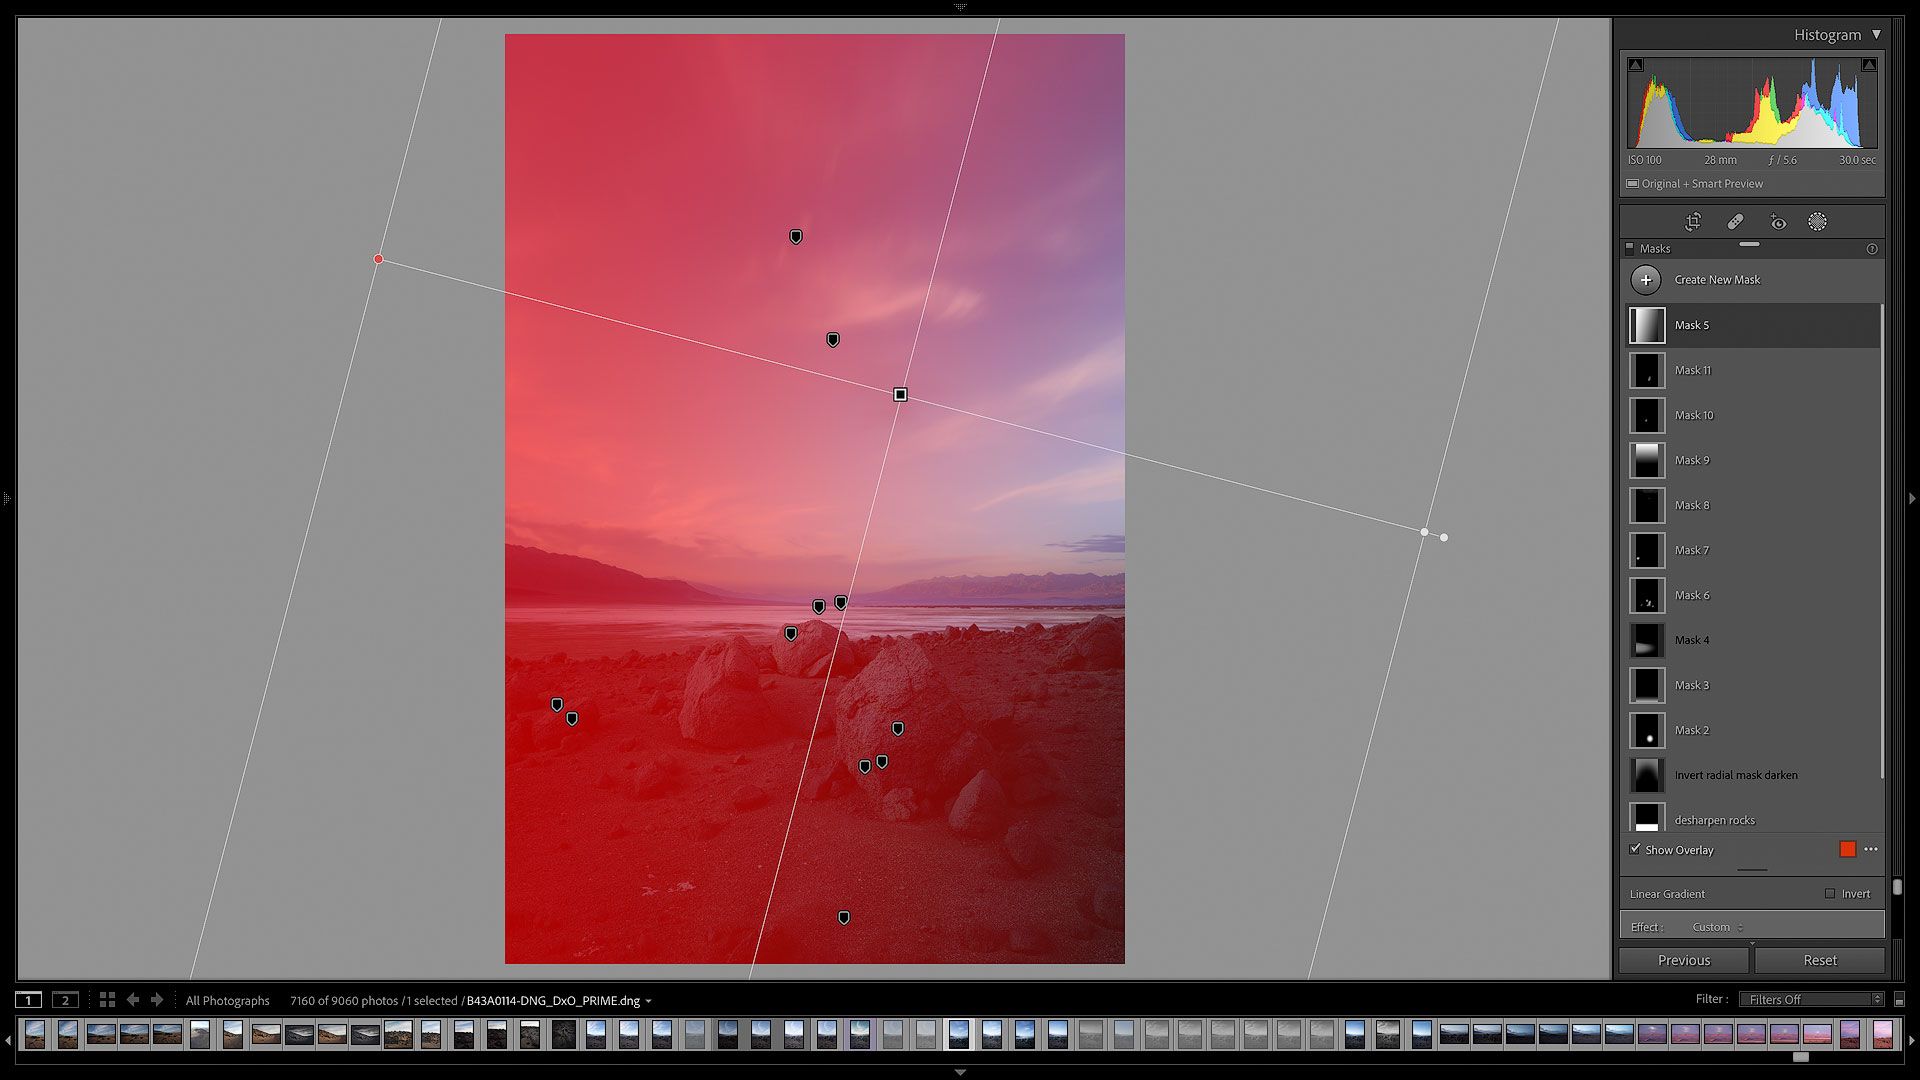
With the mask in place, it's time to apply effects. Raising Exposure does the job, but can sometimes appear forced and unnatural. Instead, I'll push the Dehaze slider into the negative. This creates a bright, glowing atmosphere emanating from the left side of the frame. I'll also increase Clarity a little to add micro-contrast and keep the light from being too soft.
Next, I'll focus more on the three rocks by adding a radial gradient mask. Here again, the mask begins off-canvas to the left (where the sun is), and slowly fades in intensity as it stretches towards the right.
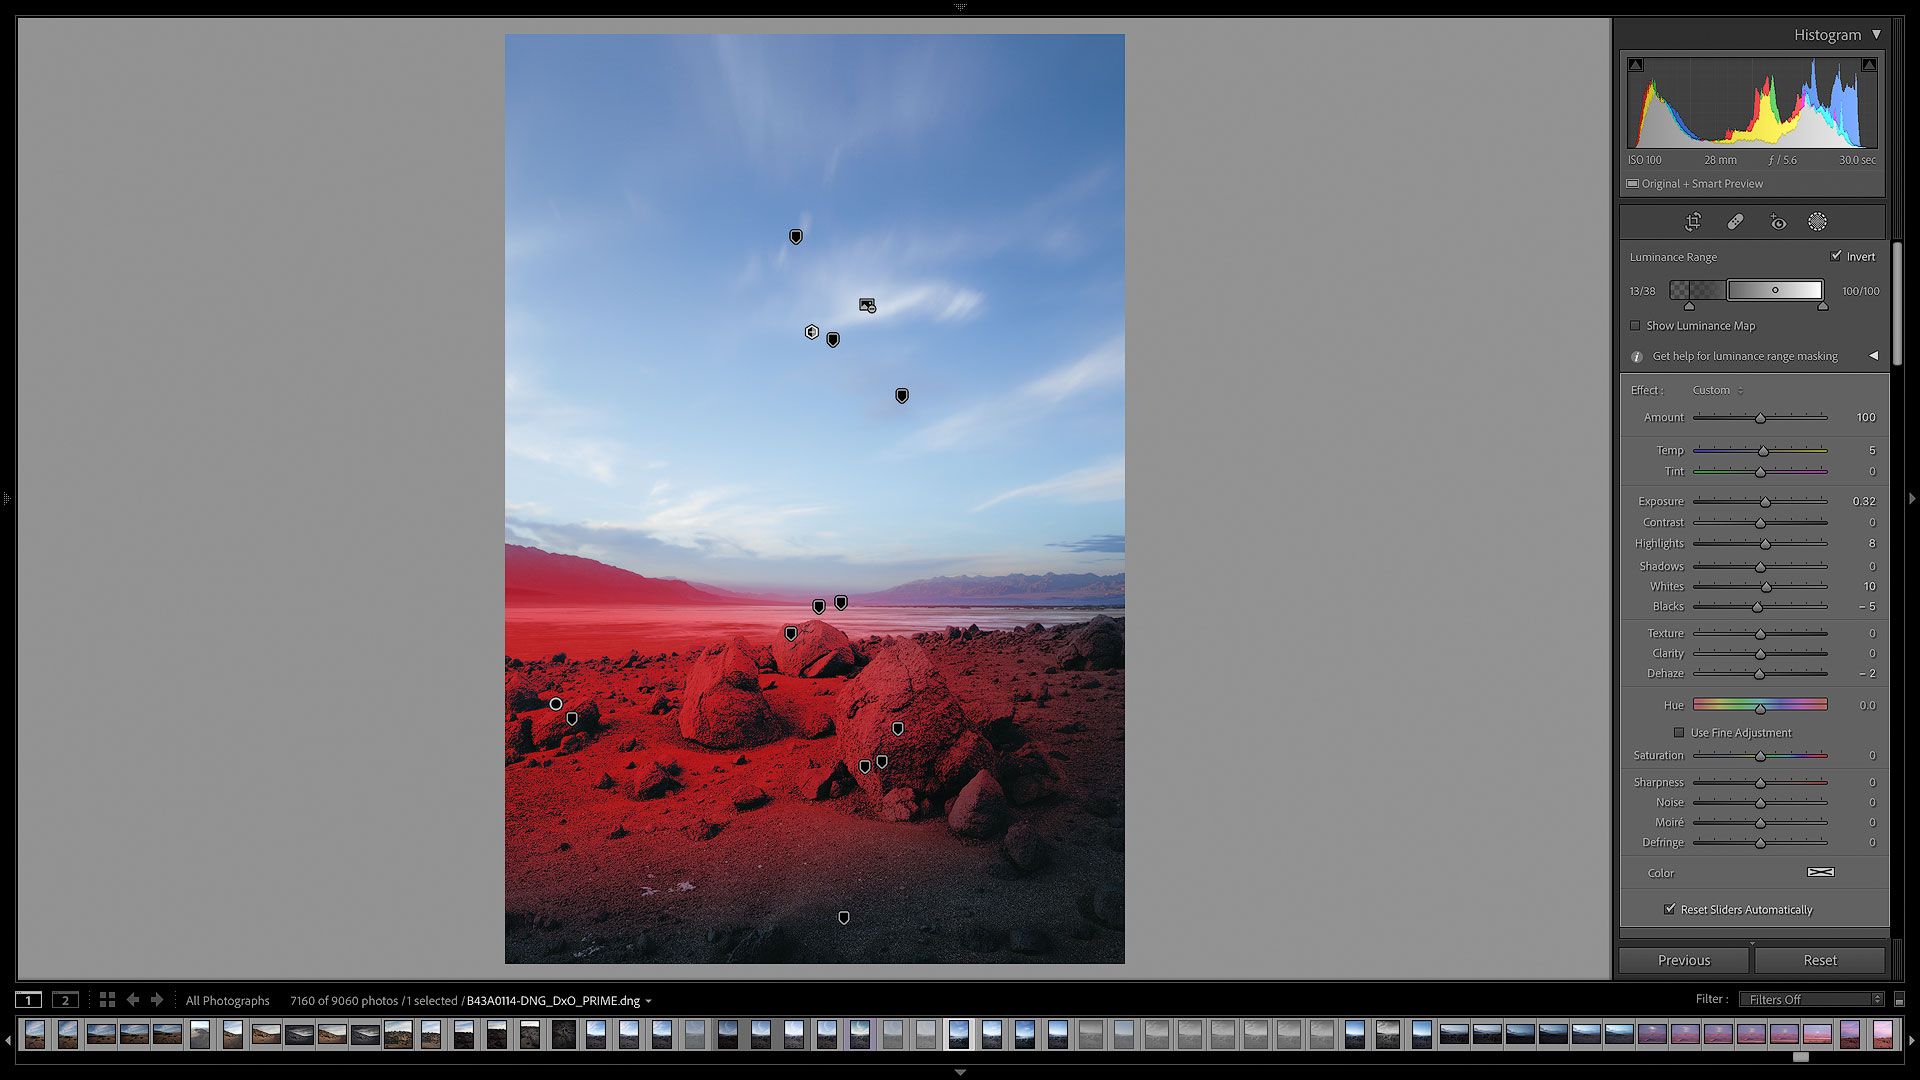
With these two masks, I've fixed the dark exposure issue in the bottom third of the frame while also accentuating and enhancing the natural sunlight captured by the camera. Here's the before and after.

By adding motivated light, the image now has more depth and shape. The three rocks in the foreground feel more three dimensional, yet retain their natural appearance. What was once a flat, static shot now feels more intentional, dynamic, and with better light than what mother nature originally provided.
Using motivated lighting in your images
In photo editing, there are no right or wrong answers. What you do with a raw image is entirely up to you. Success is defined by how clearly your intent as a photographer can be seen, felt, and understood without using words. In landscape and outdoor photography, light is one of the most powerful tools in the toolbox for accomplishing that goal.
Anytime you sit down to edit a landscape or outdoor image, I recommend starting by analyzing the natural light in your scene. Pay attention to where the light is coming from, its angle, color, and volume. Note how the light is illuminating and giving subjects shape.
Then, switch to your creative right brain. Consider whether the light feels strong enough. Whether the light can be felt and "heard" (if it were a sound). Work with the grain of the image by accentuating the light that's already there. Doing so should make your dodging and burning edits more natural and believable.
Interested in more tutorials about photo editing? I recommend checking out the following.

Video
Check out the video version of this article over on my YouTube channel.