DxO PureRaw 3 review: magical noise removal and corrections, questionable upgrade value
New update that adds a fourth "XD" denoising option, file processing queue, and more user control over optical corrections, but still lacks a proper live preview.
DxO PureRaw 3 ($129 new, $79 upgrade) is new and improved version of DxO's raw photo pre-processing utility that adds a fourth denoising algorithm ("DeepPRIME XD"), a file queue for batch processing large amounts of raw files, plus improved control over optical corrections.
I reviewed the first version of PureRaw and found it to be an excellent tool for squeezing the best possible image quality out of raw files created using older DSLRs, mid-range cameras, and drones. I've continued to use it with my own photography ever since.
Does version 3 provide anything new, or is it more of the same? Let's find out.
- Exceptional denoising
- Best in class optical corrections
- Bayer and X-Trans sensor support
- More configurable lens correction options
- No monthly subscription
- Still cannot preview settings prior to export
- Quirky user interface
- Generated DNG files are 3-4x larger in file size
What is PureRaw?
PureRaw is a standalone version of the raw demosaicing engine used by PhotoLab, DxO's raw photo editing equivalent to Lightroom, Capture One, etc. The software uses DxO's own custom-built optical modules (which DxO claims includes over 70,000 possible camera and lens combinations) to fix optical distortion, vignette, and chromatic aberration. PureRaw also includes four denoising algorithms of varying strengths, two of which use deep learning to reconstruct detail that would otherwise be lost in the denoising process.
PureRaw does all of this — apply optical corrections, denoise, add detail, and sharpen — when a raw file's data is demosaiced (the process of turning zeros and ones into a visual image). This is what makes PureRaw a raw pre-processing app, for it optimizes raw photo files before they are imported and edited elsewhere.
Processing raw files in PureRaw 3
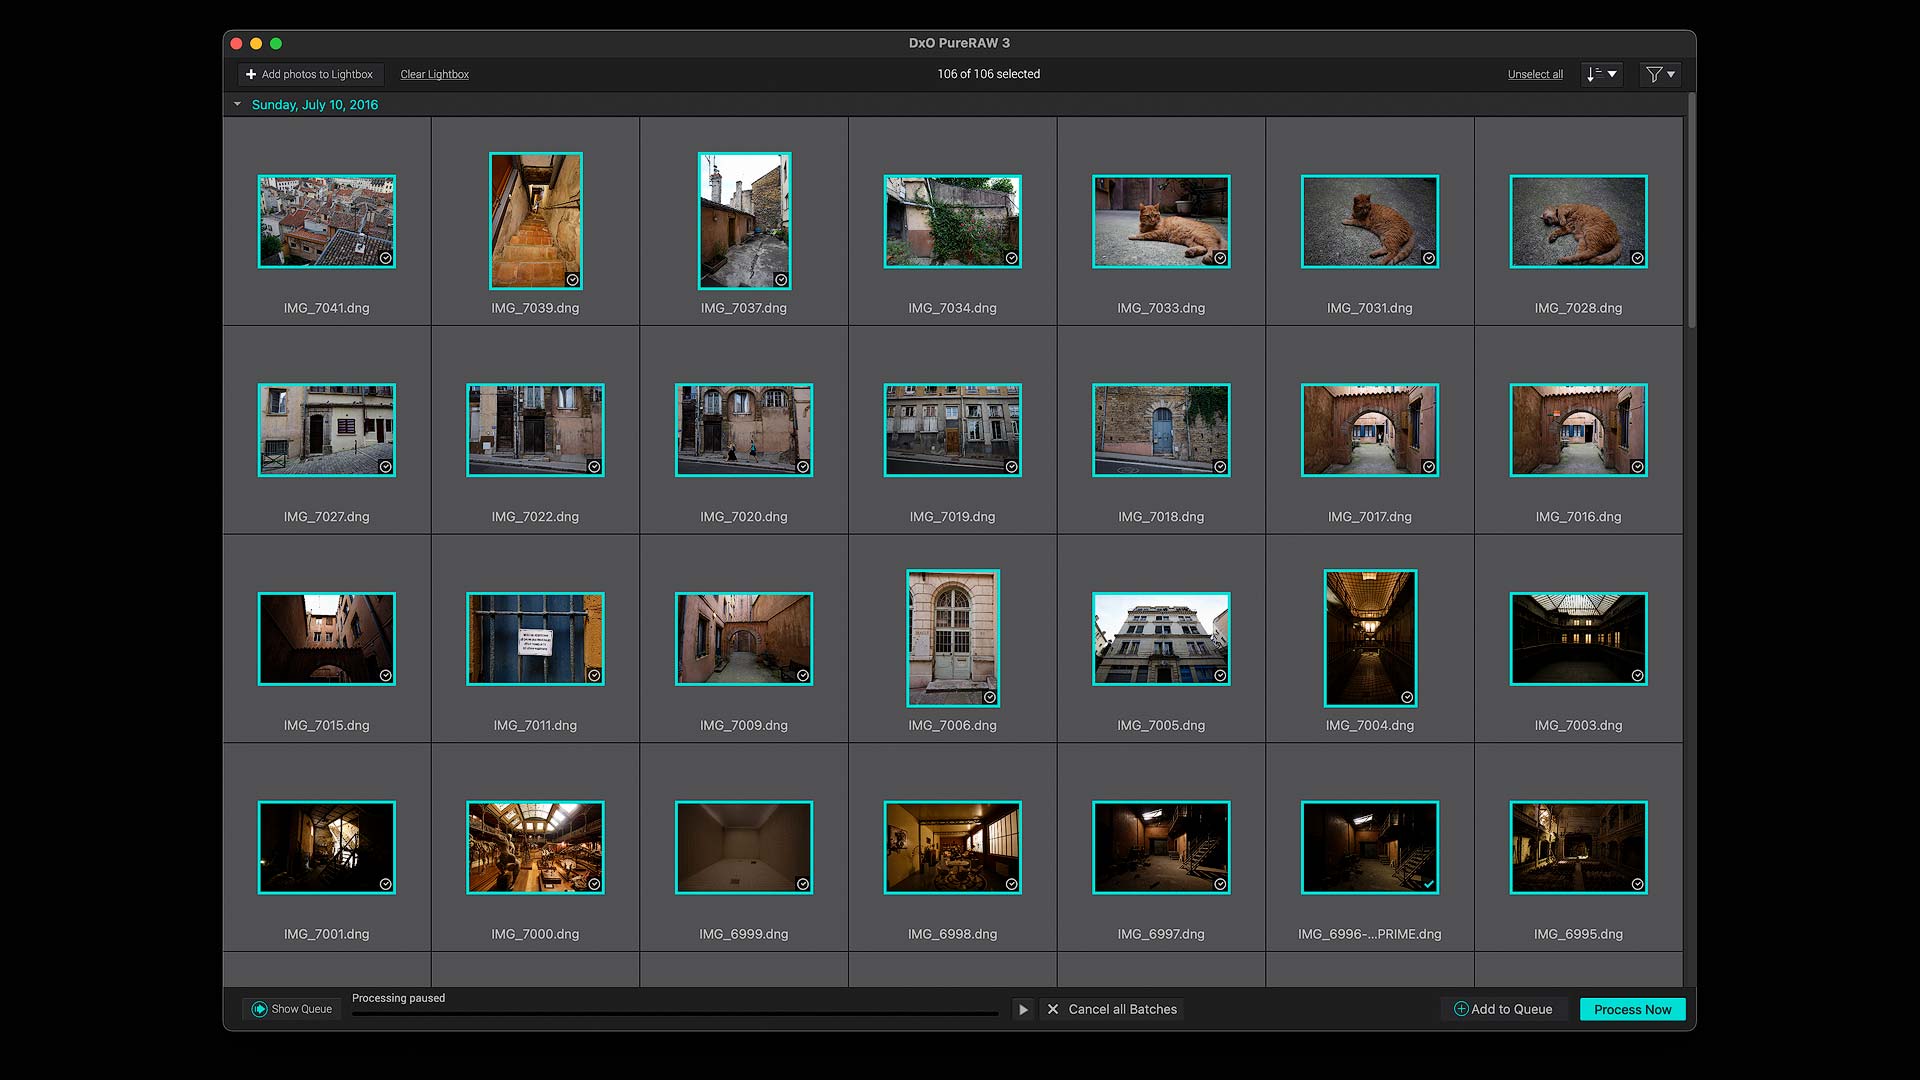
Raw files are added to PureRaw via drag-and-drop from a local file browser or through a plugin for Adobe Lightroom Classic (accessed through the File>Plugin Extras menu). Imported raw files then appear in PureRaw's "lightbox" (pictured below) for processing.
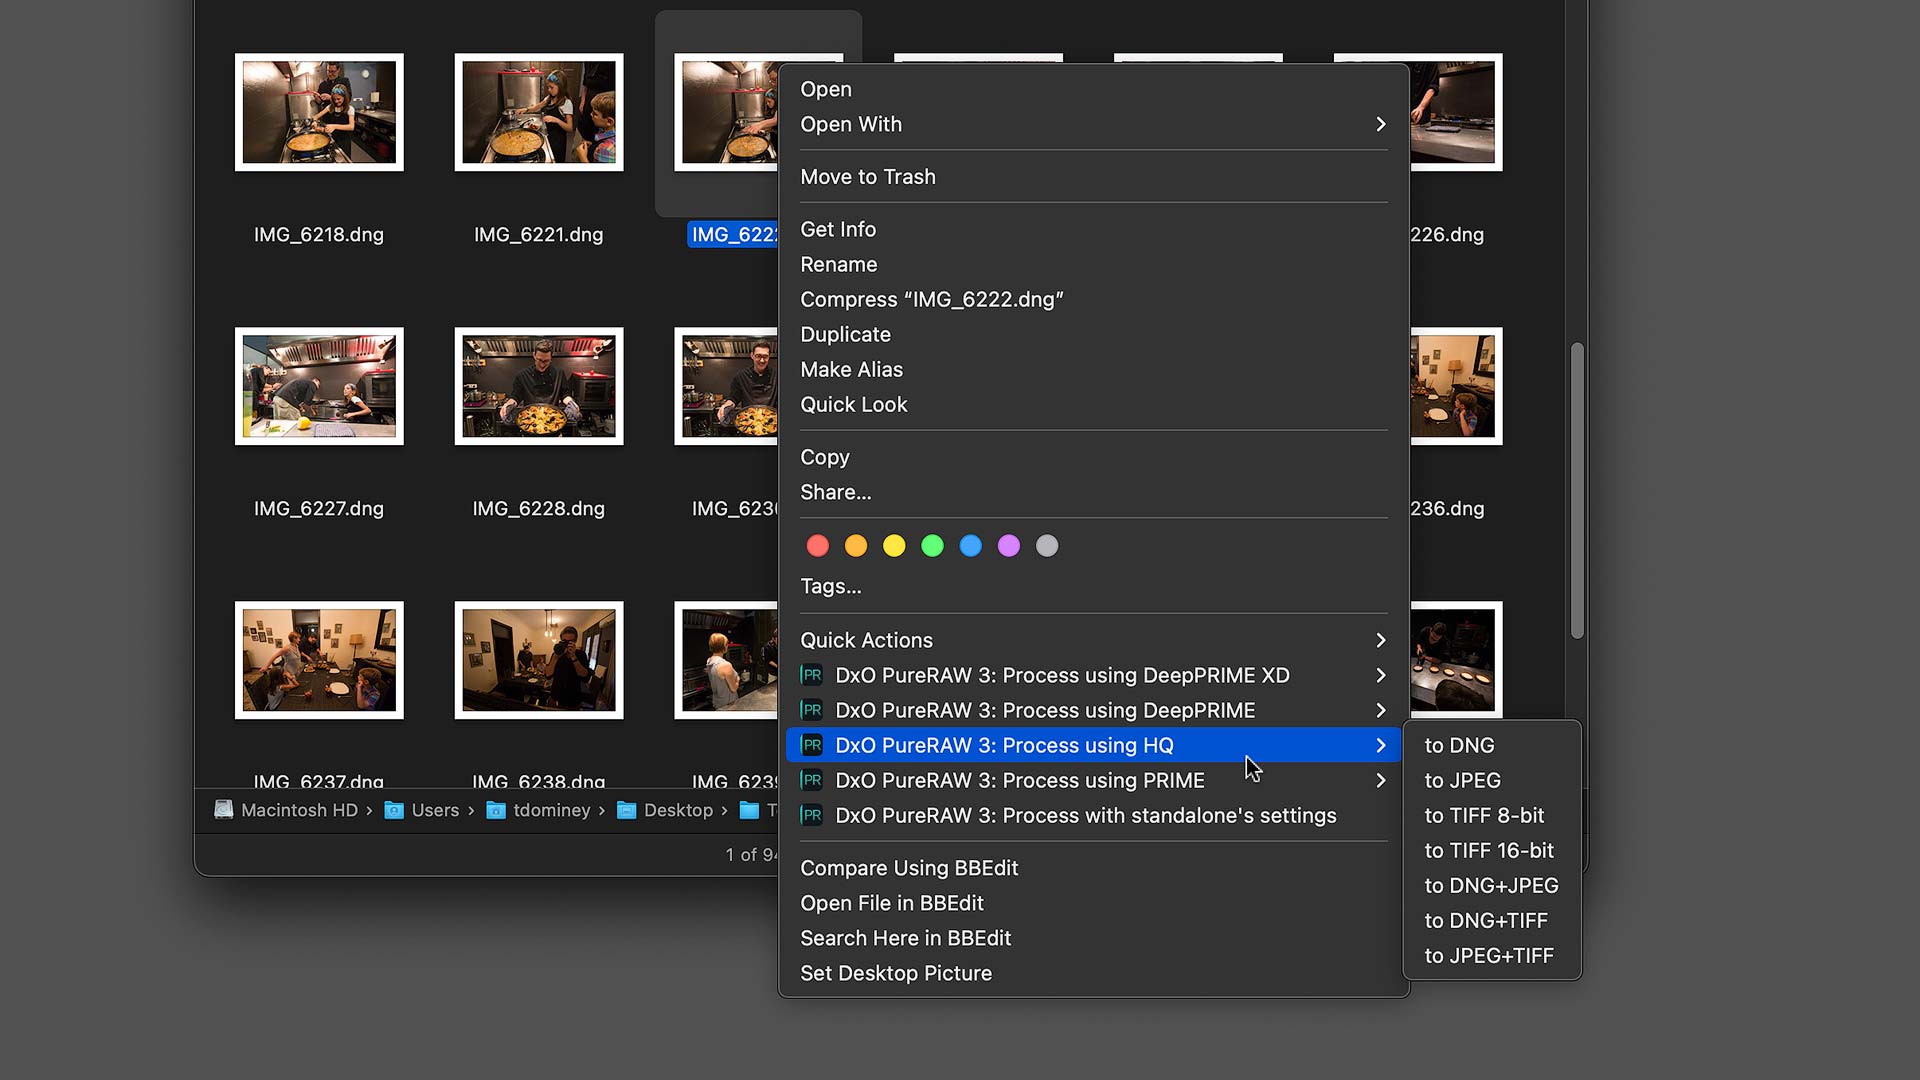
Raw files may also be processed directly through the macOS Finder and Windows File Explorer. Right click on one or more raw files, select a denoising algorithm, and newly optimized DNGs and/or rasterized images are generated without launching PureRaw .
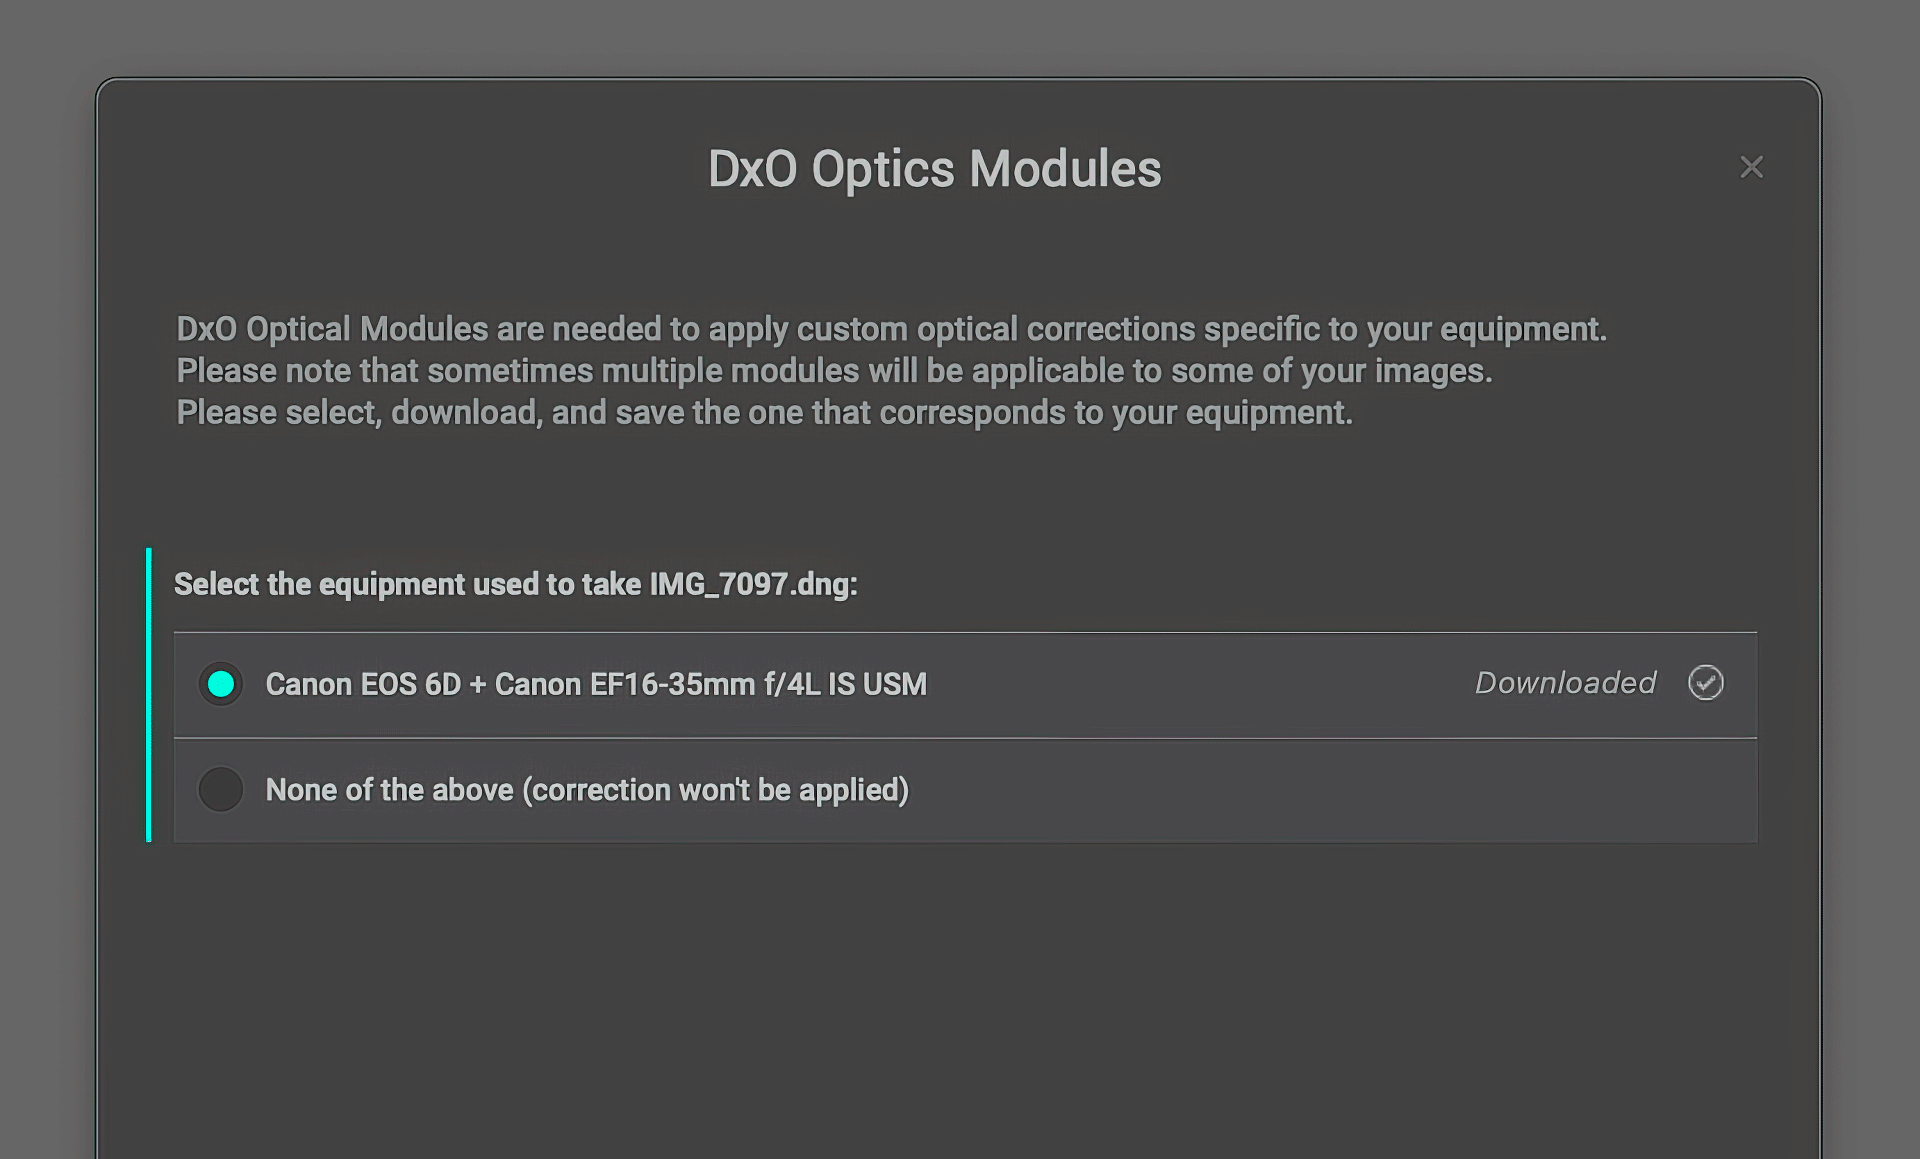
If PureRaw doesn't have the optics module it needs to correct a raw file, a modal window appears asking permission to download the requisite files (pictured below). Maintaining the optics modules separately from the main application allows DxO to add new modules as new camera and lens combinations are released.
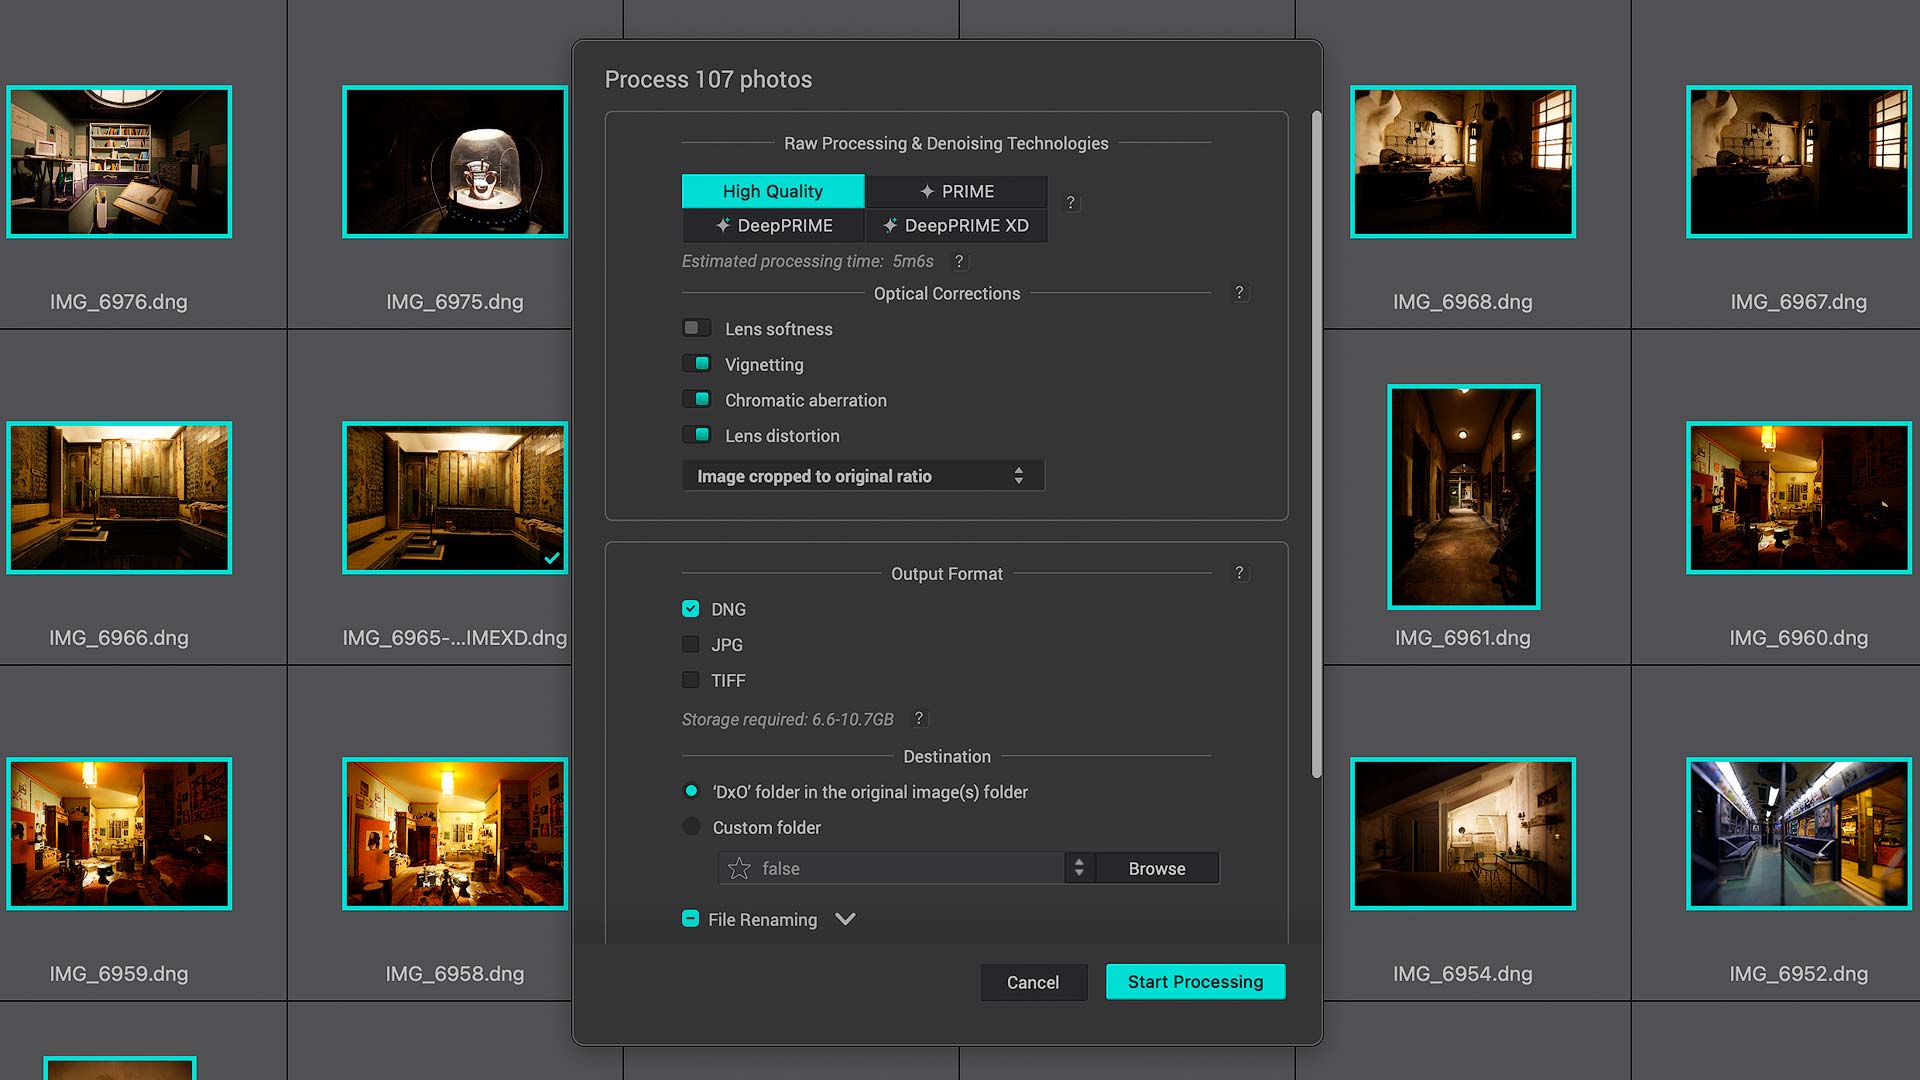
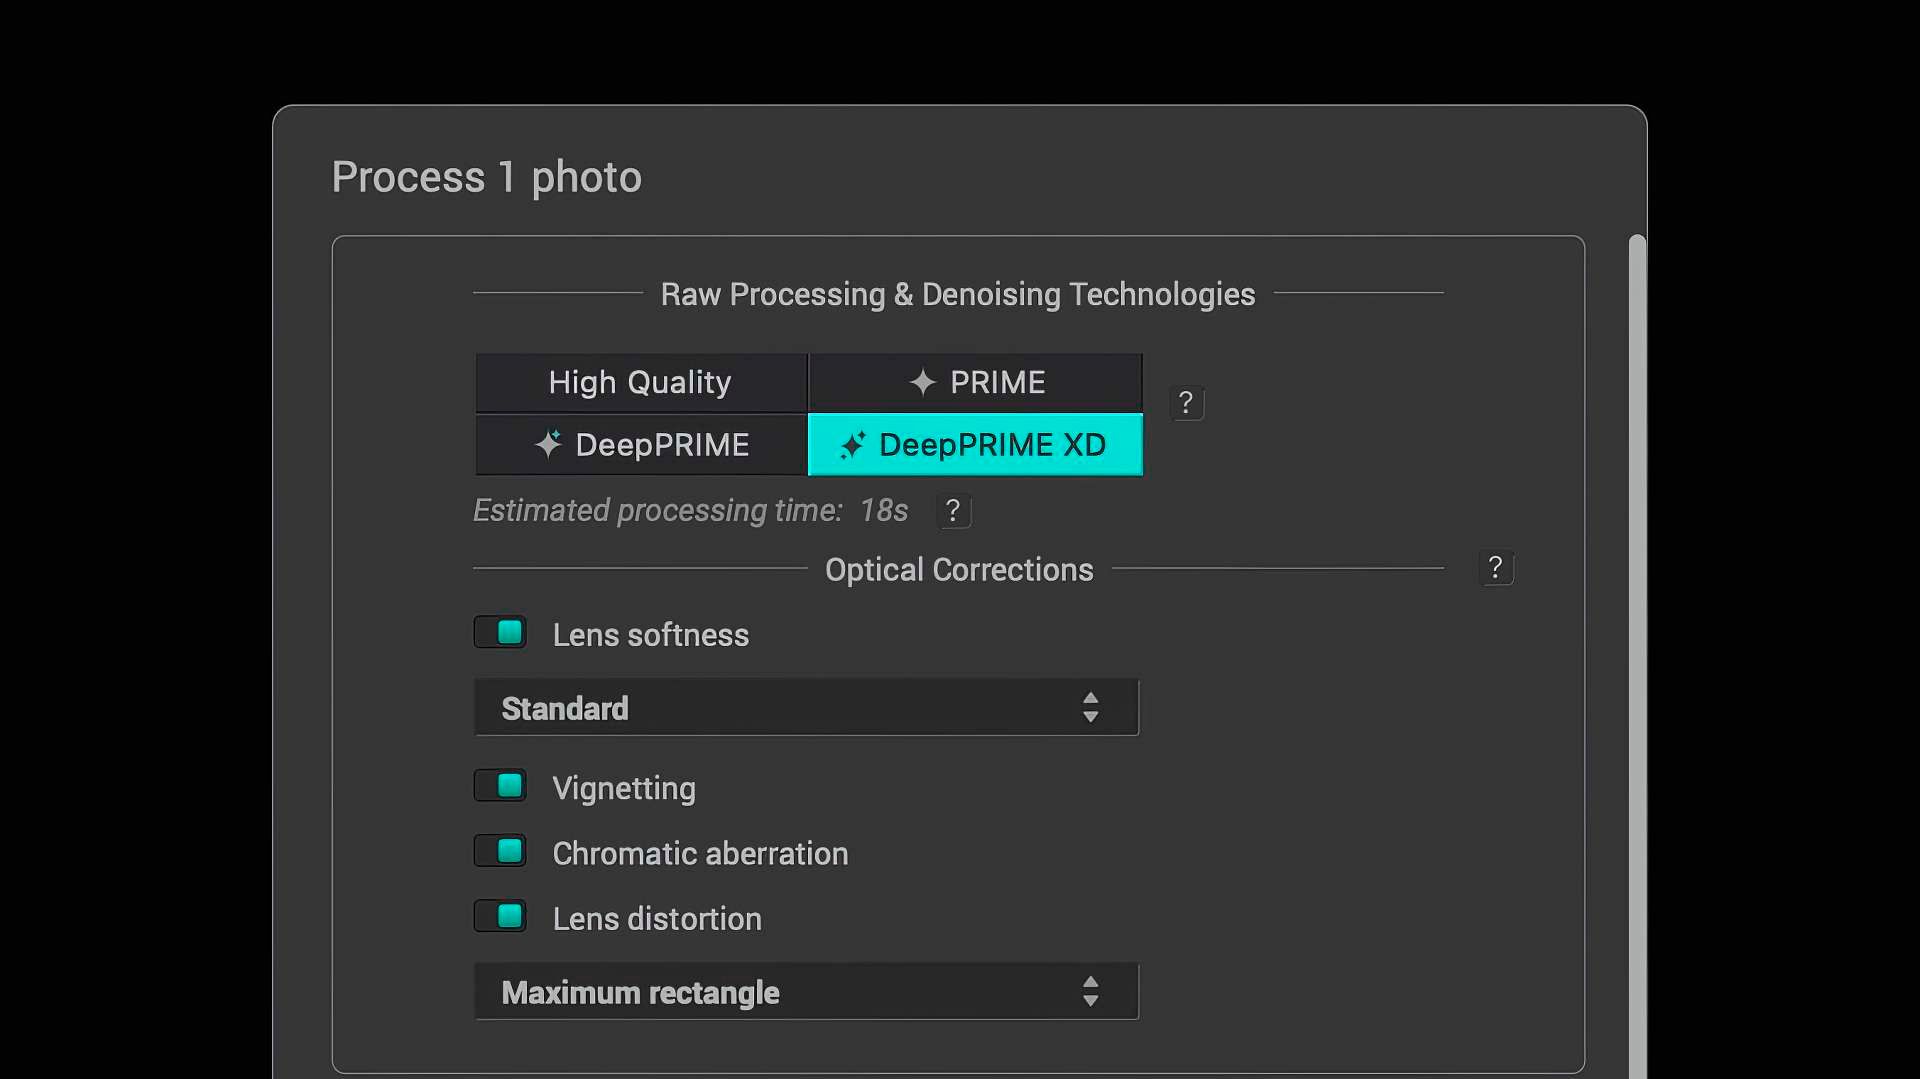
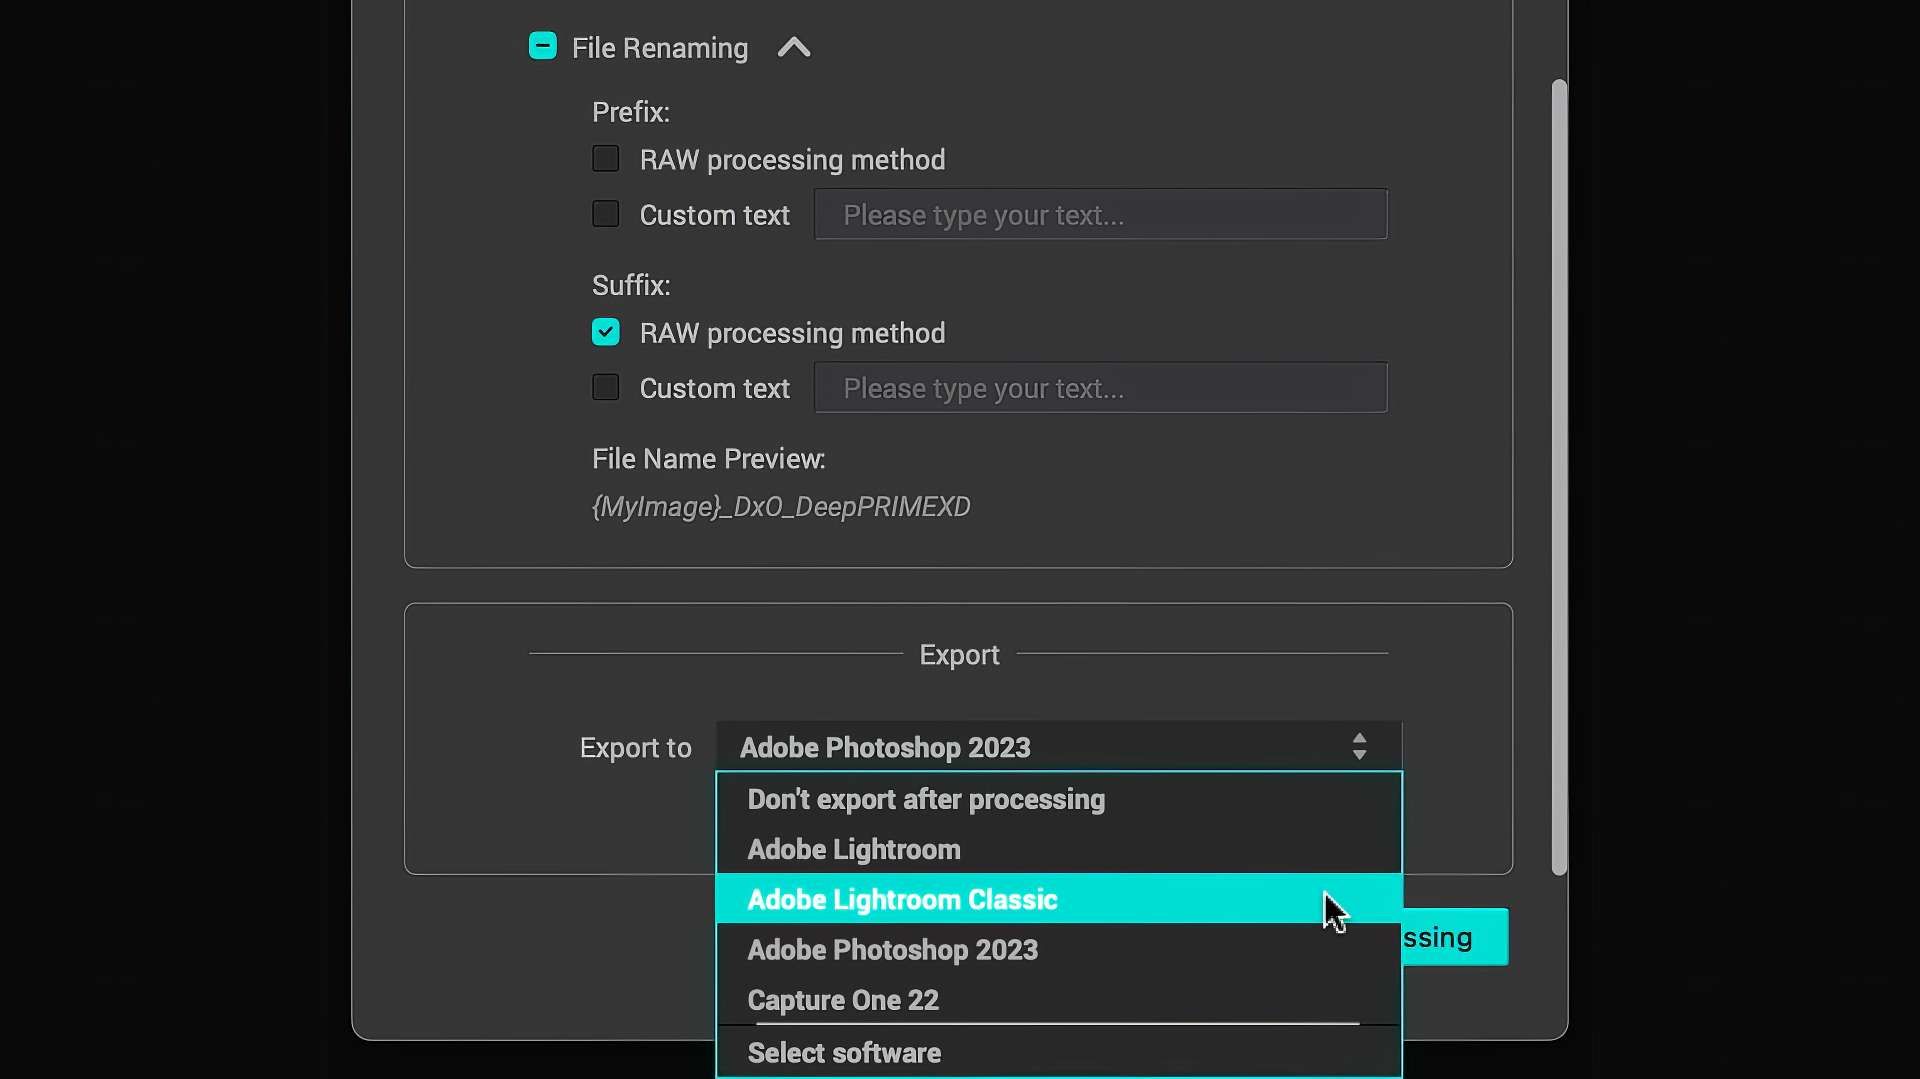
Raw files added to PureRaw 3's lightbox are processed by clicking the "Process Now" or "Add to Queue" buttons at bottom right. Both produce the same window for assigning a denoising algorithm, options for optical corrections, output file format and naming, and what to do with newly generated files after processing (export to Lightroom, Lightroom Classic, Photoshop, a specific app, or nothing).
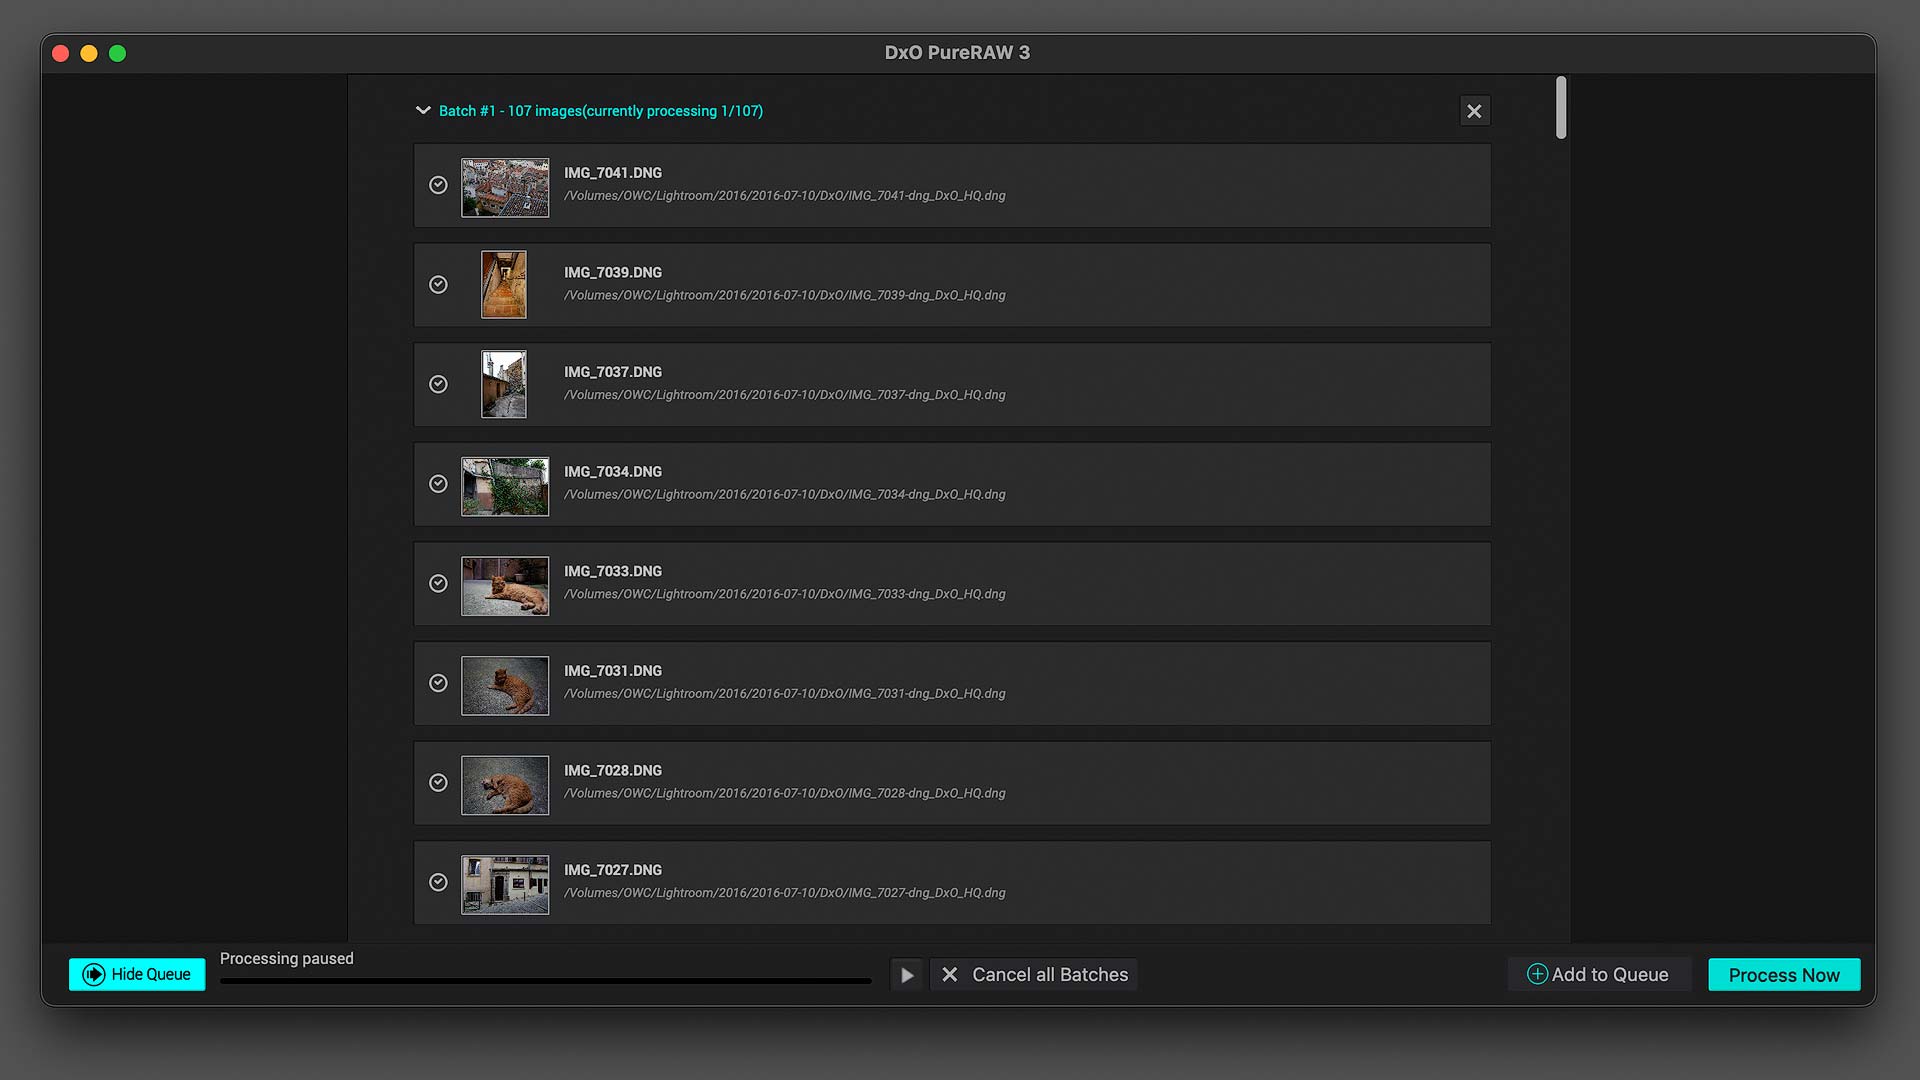
"Add to Queue" is a new feature in PureRaw 3. It creates a queue of raw files that may be paused, restarted, or canceled. Jobs may also be re-ordered via drag-and-drop or right-click. The queue functions independently, so PureRaw's lightbox remains usable while the queue is running.
Denoising
PureRaw denoises raw files using one of four algorithms: "High Quality", "PRIME", "DeepPRIME" and "DeepPRIME XD". The latter is a new "extra detail" option in PureRaw 3.
"High Quality" and "PRIME" are the most basic forms of noise reduction, and are suitable for images with light noise and acceptable detail and sharpness. "DeepPRIME" and "DeepPRIME XD" are more sophisticated, for they utilize a backend "neutral network" trained on thousands of real-world images that intelligently removes noise and retains maximum image detail.
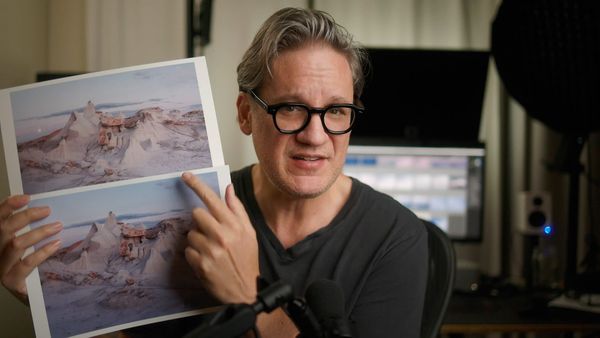
For example, here's an image I shot handheld using a Canon 6D DSLR inside a historic cathedral in Lyon, France. The image was shot at ISO 4000 to raise my the camera's shutter speed and avoid camera shake. The image on the left is the original raw file processed using Lightroom Classic's lens correction profiles (and nothing more), while the image on the right uses DeepPRIME XD denoising and optical corrections in PureRaw 3.
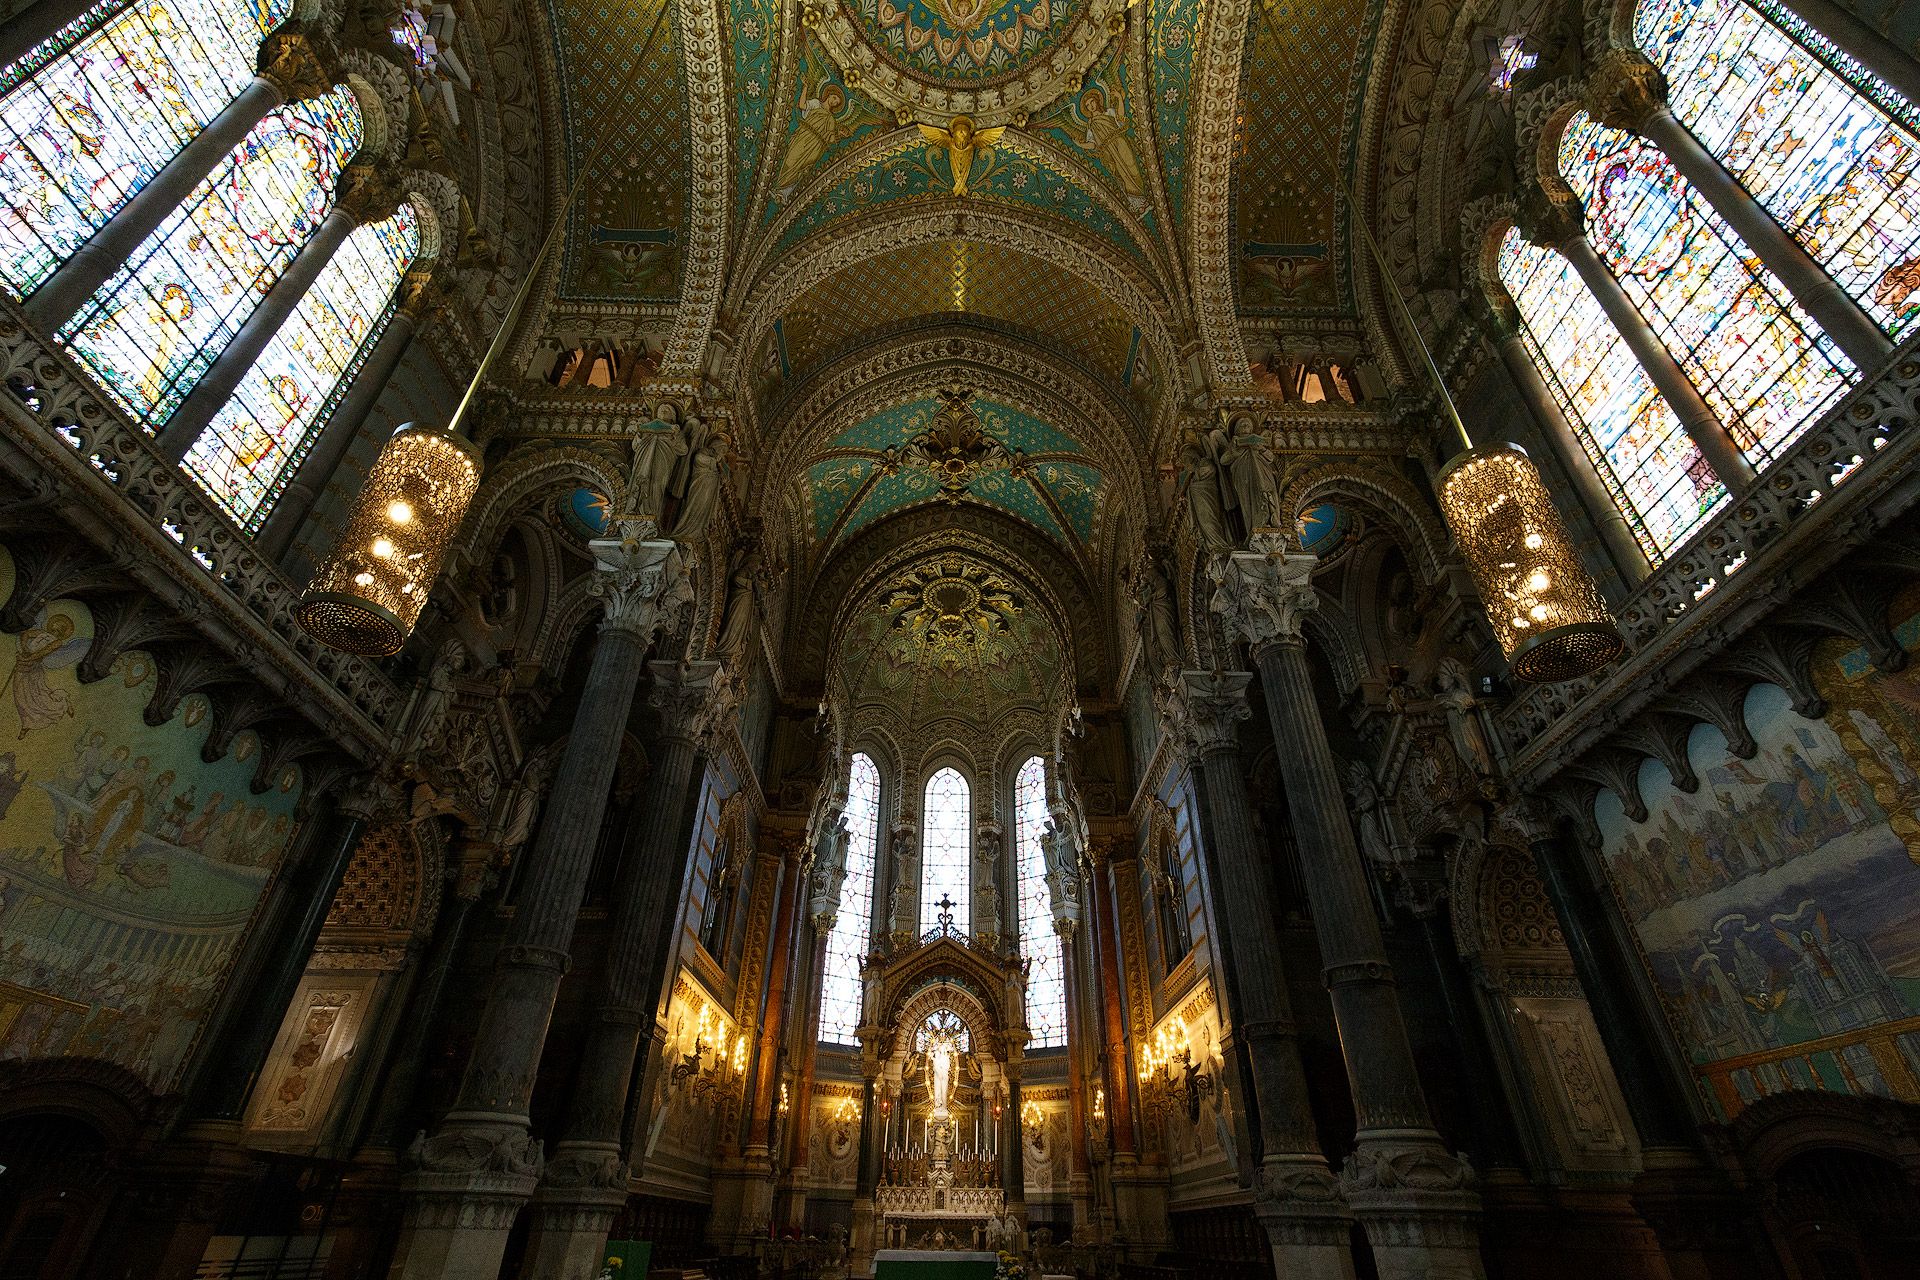
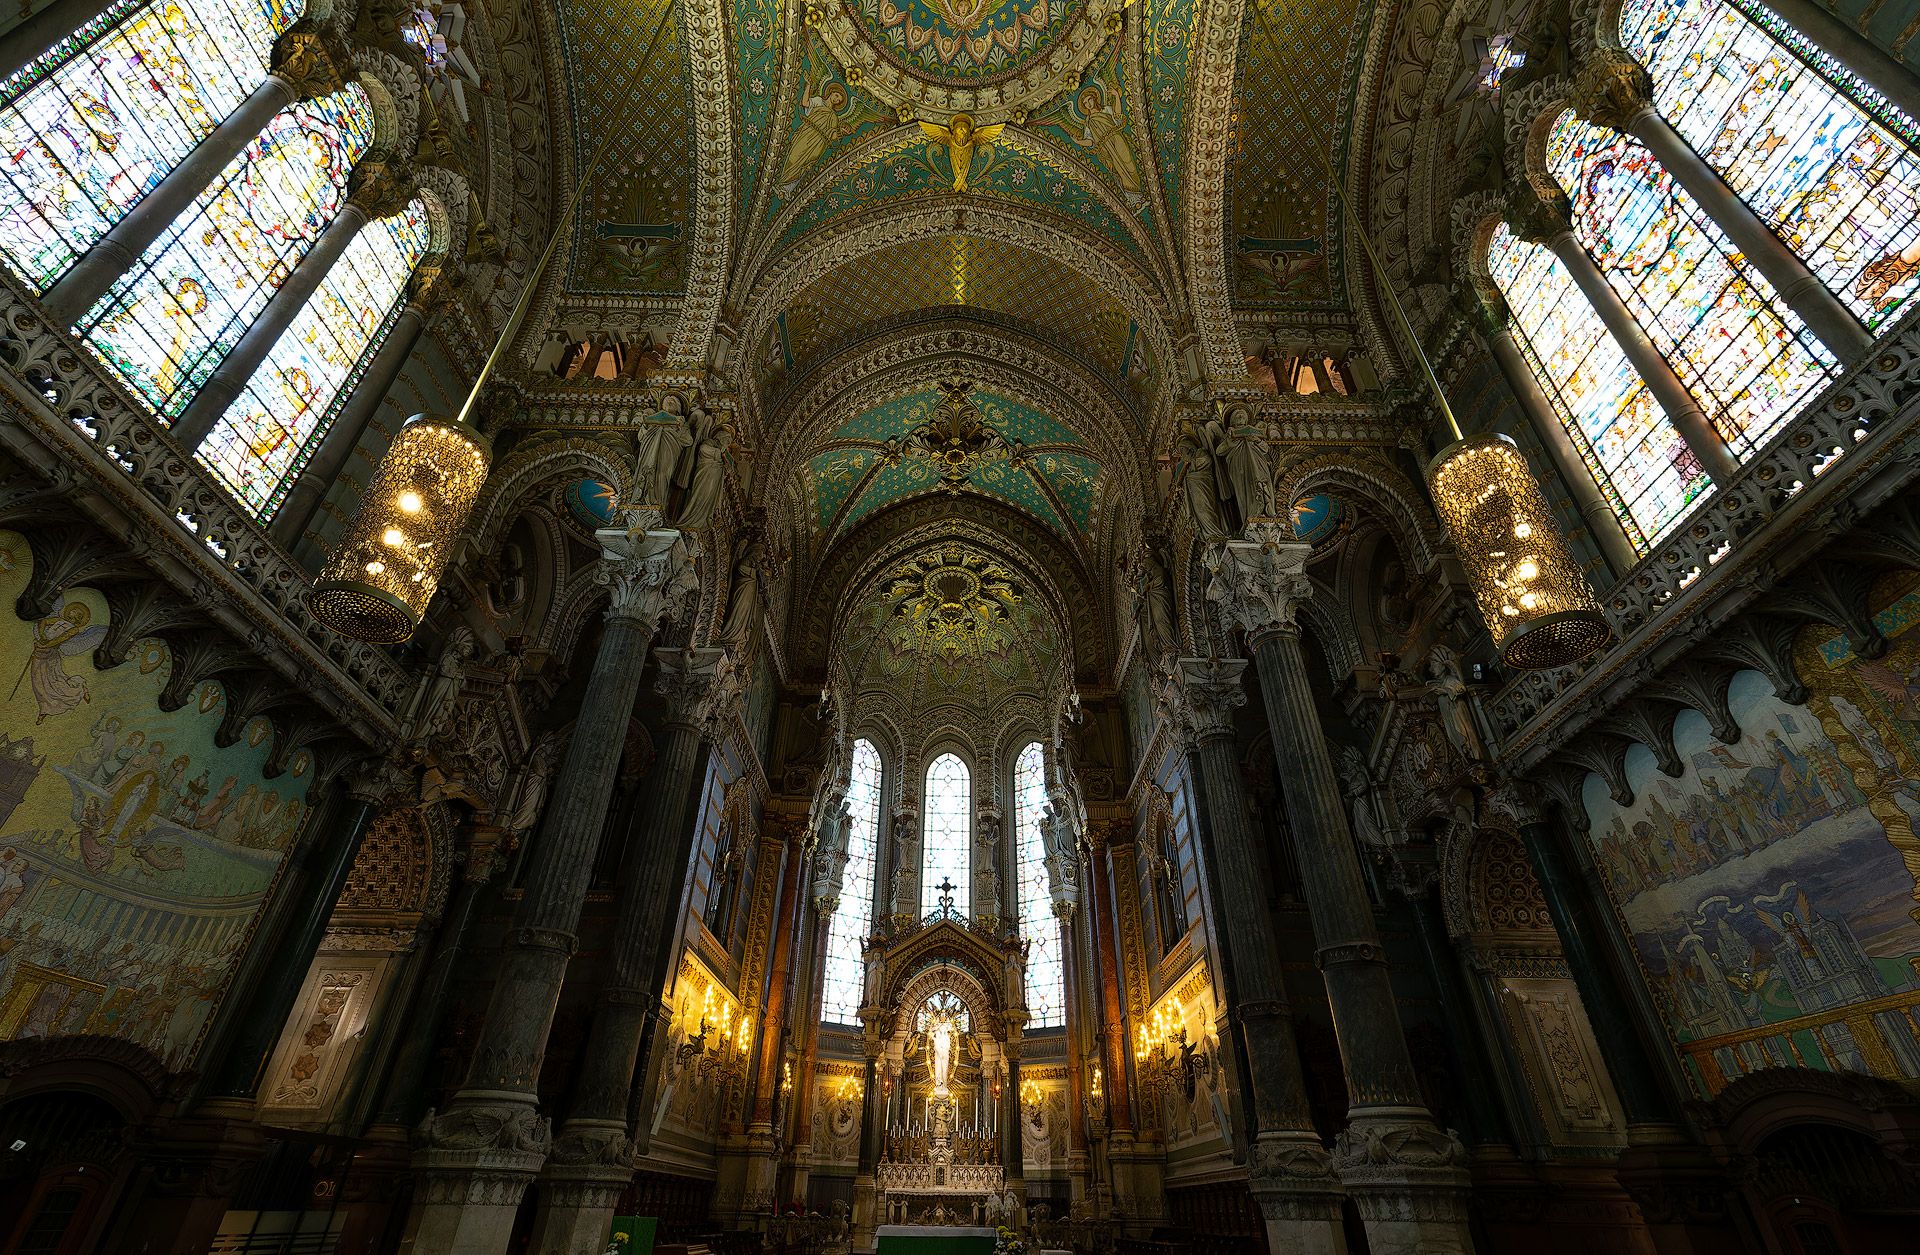
Not a big difference when viewed at a distance, but let's now take a closer look at the top of the frame.
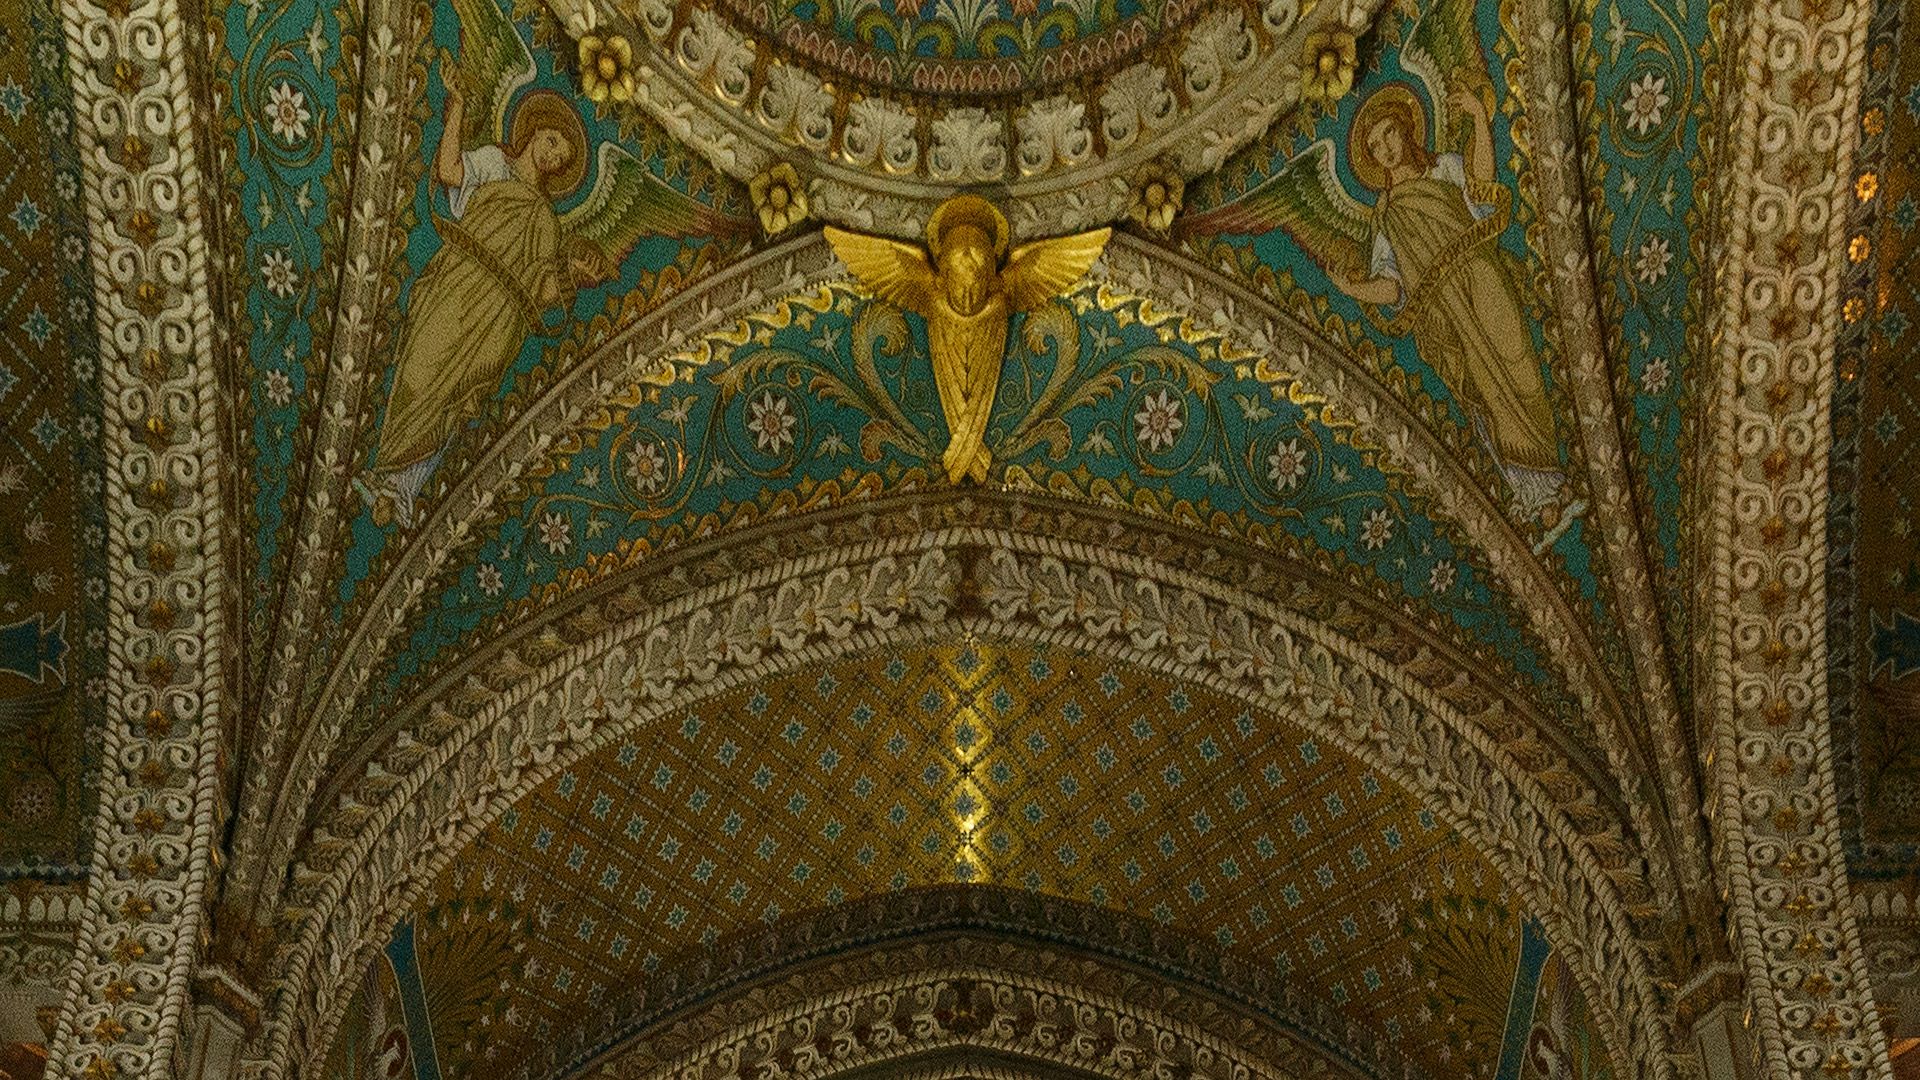
Wow. PureRaw 3 has reconstituted the intricate ceiling details, making it possible to see the intricate lines and patterns with increased clarity. PureRaw isn't simply sharpening the image, but rebuilding the raw file's DNA with new detail data that wasn't present in the original raw file.
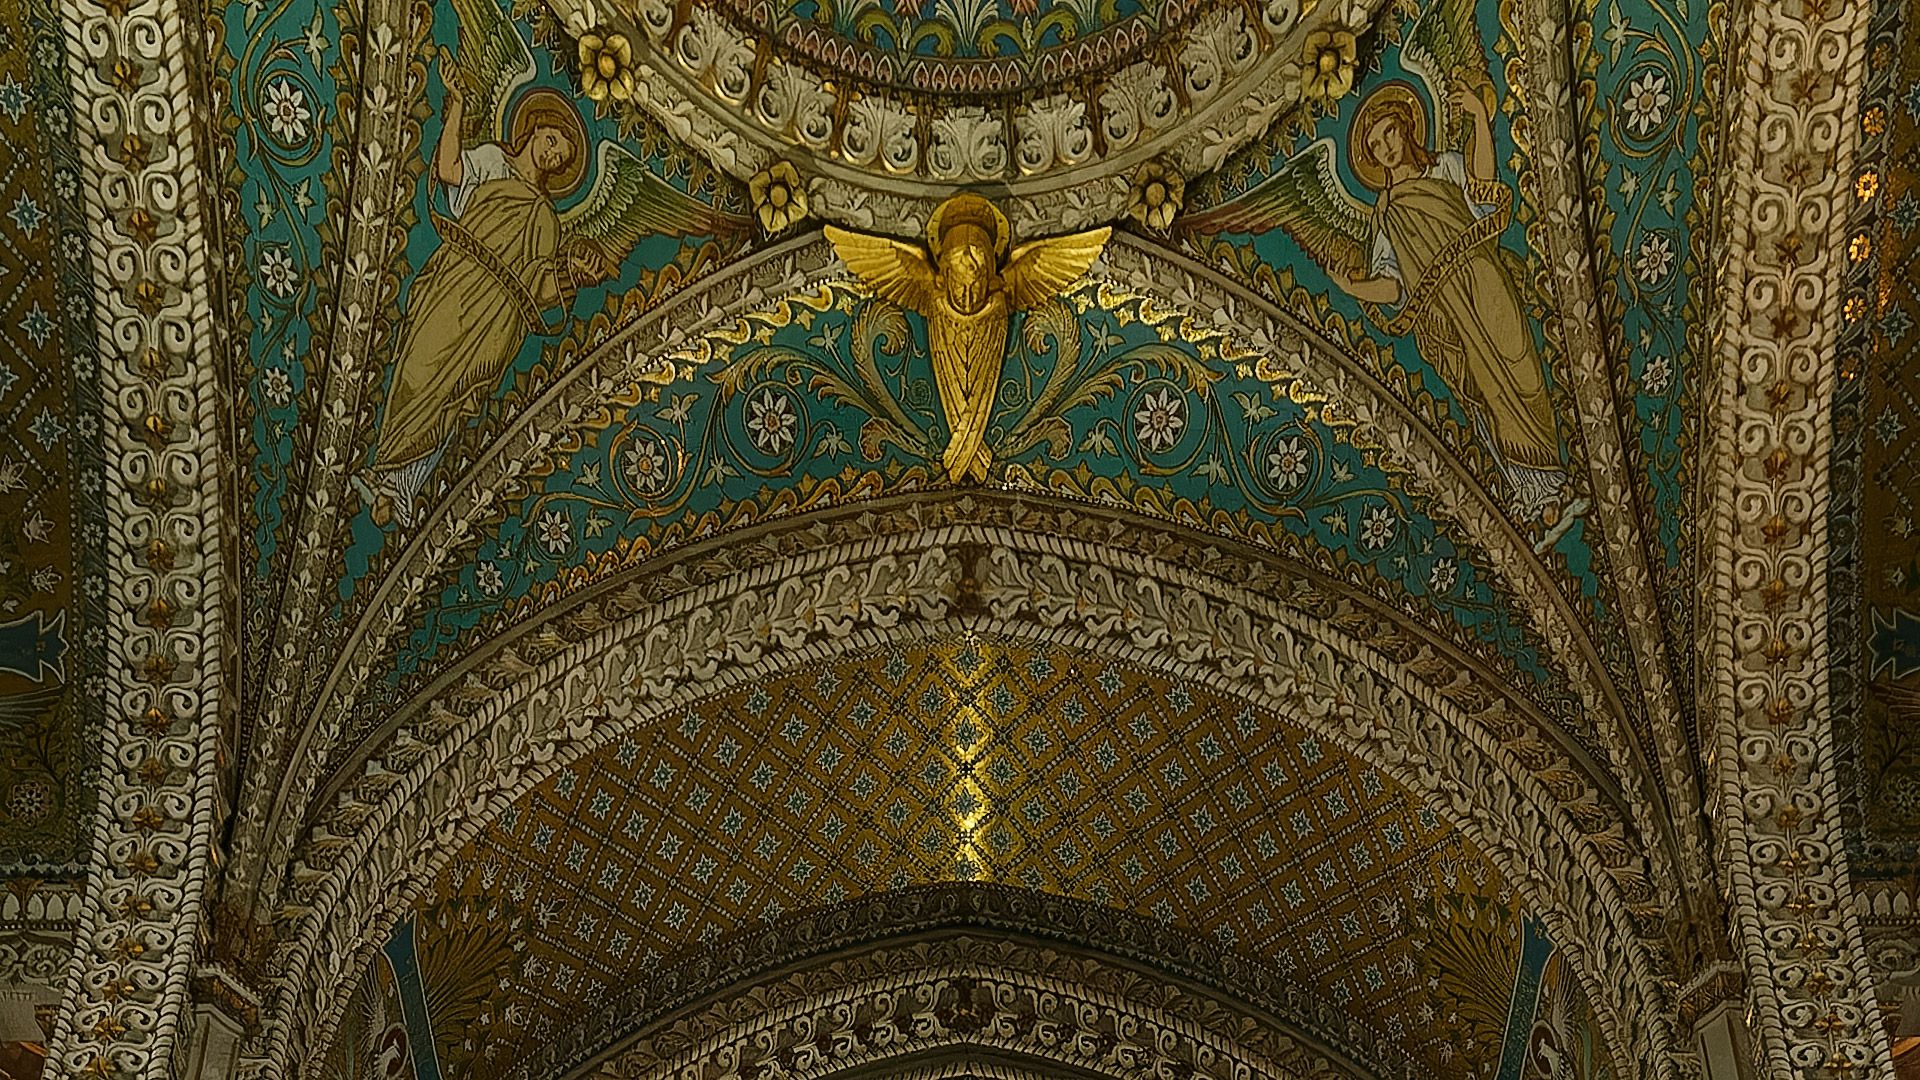
Let's now zoom super close (800%) to get a better look.

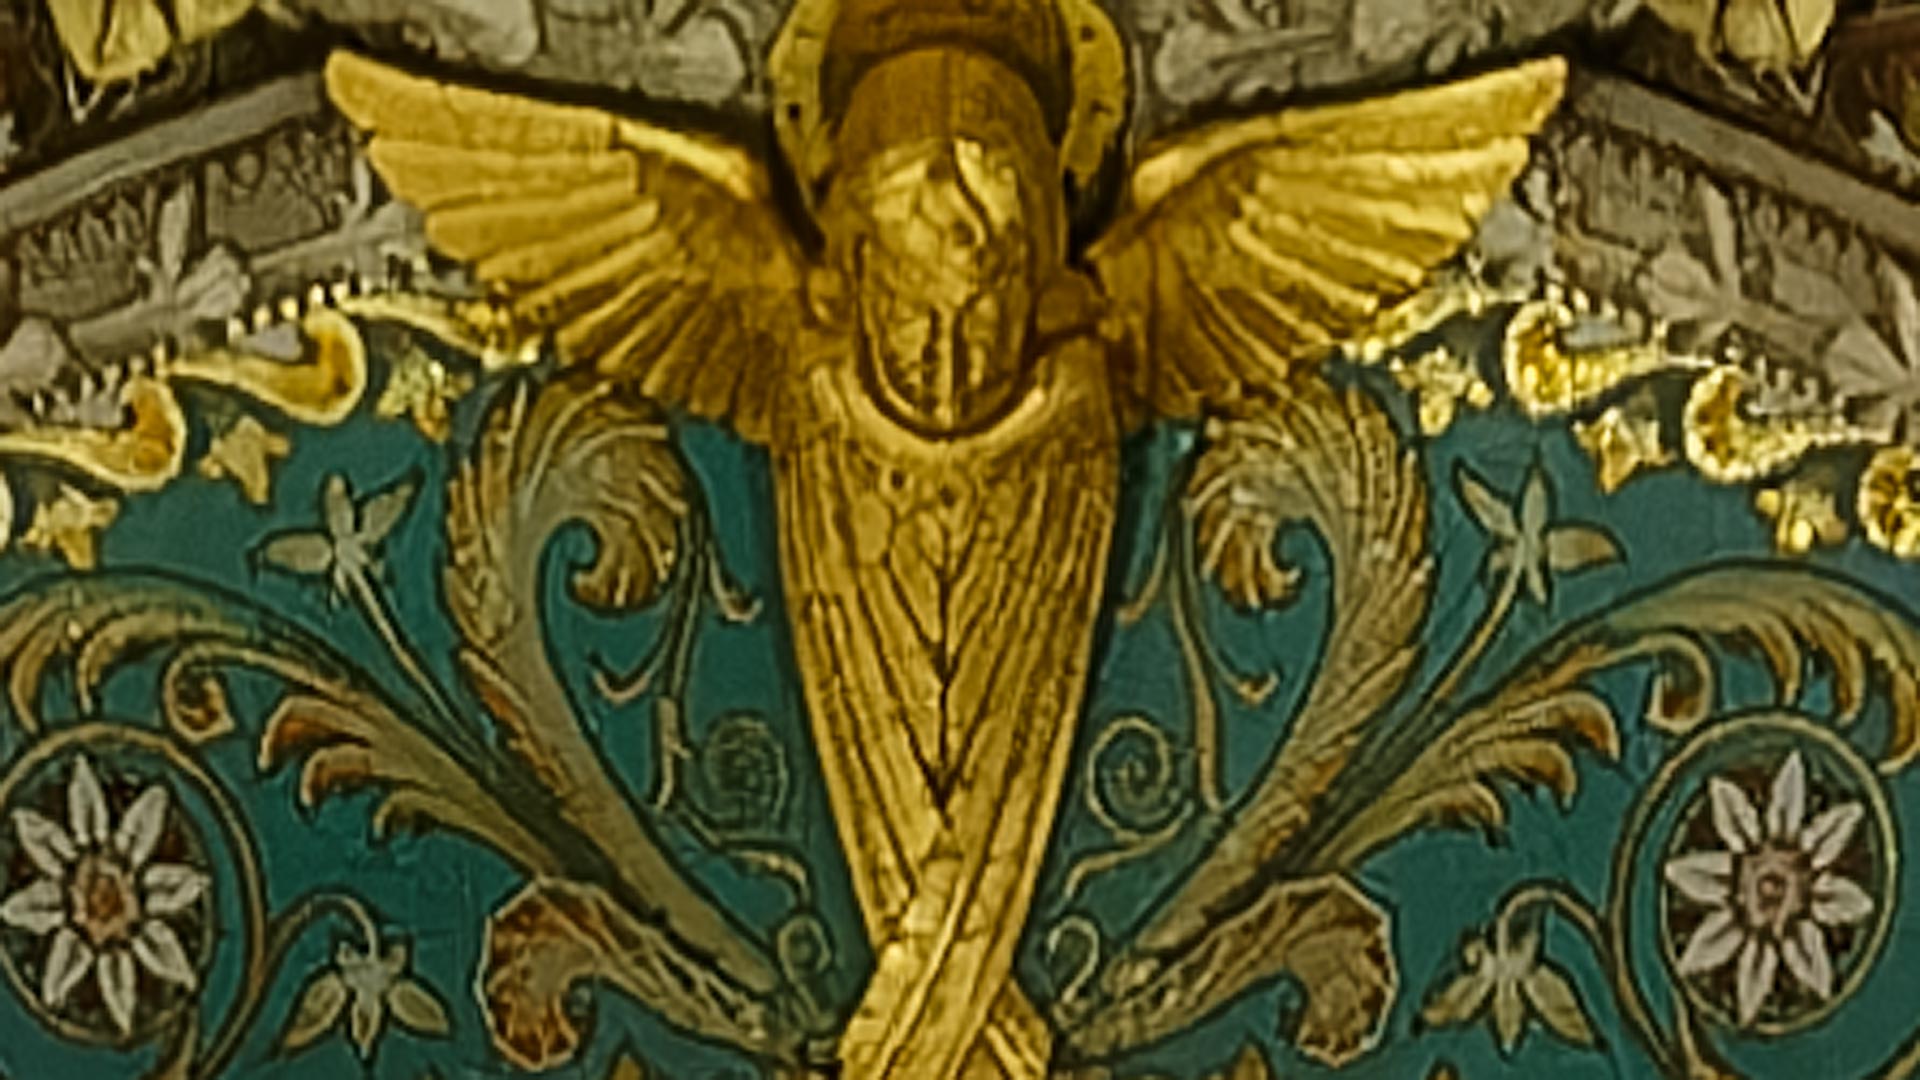
At this extreme scale, we can see that DeepPRIME XD denoised and smoothed areas of flat, consistent color (eg, the green areas), while also strengthening thin lines and subtle textures.

Optical corrections
As mentioned earlier, DxO developed their own optics modules to remove anomalies including vignette, chromatic aberration and lens distortion from raw files. These modules are proprietary to DxO products, and are different from lens correction profiles bundled with Adobe Lightroom, Capture One, and any other raw editor.
Optical corrections are configurable with all four denoising algorithms. This is different (and better) than earlier versions of PureRaw that allowed limited control of the raw demosaicing process. With PureRaw 3, everything can be disabled or enabled — even sharpness (aka "Lens softness") which was one of my main criticisms of earlier versions of PureRaw, for I much prefer sharpening at the end of a photo edit.
The new "Lens distortion" parameter includes four options: "Image cropped to original ratio", "Maximum rectangle" and "Complete image area". The latter corrects distortion, but does not crop. This retains maximum field of view, and allows the photographer to decide what to do with the extra areas (eg, Photoshop's "Content Aware Fill", distortion transforms).
Exporting raw files in PureRaw 3
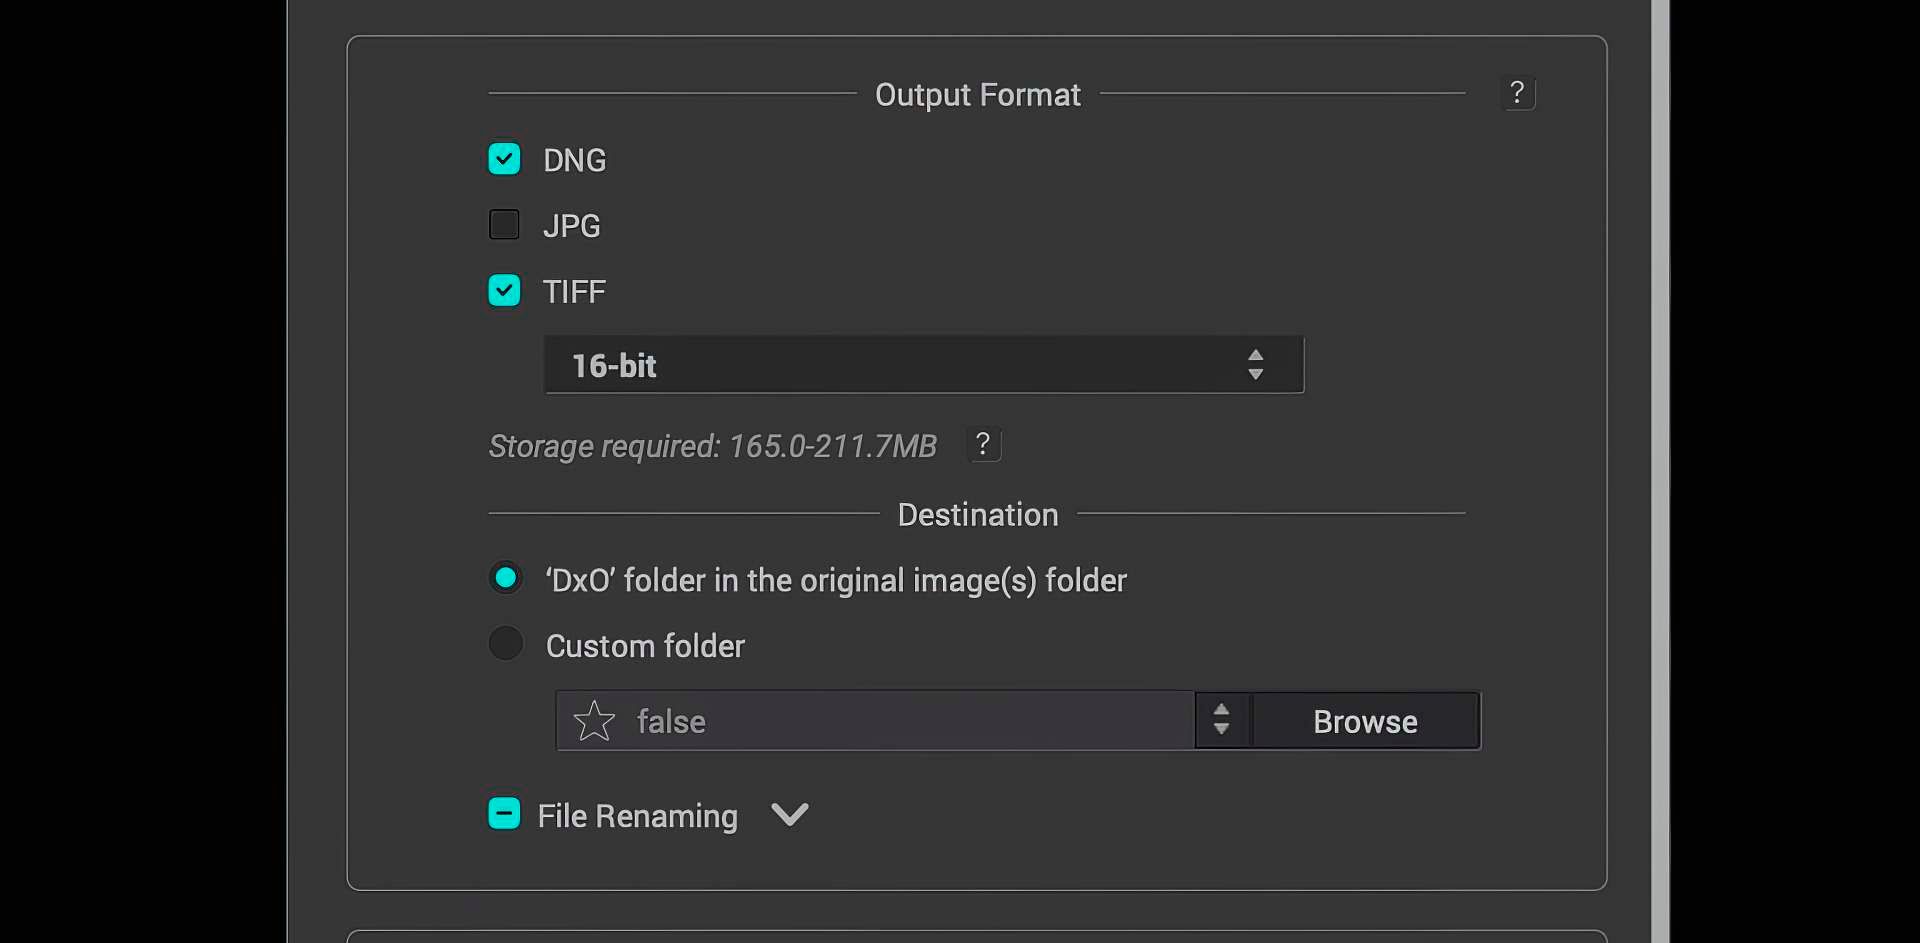
PureRaw 3 expands output options with additional file formats including JPG (with quality control between 0 and 100%) and TIFF files (8-bit, 8-bit compressed and 16-bit). Images may be exported in one or more file formats at the same time. I can't think of a reason why I'd ever want to export JPGs or TIFFs, but at least the options are there.
PureRaw 3 DNGs are linear DNGs, which means the files are uncompressed and are at least 3x larger than the original raw files produced by a digital camera. This means they take up considerably more disk space.
PureRaw 3 can also send processed files to a separate application for import. Default options include Lightroom, Lightroom Classic and Photoshop, but you may select alternative software from your local operating system.
File management tips using PureRaw
As mentioned above, DNG files exported by PureRaw are 3x larger than camera raw files. To conserve space, it may be tempting then to delete straight-out-of-camera raw files after PureRaw generates optimized versions. But this would be a big mistake.
All raw processing applications — including PureRaw — are continually updated with new lens correction modules, not to mention artificial intelligence. These tools work best with the original raw file data created by a camera, so it's best to always hold onto those files just in case you need to process them again in the future.
For me, I only use PureRaw on select images. The images I want to be at their absolute best prior to editing. This reduces the amount of necessary disk space and keeps file management simpler.
Room for improvement
PureRaw can produce incredible results, but it doesn't work wonders with every image. PureRaw performs best with images containing "good bones" but also technical defects like high noise, poor detail and soft corners. Put simply, the worse the image (within reason), the older the raw file, the more dramatic and impressive PureRaw's results can be.
On the other hand, import a clean, well-exposed raw file captured using a recent high-quality mirrorless camera and lens, and there's often little if any difference between Lightroom's lens correction profiles and PureRaw (unless that image contains elevated levels of noise). So your mileage may vary depending on the raw files you have.
The new DeepPRIME XD denoising algorithm does create the appearance of additional detail compared to DeepPRIME, but the difference is barely significant. In my test images it was difficult to tell the difference between DeepPRIME and DeepPRIME XD unless zoomed-in super close. XD may be helpful to photographers who want absolute maximum detail (eg, wildlife photography, macro photography, etc), but in practical use, XD may not be worth the upgrade cost for everyone.
Also worth knowing, the High Quality, PRIME and DeepPRIME denoising algorithms in PureRaw 3 are exactly the same as earlier versions, so if you currently use an older version of PureRaw and are happy with the options you currently have, you won't see a qualitative difference.
My biggest criticism of PureRaw 3 is that the standalone application still cannot display a live preview until after raw files are processed.
I find this problematic because it leads to exporting multiple versions of the same raw file, each using different settings, simply to see which settings produce the best qualitative results, then deleting the extra raw files thereafter.
I believe a live preview would have been a more useful addition to PureRaw 3 rather than a file queue, for as mentioned earlier, I only process select raw files, not entire folders. Perhaps the queue will be helpful to some users, but I will likely never use it.
Speaking of user experience, I also don't care for how image selection works in PureRaw's lightbox view. If I click on one image, then another, both images are selected. This is different from established user interface patterns in apps like Lightroom and others where a user must press Shift or Command/CTRL on their keyboard to select more than one image. I find myself constantly having to deselect previous selections, or unselect everything, to avoid this unusual pattern. My advice? Use keyboard modifiers like every other app to use file multi-select when needed, not by default.
Final thoughts
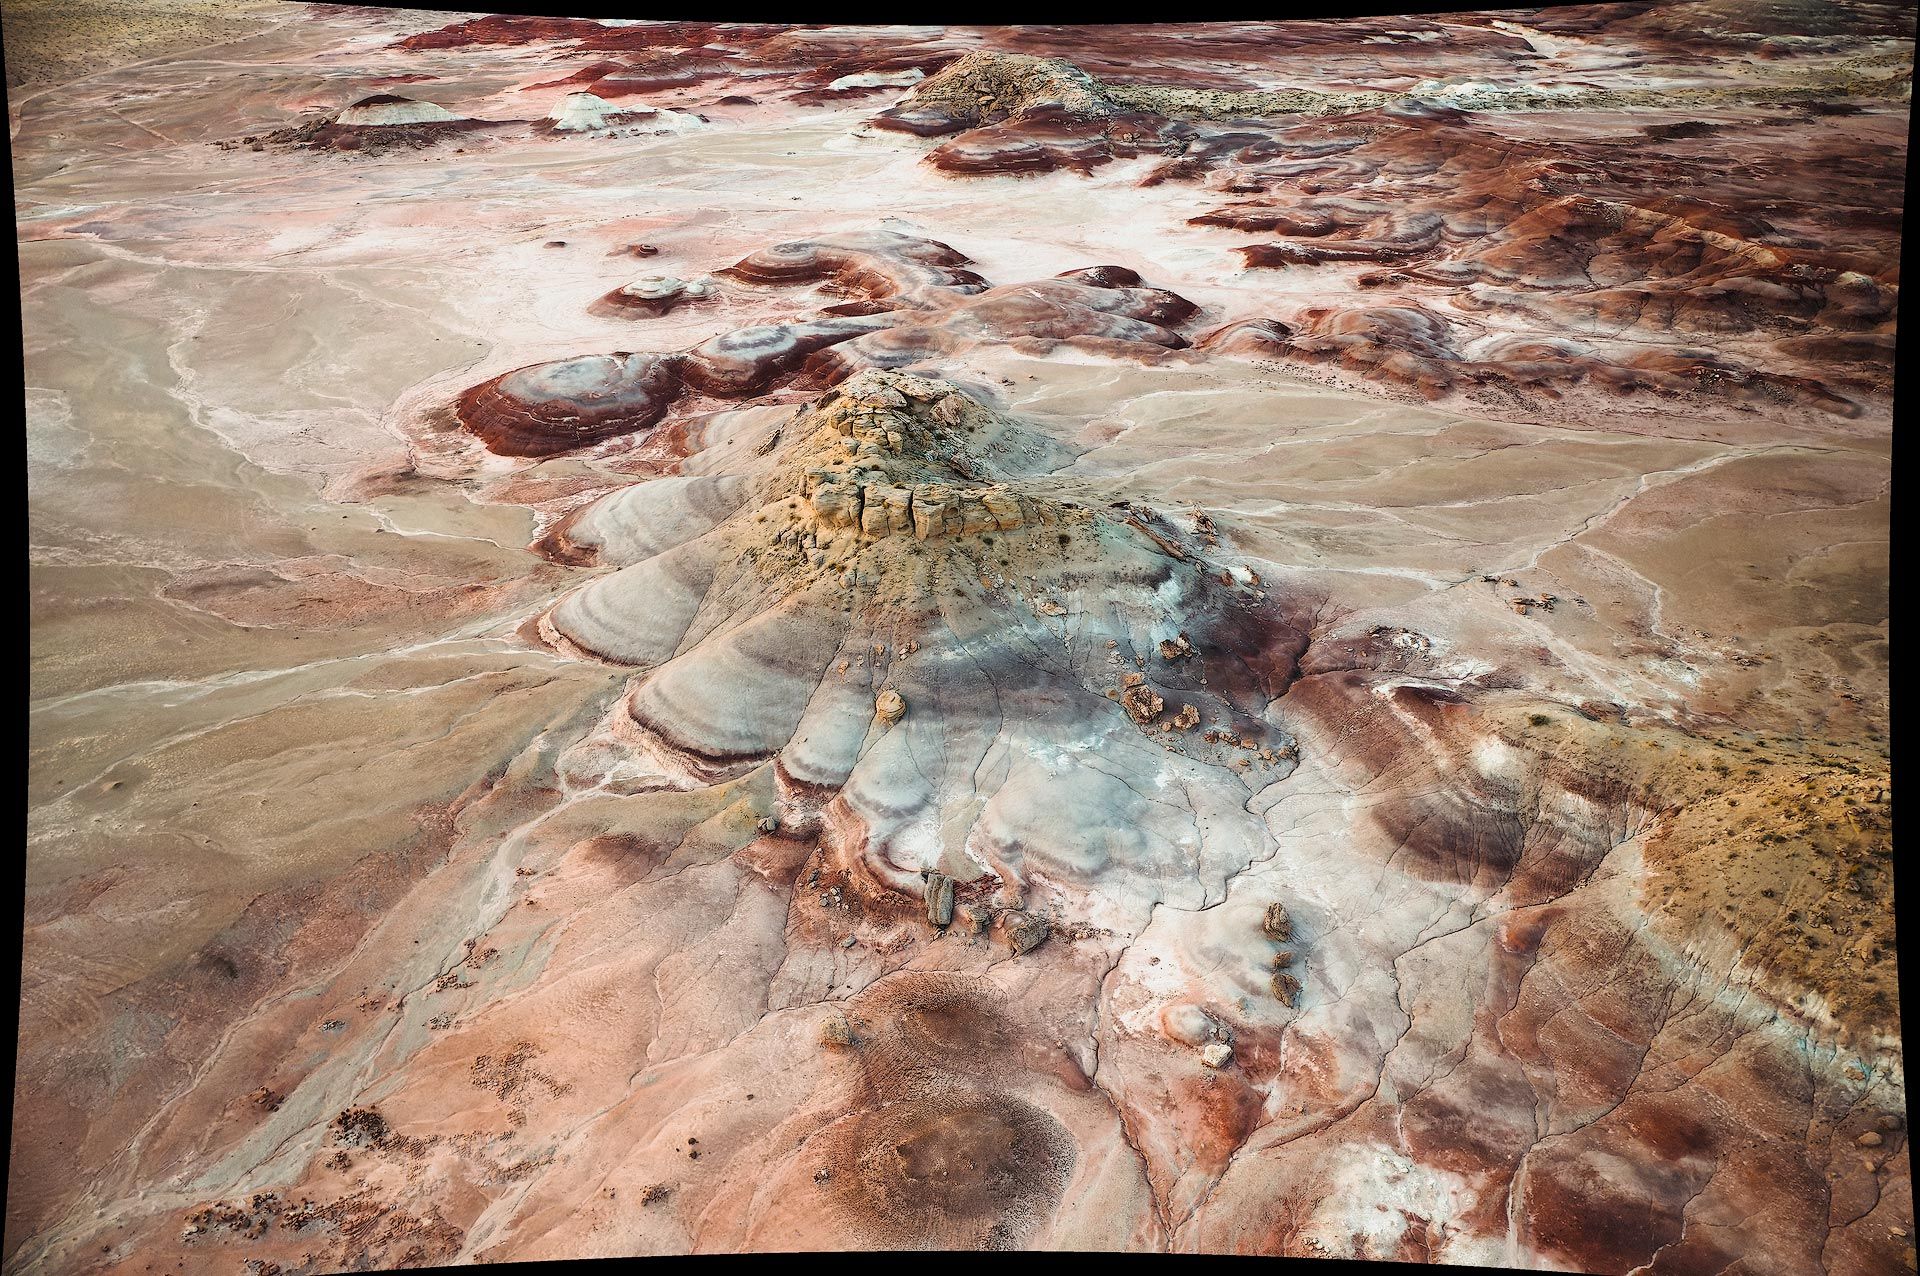
I've been a fan of PureRaw since the beginning, and frequently use it to process my own raw files. I find it especially helpful when processing raw files captured using older, lower-resolution DSLRs and aerial images from DJI drones. PureRaw can absolutely breathe new life into sub-optimal raw files and transform them into new, higher quality images ready for additional processing.
DxO's optical corrections are also fantastic, and are consistently better in my experience than the lens correction profiles used by Adobe Lightroom, Lightroom Classic, Camera Raw and Capture One. DxO's profiles do a better job of removing optical vignette, balancing exposure from corner to corner, and do a solid job of correcting distortion (especially with drone images, as seen in my video review).
Perhaps more than anything, I like the peace of mind PureRaw provides, for when I process raw files I know I'm getting a better version than what my camera captured originally. That alone is worth something. It's also incredibly satisfying revisiting years-old raw files and seeing what PureRaw can do with them. I've rediscovered a number of images doing just this.
I have my grievances with PureRaw's user interface, but it's still a great app. Any photographer looking to further enhance their digital raw files should definitely give it a go.
PureRaw 3 pricing, free trial
DxO PureRaw 3 costs $129 (115 £) for new licenses or $79 (69 £) for those upgrading from PureRaw 1 or 2. Of note, PureRaw 3 is a one-time purchase, not a subscription. This means you may use the software for as long as want without paying a monthly fee. Nice to see a software company still providing this option for photographers who prefer purchasing software.
The best way to experience DxO PureRaw 3 is by downloading a free trial for macOS or Windows. The app is fully functional for thirty days, and you'll then be able to test the app with your own raw images.