Creating black and white images with Nik Silver Efex
Taking black and white photography to the next level with Silver Efex, part of DxO's newly updated Nik Collection v6
DxO has released Nik Collection v6 ($149), an updated version of the classic Nik photo editing plugins, some of which have existed nearly as long as Photoshop itself (28 years, at the time of this writing). The collection has had a long and colorful history, including being sold to Google in 2012 (along with Nik's Snapseed mobile app), released as free software by Google in 2016, then acquired by DxO in 2017 who subsequently redesigned, updated, and re-released Nik Collection as (once again) paid desktop plugins.
Nik Collection v6 includes eight plugins compatible with Adobe Lightroom and Photoshop: Color Efex, Analog Efex, Dfine, HDR Efex, Viveza, Sharpener, Perspective, and Silver Efex. Each plugin offers something unique and is worth exploring and experimenting with, but for me the crown jewel of Nik collection is Silver Efex.
Silver Efex is a dedicated black and white photo editor. Lightroom, Photoshop, and other photo editors can of course create black and white images, but Silver Efex offers more sophisticated contrast, tonality and grain tools in comparison. Silver Efex also includes 28 black and white film emulations inspired by Ilford, Kodak, Fomapan, Rollei, Agfa and others.
- More contrast and tonal adjustment tools than Lightroom or other apps
- Natural, analog-like film grain
- Non-destructive editing of TIFF images
- Popular film emulations including Ilford, Kodak, etc
- Works well with Lightroom and Photoshop
- One-time purchase. No subscriptions.
- Application feel sluggish and slow at times
- U-Point local adjustment tool feels dated
- Confusing grain tools
- Cannot edit raw files (only TIFF)
- User interface could use design updates
Preparing images for Nik Silver Efex
Nik Collection plugins (including Silver Efex) cannot edit raw image files. They only work with rasterized images, preferably 16-bit TIFFs. This means a little extra work preparing raw images in Adobe Lightroom for import into Silver Efex.
For best results, I recommend starting with a color raw file and correcting lens distortion, chromatic aberration, and white balance. Would also be good to remove noise and optical vignette (either using Lightroom itself or DxO's other excellent app, PureRaw).
If the raw image is over or underexposed, or has very bright highlights or dark shadows, it's also a good idea to lower contrast. The raw image may look flat, but pushing tonal values towards the middle of the histogram will help make the image more malleable when adding contrast in Silver Efex. No need to convert the image to black and white beforehand (Silver Efex will handle that).
Another important consideration is cropping. Silver Efex cannot crop images, nor can it un-crop and revert an image back to its original aspect ratio. To play it safe, I recommend not cropping a raw file prior to import. That way you have maximum flexibility in the future with the TIFF image created by Silver Efex.
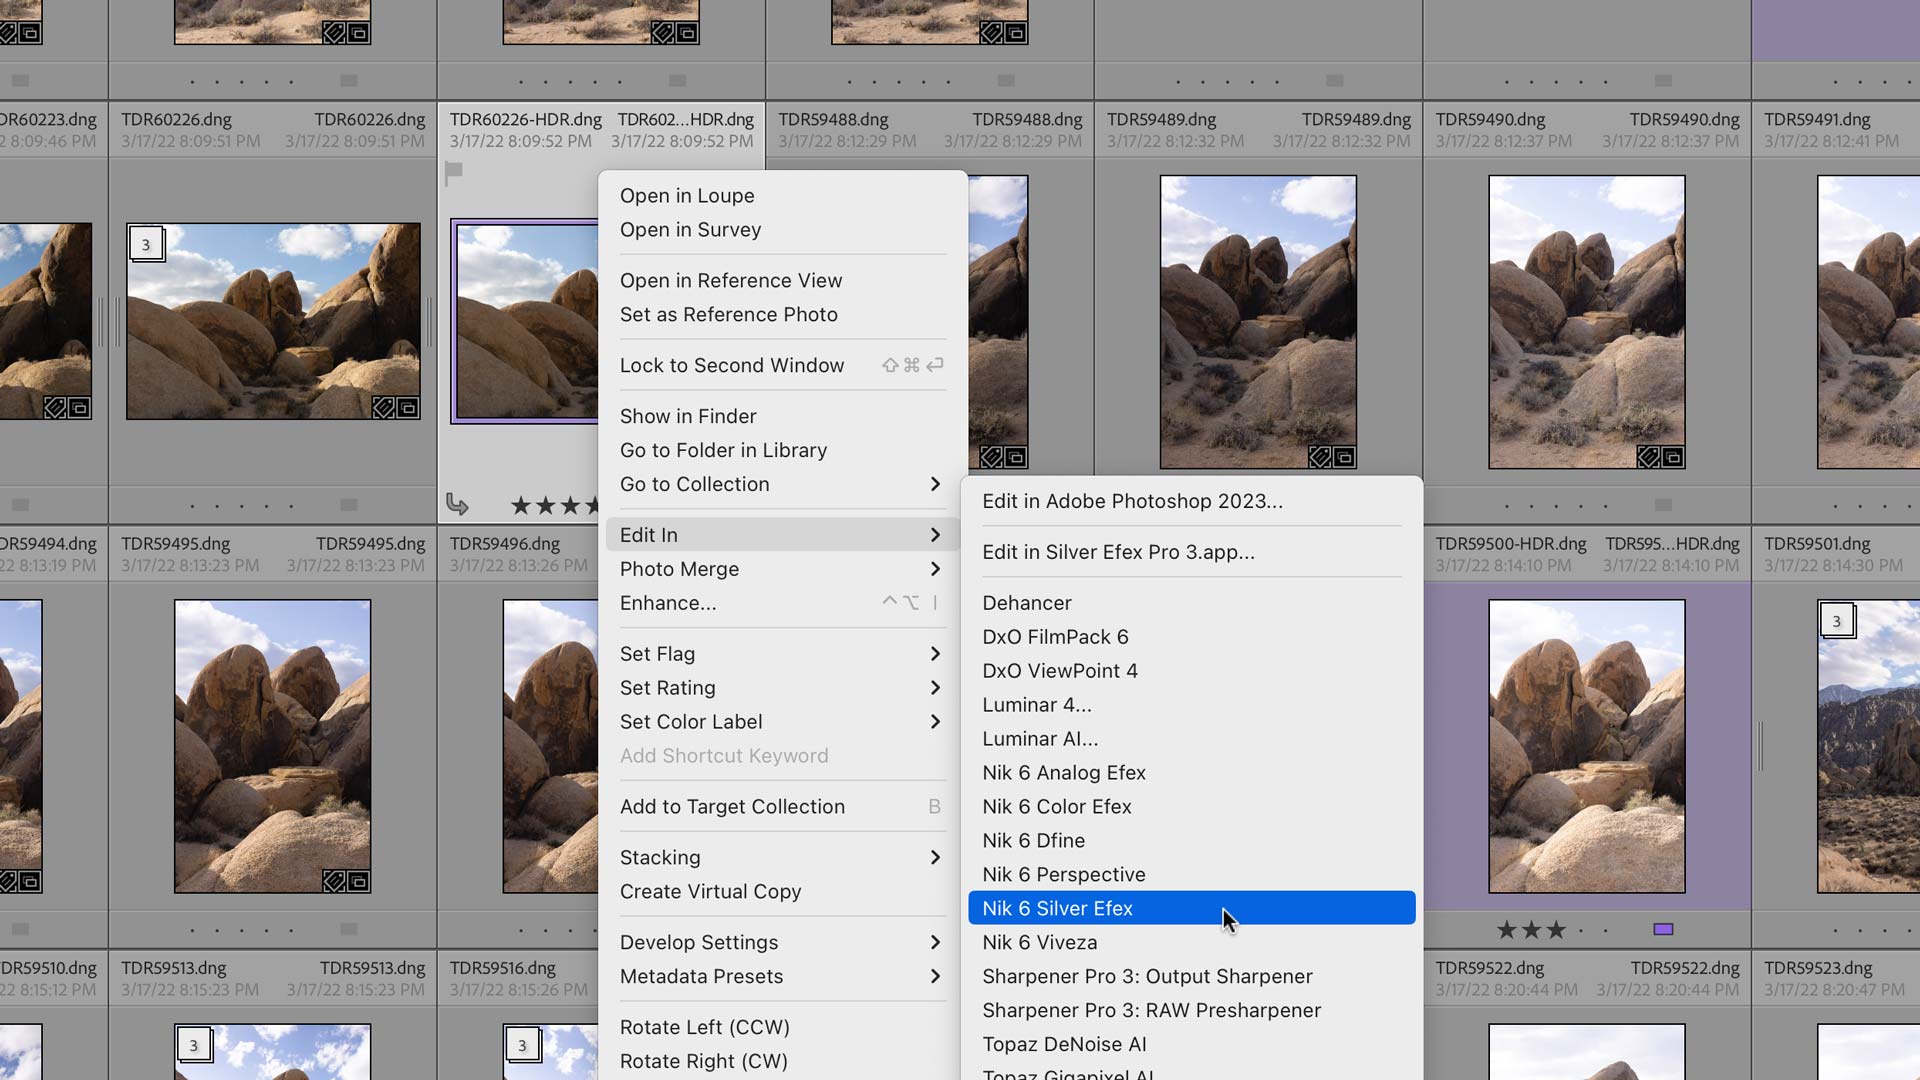
To import a raw file into Silver Efex, simply right-click on a raw image file and select "Nik 6 Silver Efex" from the contextual menu, as shown below.
A new window will appear asking whether you want to Edit a Copy, Edit a Copy with Lightroom Adjustments, or Edit Original. When editing a new image from scratch, it's best to select Edit a Copy with Lightroom Adjustments (Edit Original will be used later).
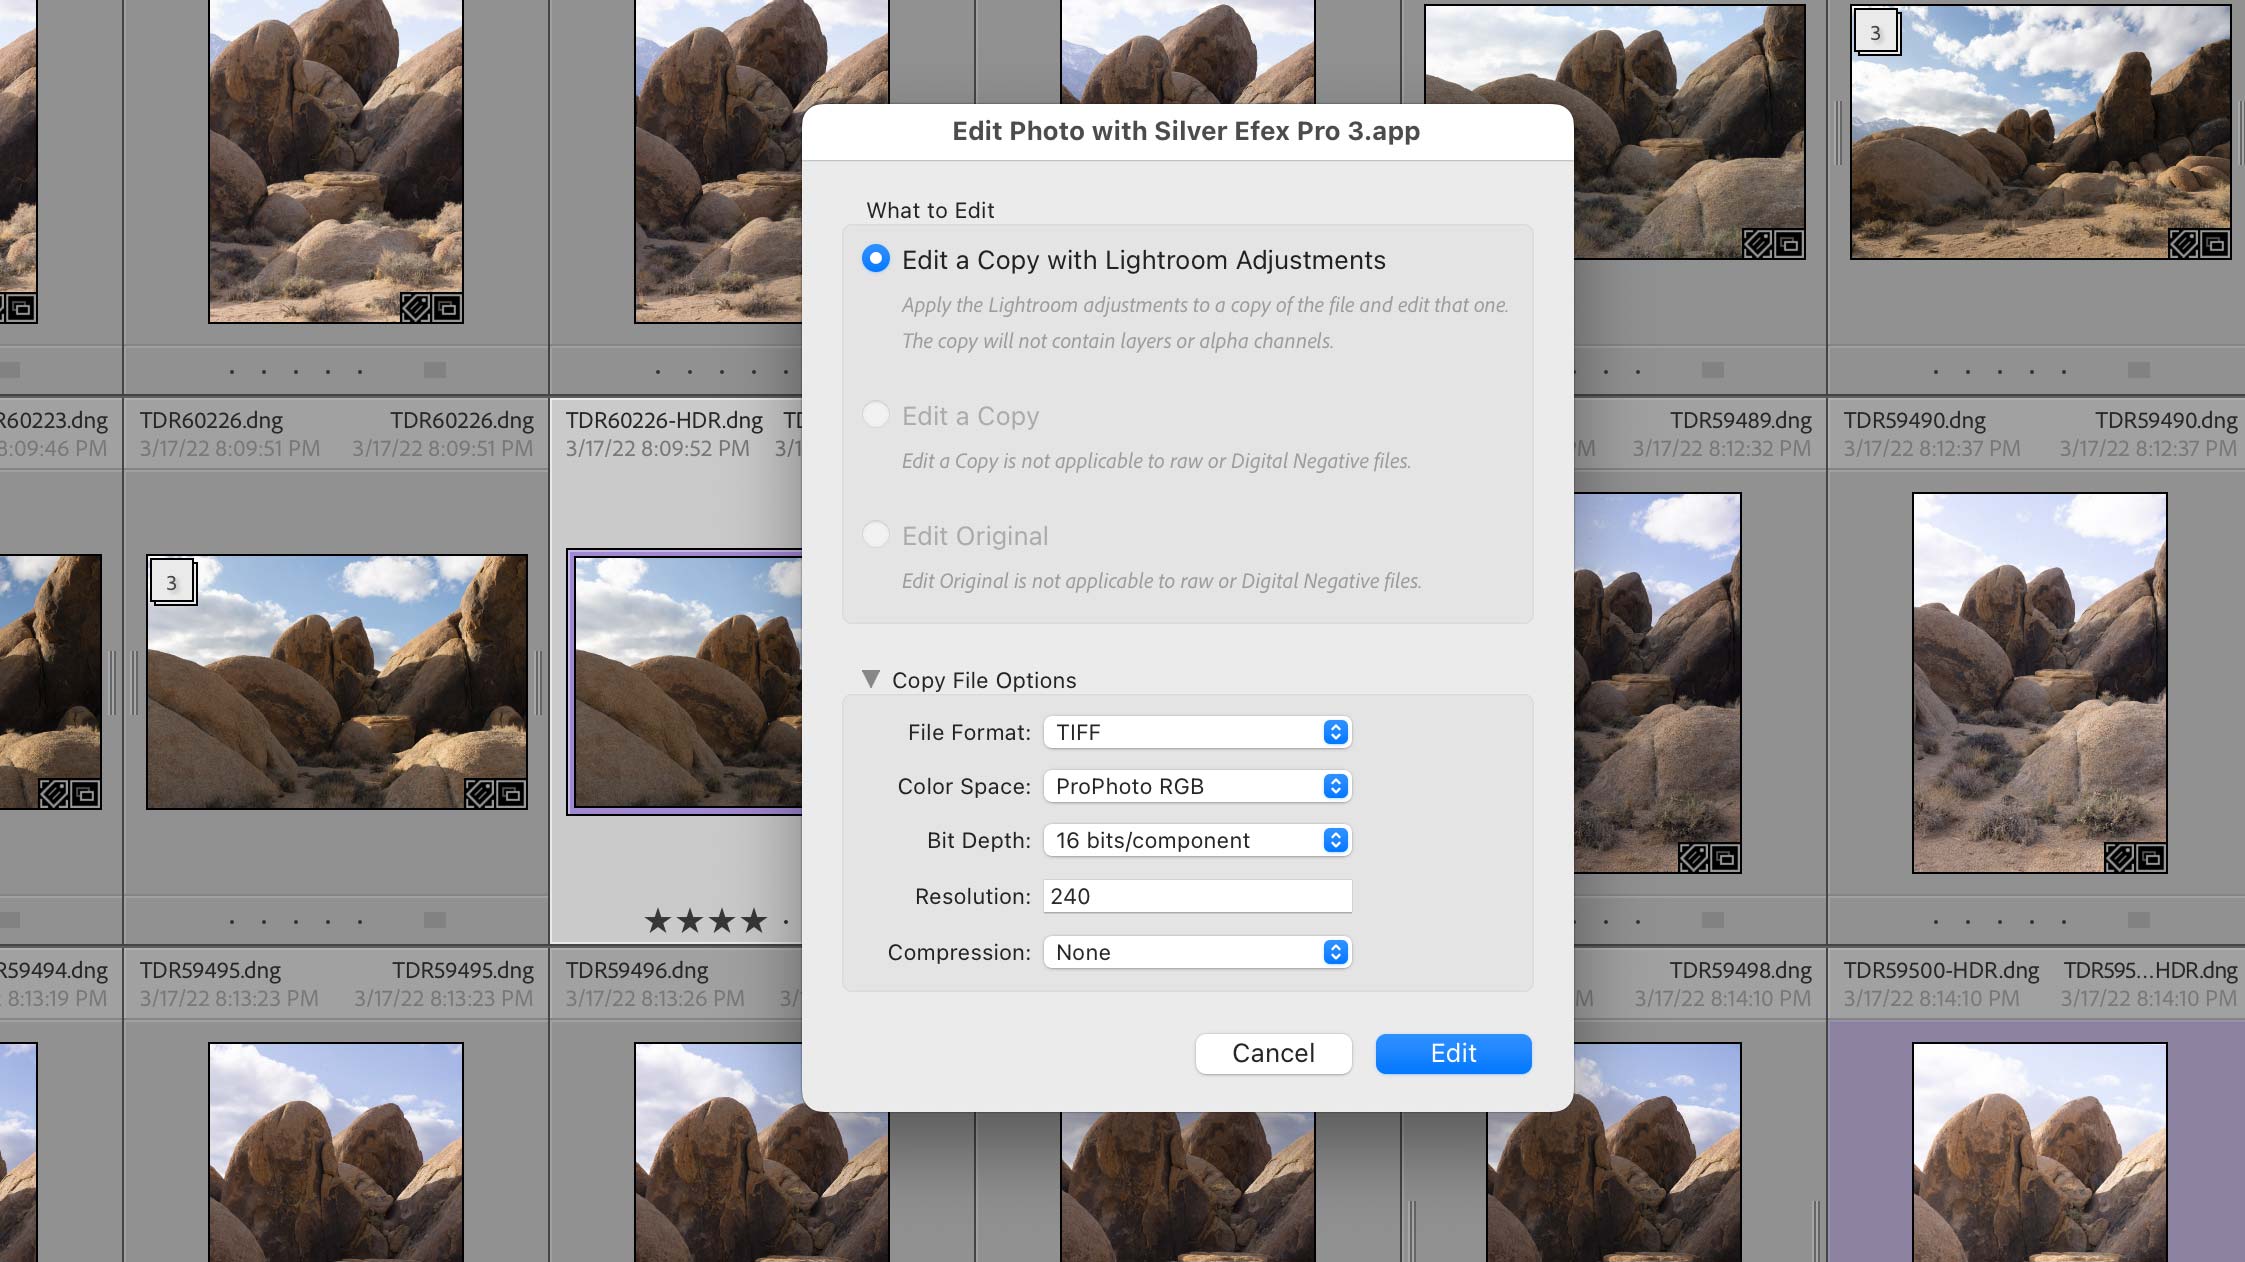
Default image file settings are 16-bit TIFF, sRGB at 240dpi with no compression. I use the ProPhoto RGB color space instead of sRGB to ensure I'm capturing the largest and most accurate color information possible from the raw file when it is converted to monochrome. Not sure if ProPhoto RGB really makes that much of a difference, but I select it anyway for peace of mind.
After clicking Edit, a copy of the original raw file is generated, automatically added to the Lightroom catalog, and opened in Silver Efex as a monochrome rasterized image, ready to edit.
Recommended image editing workflow in Nik Silver Efex
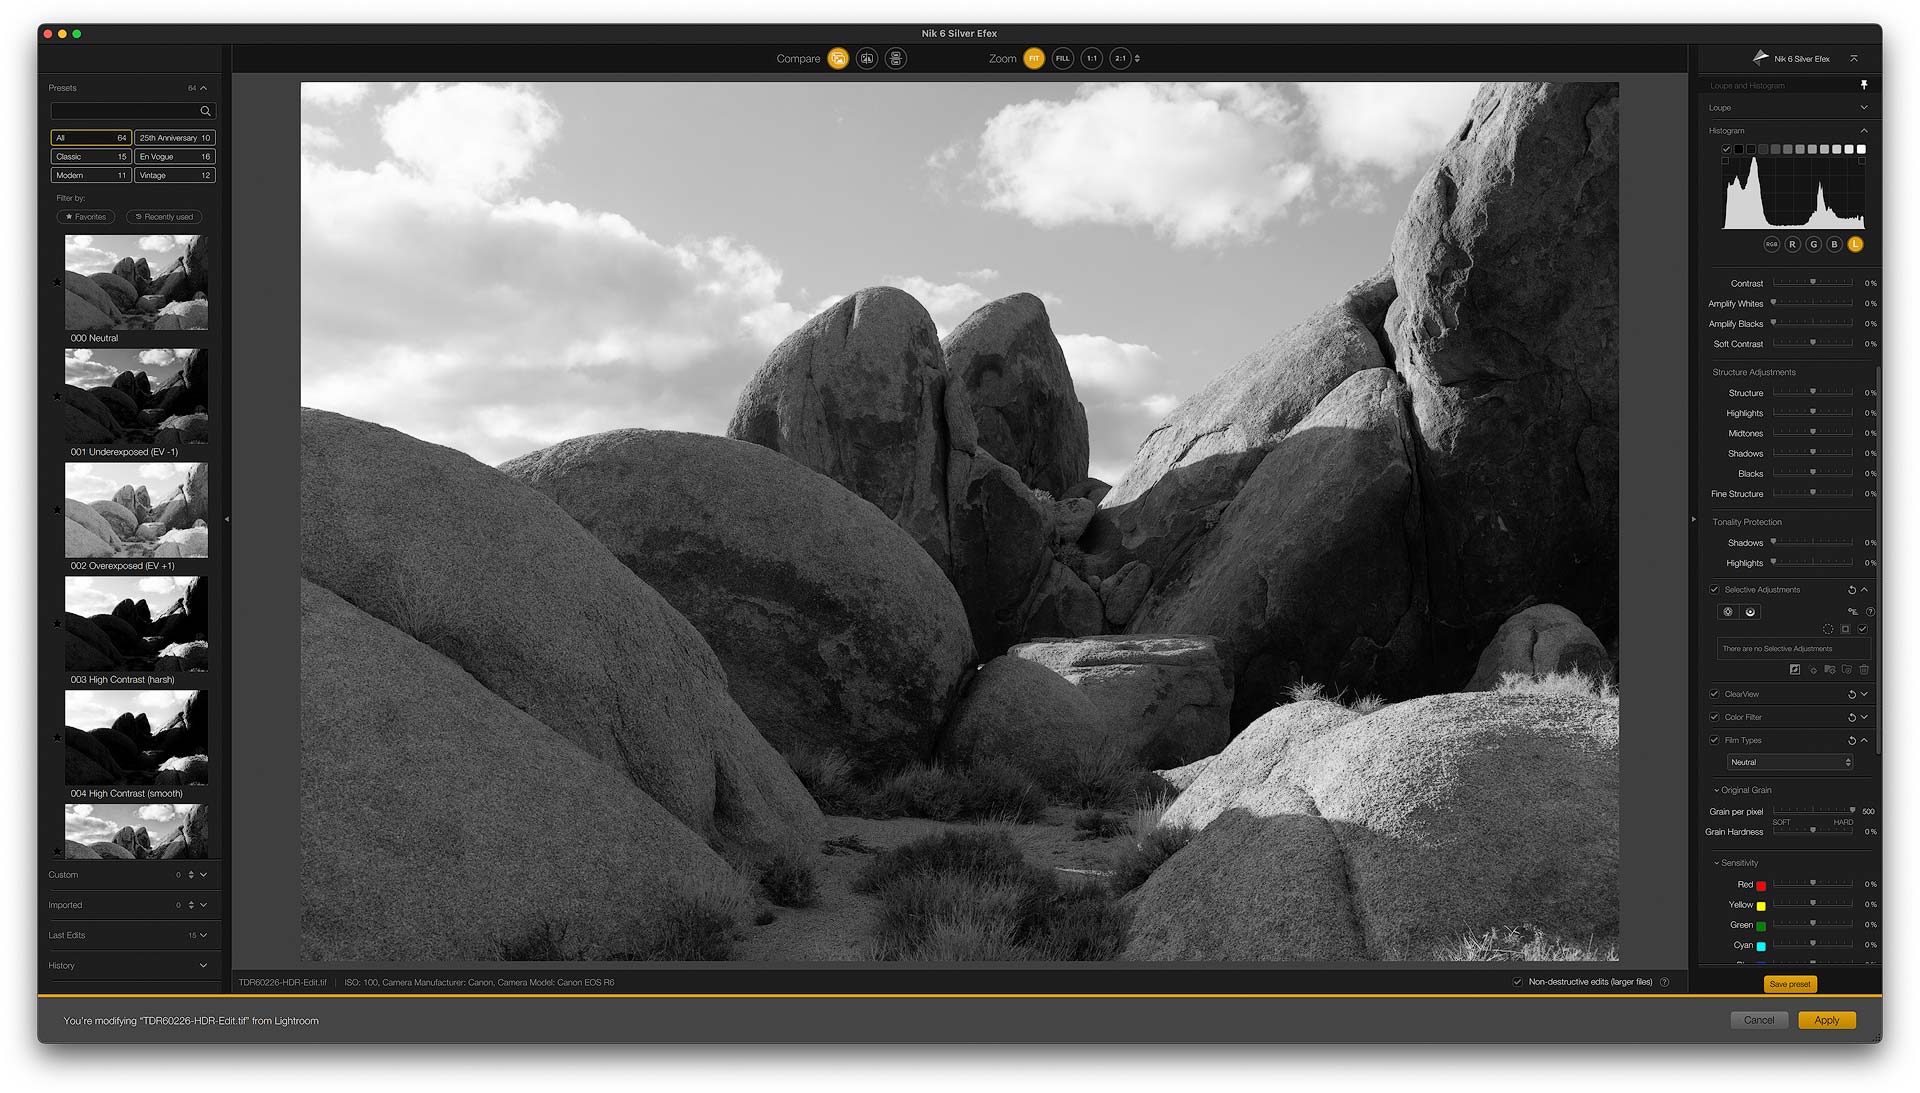
Silver Efex's interface is similar to other desktop photo editing tools. There's a large preview window in the middle, a list of editable settings on the right, and a large collection of built-in presets on the left.
Applying presets from the left column is a good way to quickly see different creative opportunities with an image before diving in. If you find a look you like, the preset's edits may be tweaked in the right column. You can also create your own presets for future use. Silver Efex also automatically saves a running history of edits from previous images that can be re-applied.
I recommend beginning an edit by applying a color in the Color Filter panel. This emulates the behavior of physical color filters traditionally used by black and white photographers. Options include Neutral (no filter), Red, Orange, Yellow, Green and Blue. General rule of thumb, apply whichever color accentuates a subject best. Warmer filters brighten skin tone or anything in the image with a similar hue, and darkens cooler colors like the sky. The green/blue filters do the opposite. I find myself almost always picking either red or orange for landscape images.
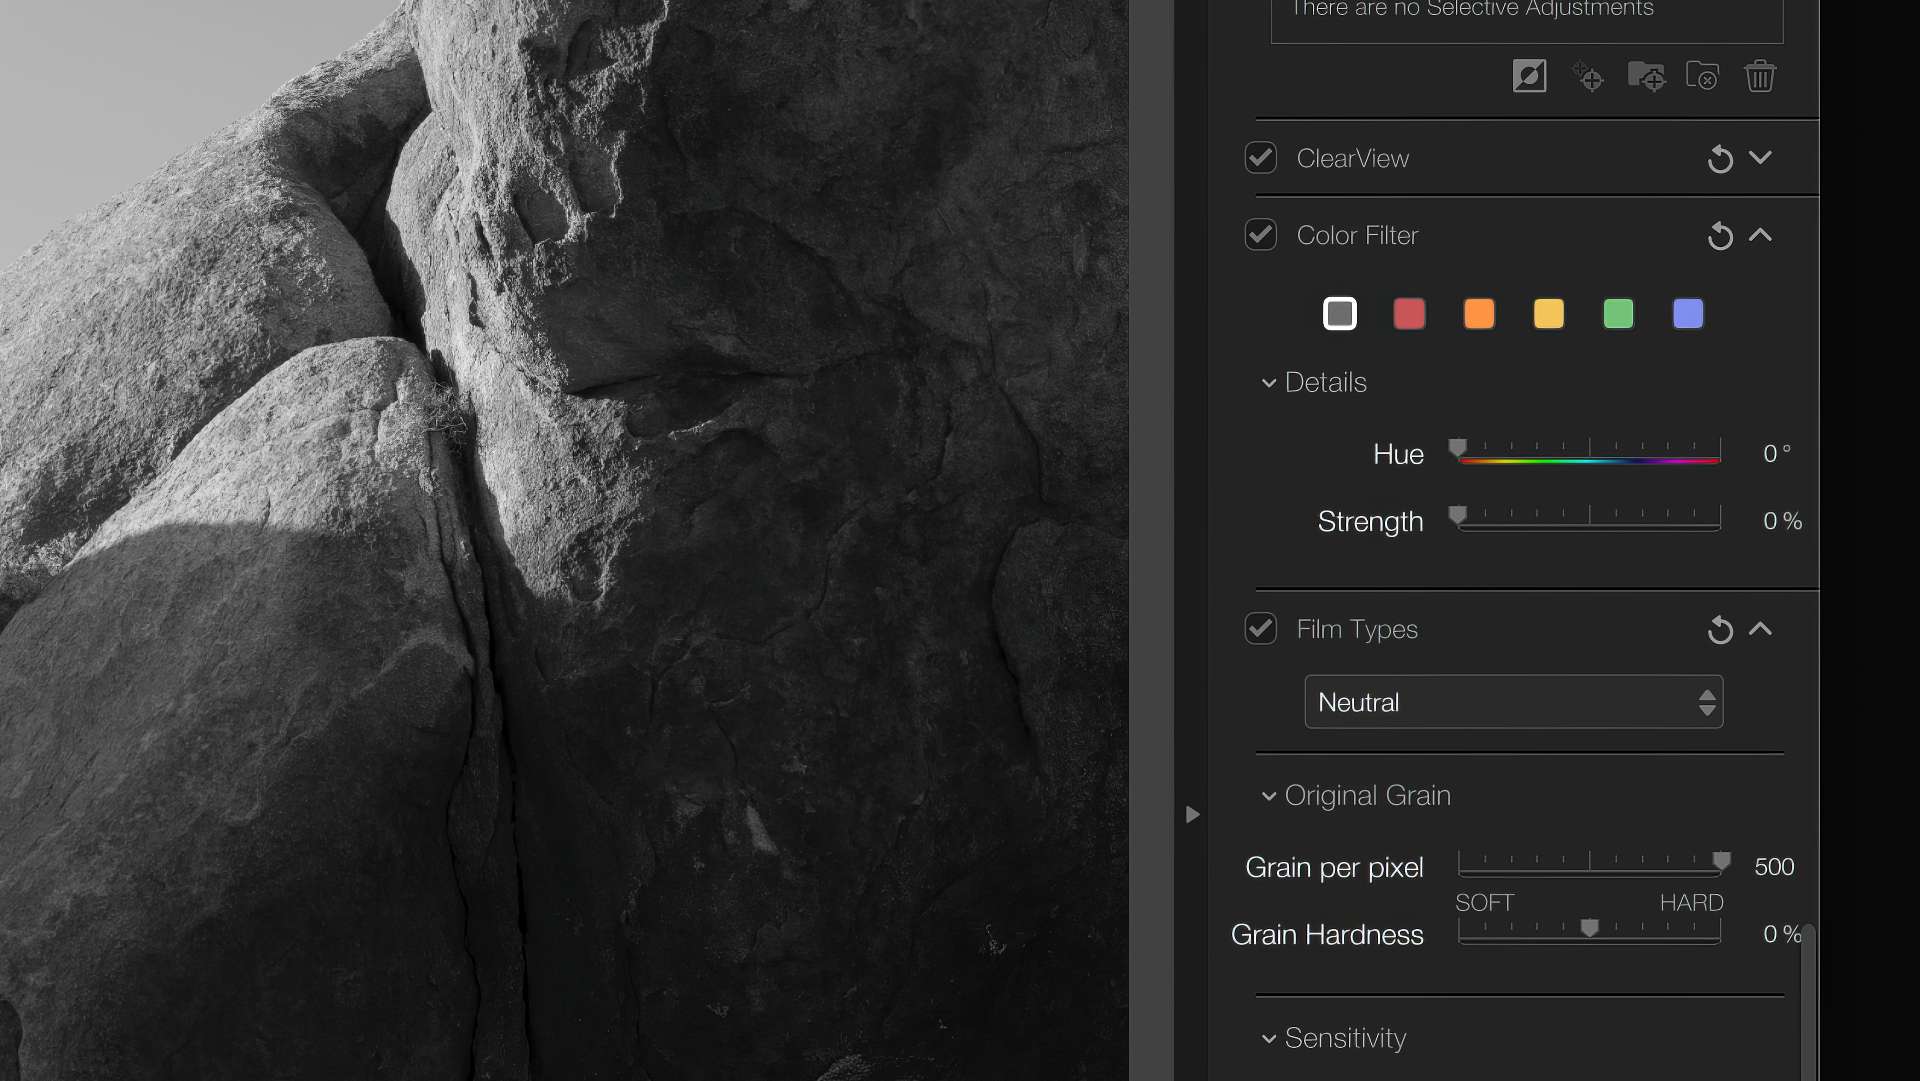
After selecting a color filter (or choosing Neutral for no filter), my next recommended step is applying an appropriate film emulation from the Film Types dropdown. Silver Efex includes 28 black and white film stocks organized by box speed. I like using the film emulations because they save time, and quickly create a tried-and-true black and white film look. Each film emulation includes custom values for tone curve, color sensitivity, and film grain that match the real-world appearance of each film stock.
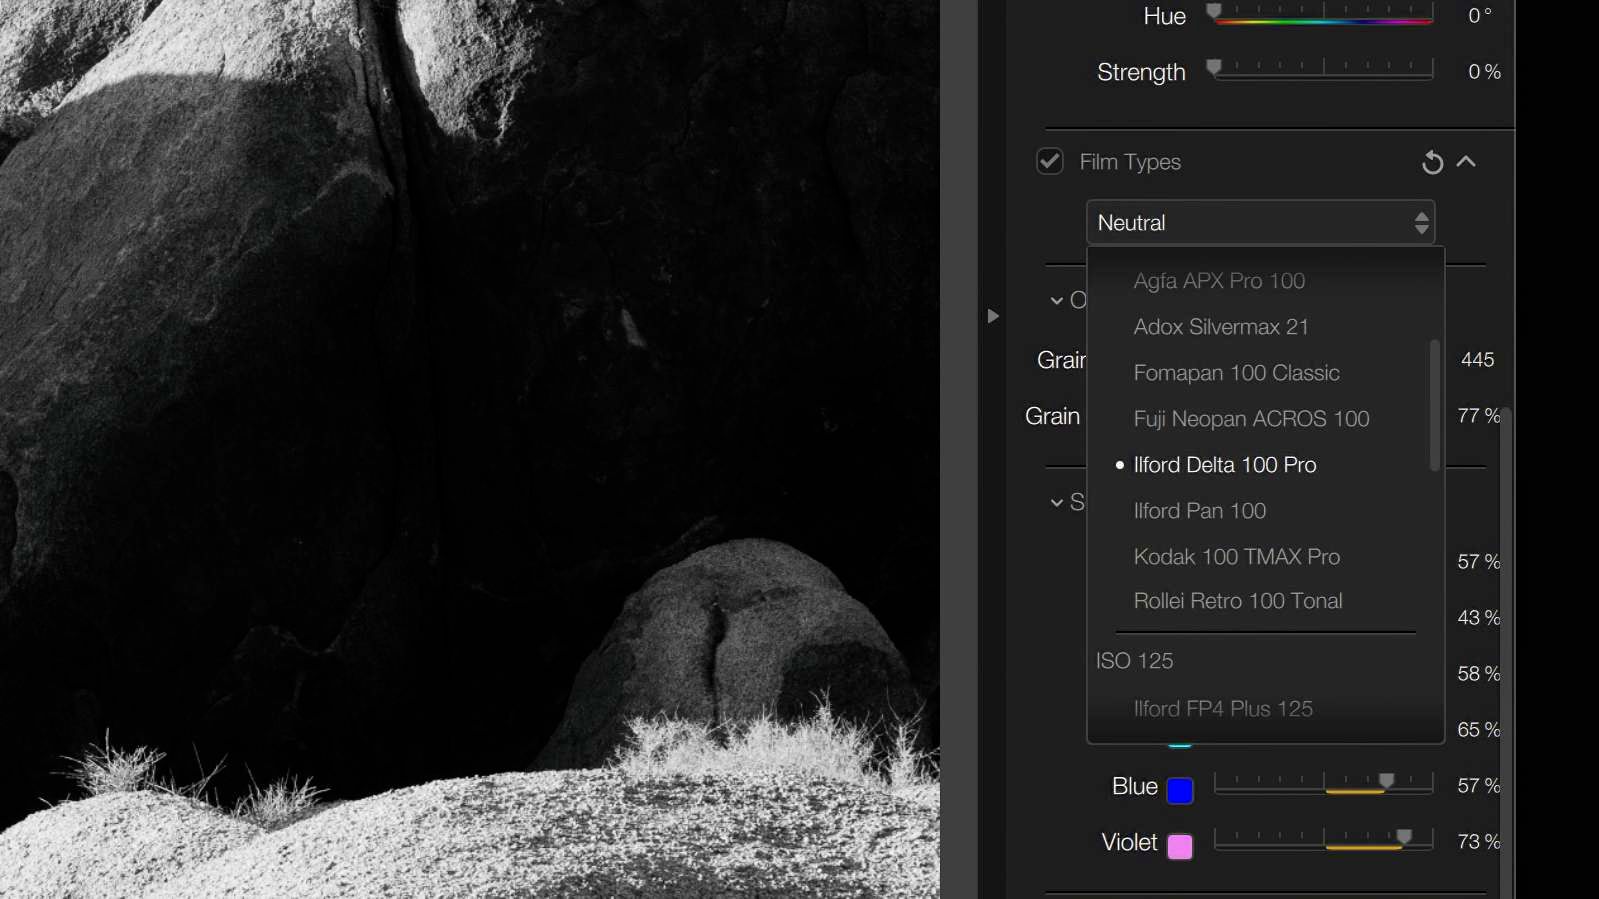
Film grain size and hardness emulate the natural grain of each film stock. Meaning, if you select an ISO 400 film like Kodak T-Max, the image will have more noticeable grain than an ISO 100 film like Ilford Delta 100.
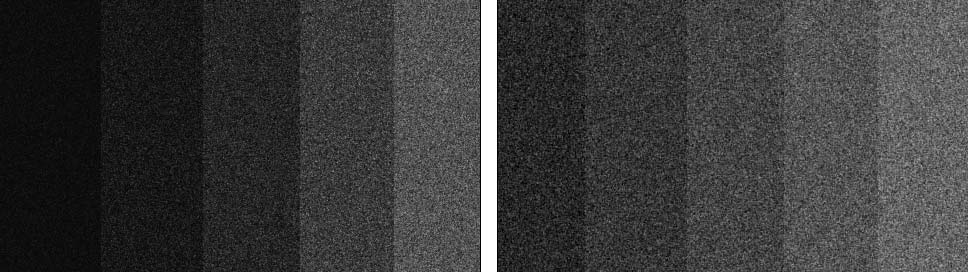
To my eyes, Silver Efex film grain appears more natural than Lightroom grain. Silver Efex grain blends into each tonal region and retains contrast, as opposed to Lightroom which appears to simply overlay a blanket pattern that flattens contrast in comparison and doesn't look as natural.
You can see the difference in the following grayscale ramp. The left image shows grain added using the Kodak T-Max film emulation in Silver Efex, while the right is the closest match I could get using the Grain tools in Adobe Lightroom. The brightest value at far right looks more or less the same, but the darker values are quite different. Lightroom's shadows are brightened unnaturally, and its grain looks like an overaly. Silver Efex's grain feels more integrated, and does a better job of retaining contrast.
Another tool in the Film Types panel is Levels & Curves. This functions just like the Tone Curve interface in Lightroom and Camera Raw, but with a twist. Select the black or white point at opposing ends of the curve, then drag. The entire curve moves! Not everyone will love this, but I think it's cool, for then I can make small adjustments to the black and white point without changing the overall tone of the image. I wish Lightroom provided a keyboard shortcut to activate this behavior.
With color filters and film emulation applied, I then move up the right panel to Global Adjustments. This is where brightness, contrast, and micro-contrast (which DxO calls "Structure") may be edited. I like selecting a film emulation first to establish a baseline, then fine-tune tonality and contrast underneath, as opposed to layering a film emulation on top of my own edits after the fact.
Silver Efex provides all the standard tonal sliders including Brightness, Highlights, Shadows, and Contrast, but also includes unique sliders like Midtones (something I've always wanted in Lightroom), Dynamic Brightness (smartly brightens different areas of the image to protect detail), Soft Contrast (increases contrast with a diffused bloom effect in the highlights), and Amplify Blacks/Whites (strengthens values at either end of the tonal scale).
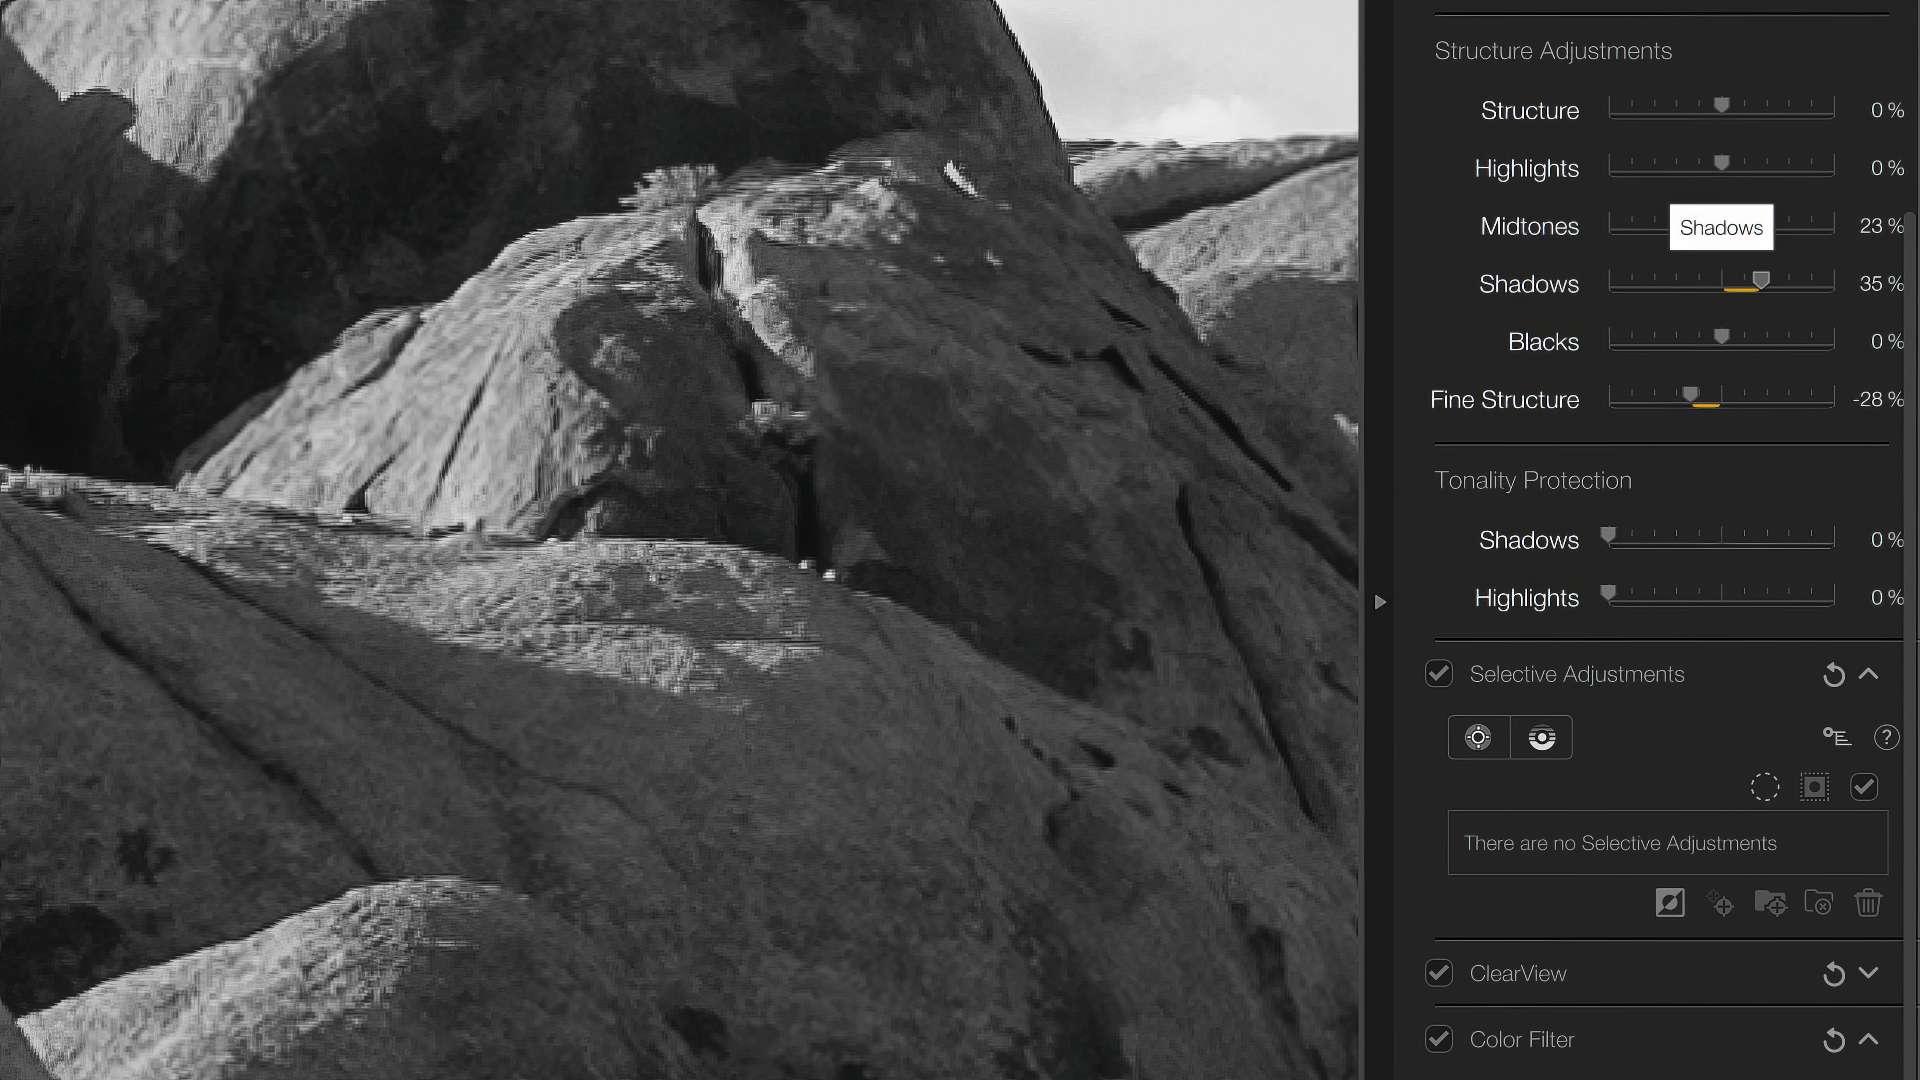
Next up is Structure, which is DxO's term for micro contrast. This is a form of contrast that emphasizes detail and texture by brightening and darkening small areas of tonal separation (similar to the Clarity slider in Lightroom). Structure may be applied globally or selectively to the shadows, midtones and highlights. There's also a Fine Structure tool, which applies global micro contrast but with a lighter touch. I'm especially fond of applying structure to the shadows and midtones to bring out textures in a landscape, but not the highlights to retain softness in those regions.
Underneath the Structure Adjustments panel is Tonality Protection. This is a finishing step after all brightness and contrast adjustments have been applied to help recover more detail in the darkest and brightest areas of an image. Lift Shadows to recover details in dark areas, and lower Highlights for bright areas. The effect and influence of these sliders is very slight, so don't expect huge changes. These are best used as a polishing step at the end of an edit.
Finally, there are finishing options at the bottom of the right panel. Here you may apply a vignette, tone the image cooler or warmer, and apply burnt edges around the outside. I like the vignette tool, for it provides a center point tool to place the brightest area of the effect over a subject. I personally find the burnt edges look to be a little retro, but hey, it's there if you want it.
Selective adjustments using Control Points and Lines
With global adjustments out of the way, the next (optional) step is applying Selective Adjustments using Control Points and Lines. These are similar in practice to the local adjustment masks, radial gradients, and linear gradients in Adobe Lightroom, yet different.
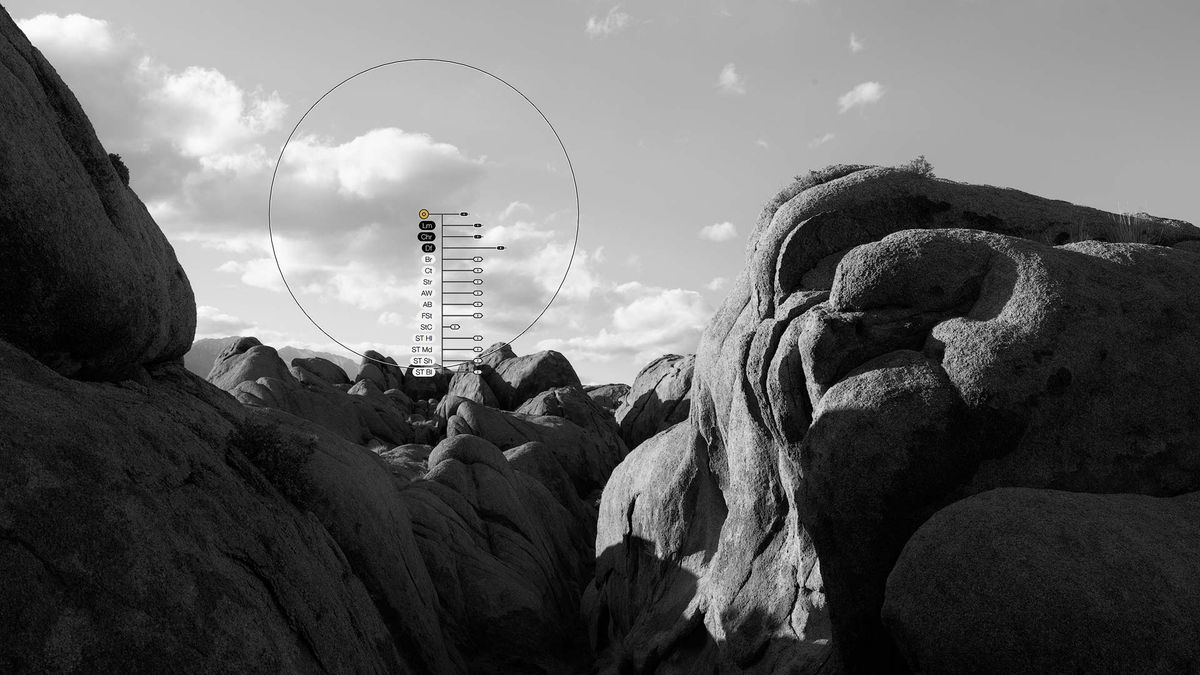
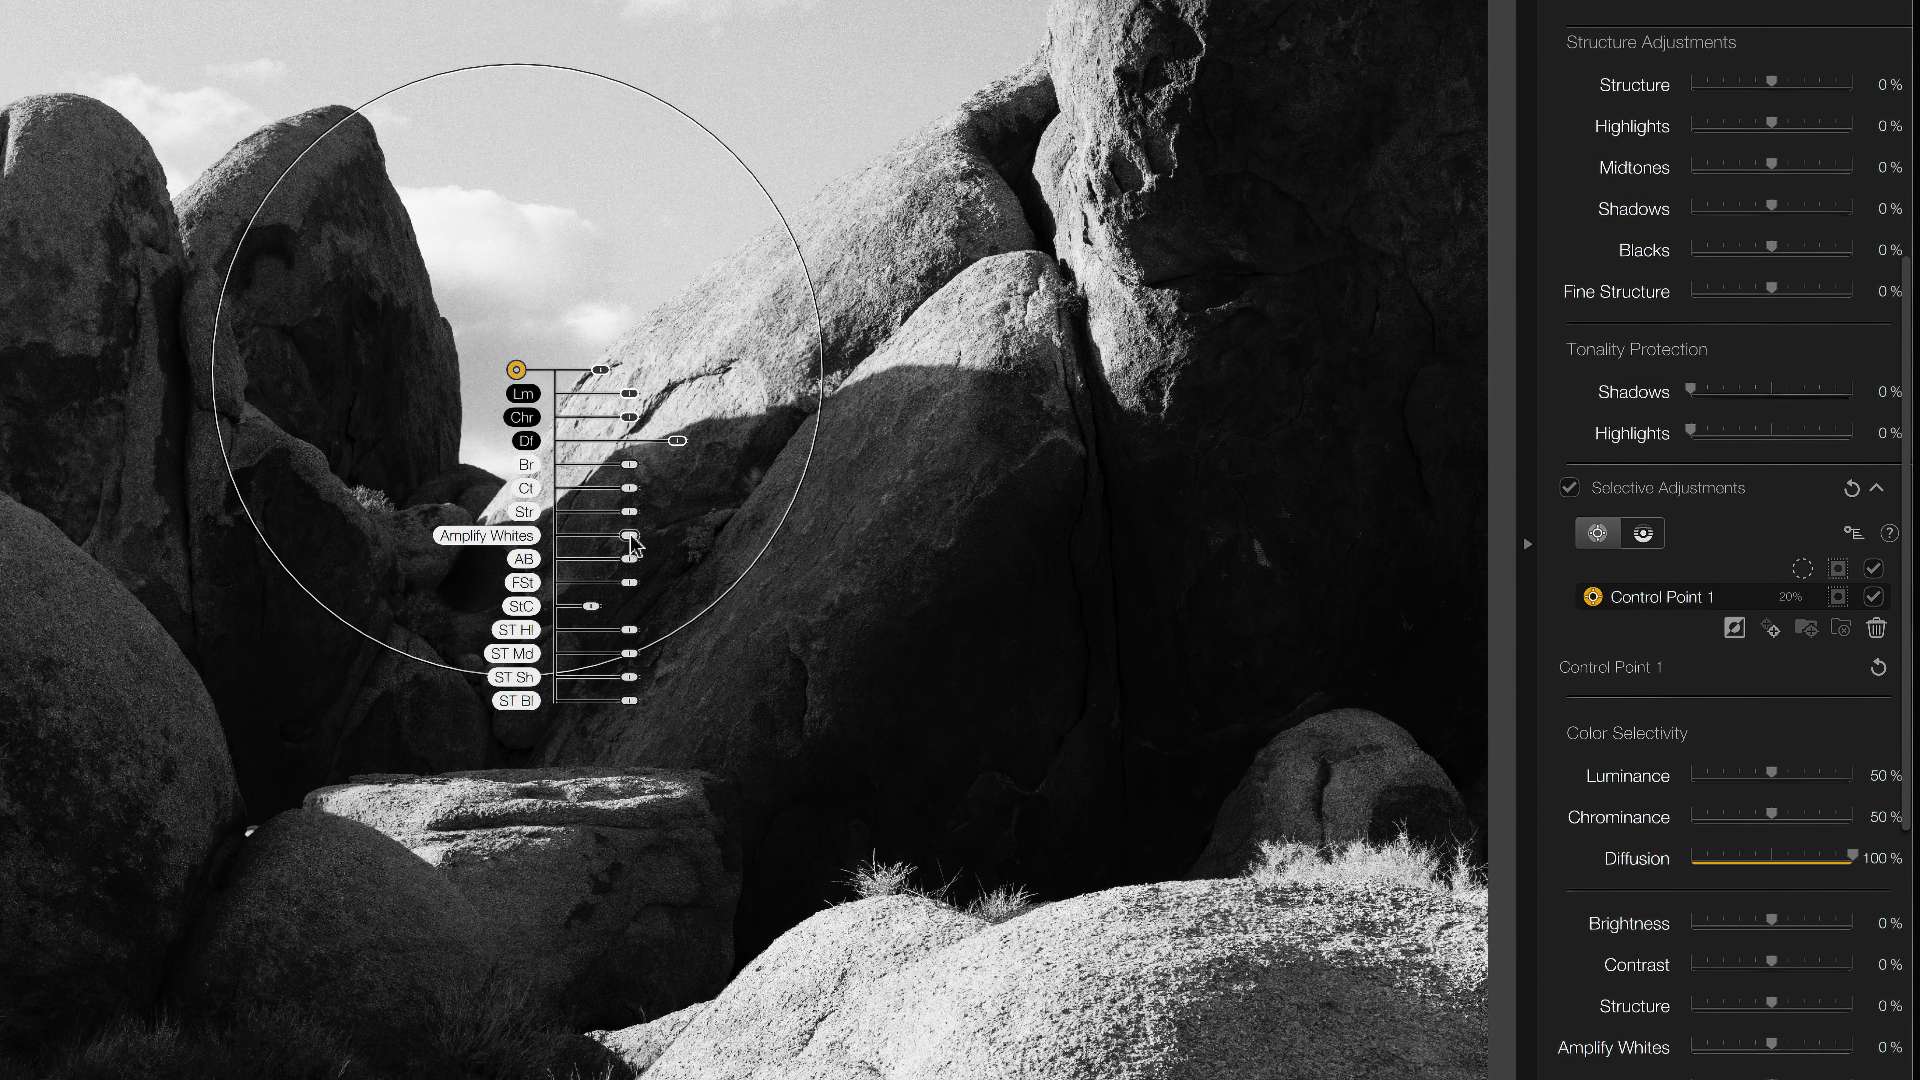
Control Points utilize two-decades old U-Point technology first created by Nik Software. They are designed to make targeted, selective adjustments easier and more intuitive than using magic wands, lassos or pen tools in Photoshop. With Control Points, you simply place a point over the region you intend to edit, adjust the radial size of the adjustment, then apply localized brightness and contrast edits using sliders that hang underneath (pictured below).
For Lightroom users, imagine a radial gradient with automated luminosity/color masking. That's basically how Control Points work. For example, when placed over a blue patch of sky, a brightness adjustment would raise and lower the brightness of blue but not the white clouds.
Their effect is concentrated towards the center of the circle, then feathers and fades towards the outer edge. Control Points work fine with small and medium sized adjustments, but their circular shape can feel unwieldy when making large, uniform changes.
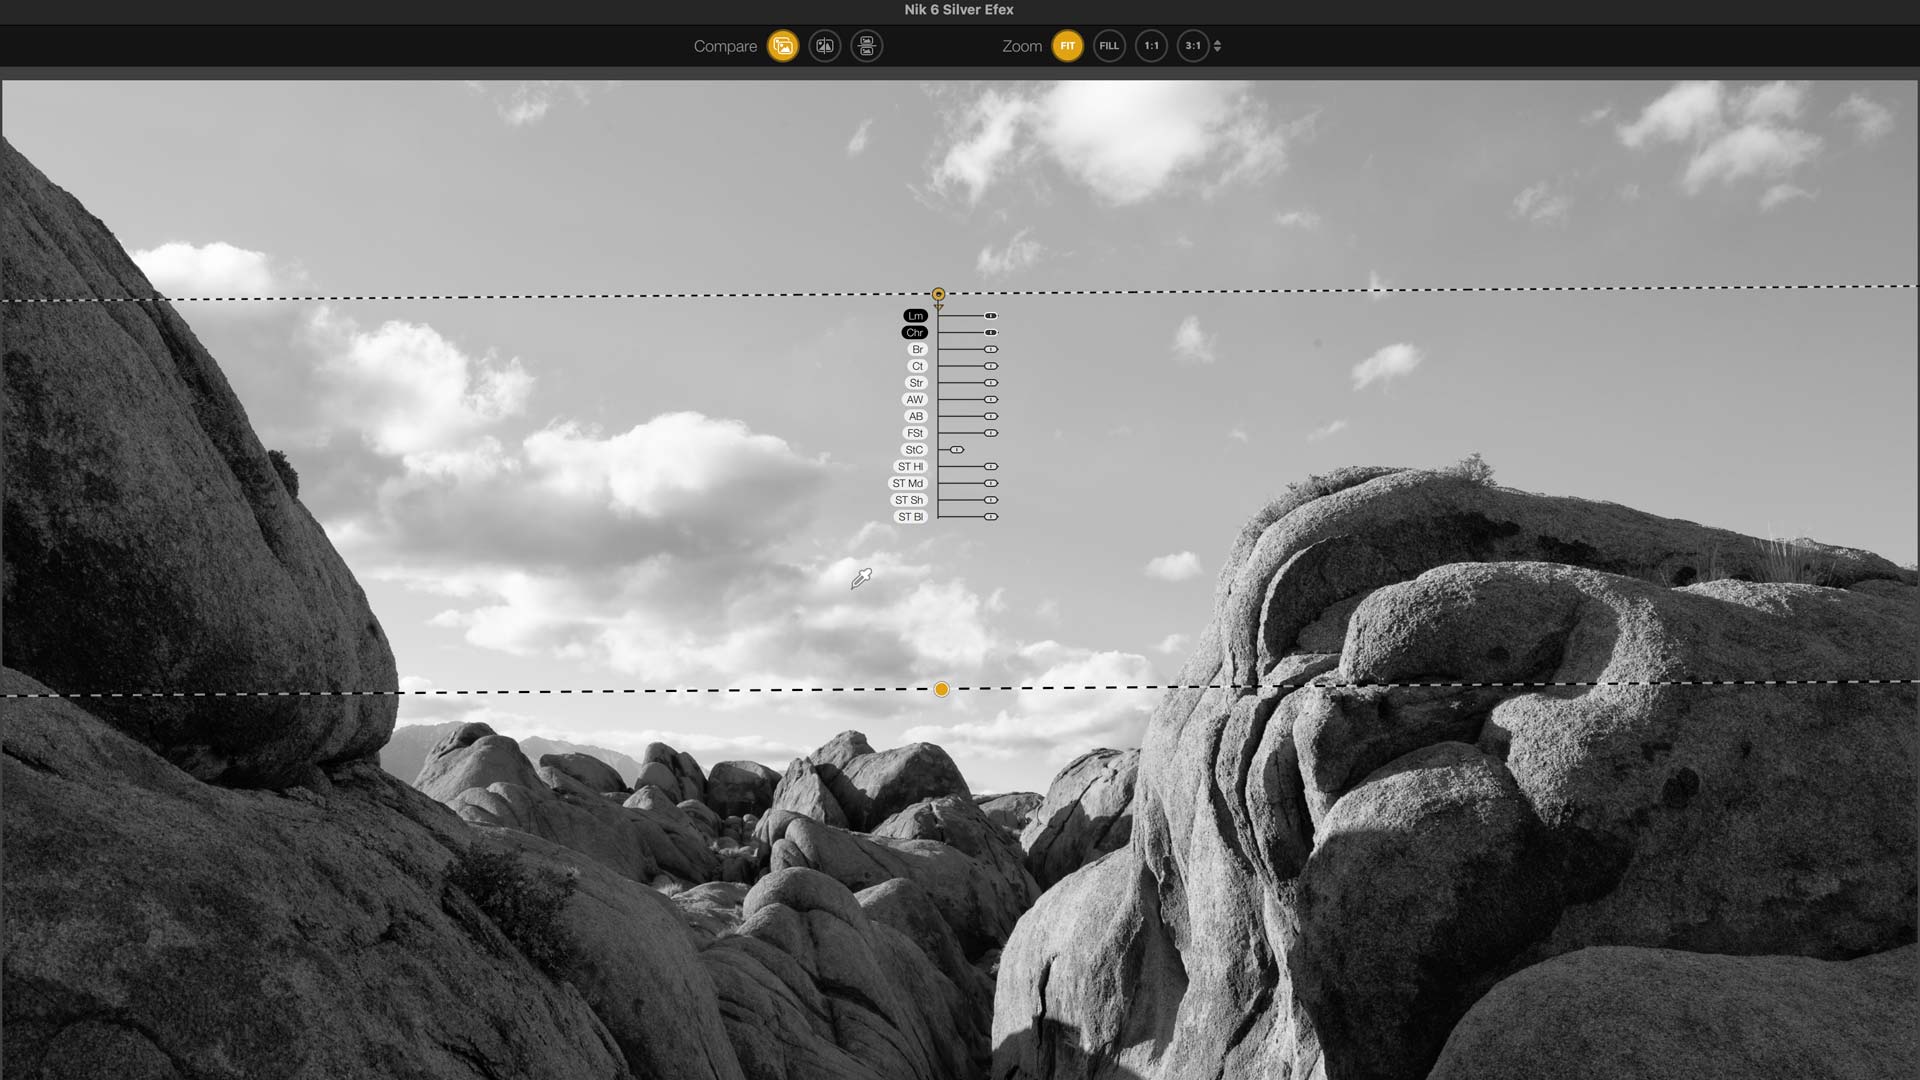
Control Lines (a more recent addition from DxO) apply local adjustments using a linear, graduated mask. They function more or less the same as Control Points, but do not target specific tones or colors. Control Line effects are simply layered on top of whatever happens to be underneath without masking.
Control Points and Lines may be grouped to create composite masks that share the same settings. This is helpful when needing to apply a uniform adjustment to different areas of an image (eg, lower right and left corners). Grouped adjustments can be also be un-grouped and split apart for individual editing if needed.
Overall, Silver Efex's Control Points and Lines work acceptably well, but their user interface could use a design refresh. Their tiny, white adjustment sliders may have been fine on an 800x600 CRT back in the day, but in 2023 on a 4K display, they're terribly uncomfortable to click, hold, and slide. Thankfully, the same settings are mirrored in the right column and are easier to use, but why DxO hasn't migrated their new and improved U-Point user interface from PhotoLab is a bit of a mystery to me. Perhaps there's hope for the future.
Users accustomed to Adobe's superior, AI-driven masking and local adjustment tools will likely feel frustrated and limited by Silver Efex's Control Points and Lines, and may prefer dodging and burning their black and white images in Lightroom. But for basic use, the Selective Tools in Silver Efex provide sufficient power and control for localized dodging and burning.
Using the histogram in Nik Silver Efex
Silver Efex's histogram is more or less the same as histograms found in other photography apps, but with one notable difference: visualization of Ansel Adams' famous Zone System designed to quantify different tonal regions of a black and white photograph.
Select a zone using the small row of squares above the histogram, and pixels with brightness values that fall within the selected zone will highlight in the live preview (see below). You may also select two or more zones to highlight a range of tonal values. Once visualized, you could then adjust brightness and contrast to shift tones from one zone to another.
I don't follow the zone system with my own photography, but can see how this would be a helpful guide for those who do.
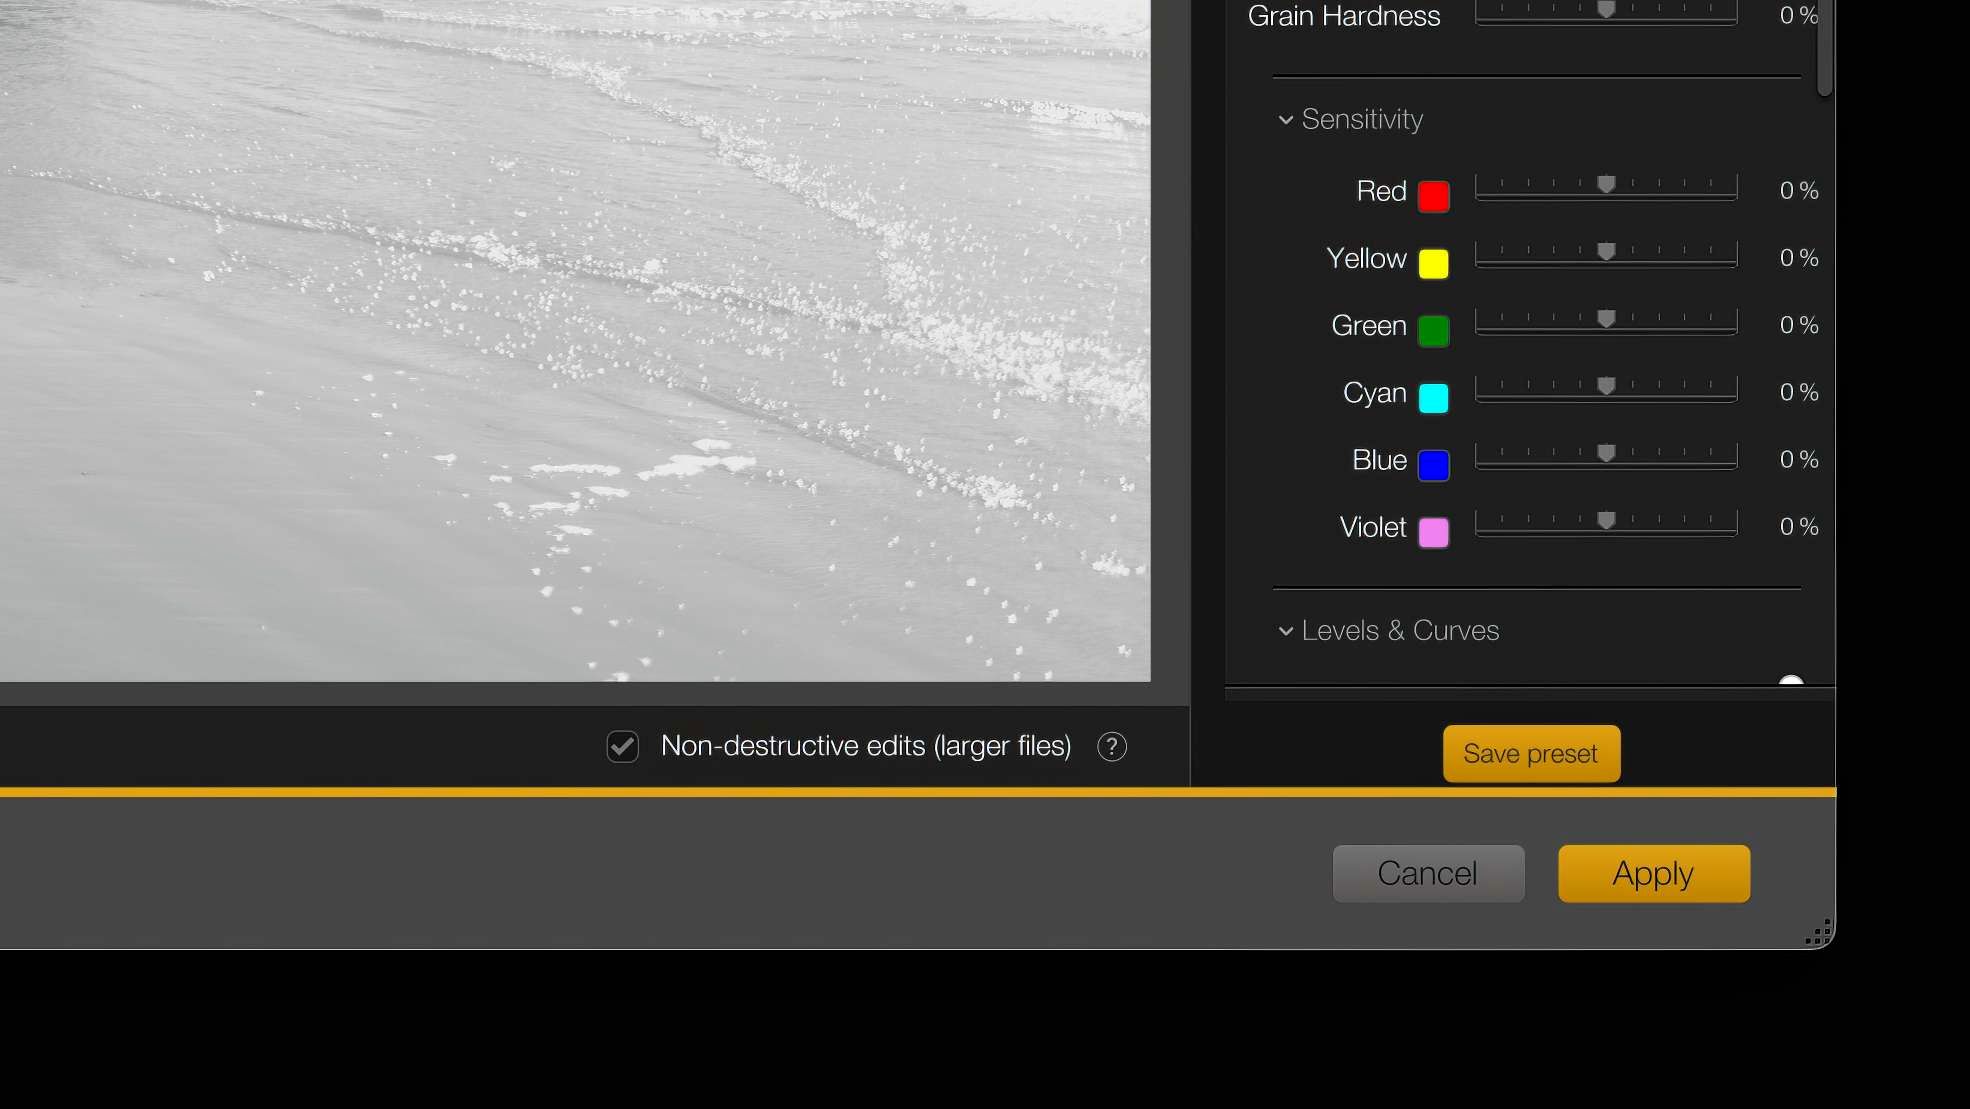
Non-destructive photo editing (sort of)
Silver Efex cannot edit raw files, but it can non-destructively edit TIFF files by enabling the "Non-destructive edits..." checkbox at the bottom of the preview window. This saves Silver Efex develop settings in the metadata of a TIFF file, which then allows the TIFF image to be re-edited when re-opened. Even Control Points and Lines are saved. You can even reset all changes and start an edit from scratch, if need be.
To re-edit a TIFF image formerly edited in Silver Efex from Lightroom (that was saved with "Non-destructive edits..." enabled), right click on the TIFF file and select "Edit Original". This will open the source TIFF file saved by Silver Efex with all its settings intact, unlike the other options that create a new TIFF file.
This feature works well, and feels surprisingly similar to editing raw. TIFFs with non-destructive edits behave just like regular TIFF images outside of Silver Efex (eg, can open them in Photoshop for printing, saving for the web, etc), but are then fully editable when opened again in Silver Efex.
Only downside is that TIFFs with non-destructive edits enabled are 2-3x larger than normal TIFFs, so keep that in mind. Also, this feature is only available with images from Lightroom or a local drive, not Photoshop.
Using Silver Efex with Photoshop
Thus far in this review I've only written about using Silver Efex with Adobe Lightroom, but all Nik Collection plugins are compatible with Adobe Photoshop as well. Images may be opened from Photoshop using a floating palette (pictured below). If the palette annoys you, it can be disabled by clicking the gear icon at bottom left.
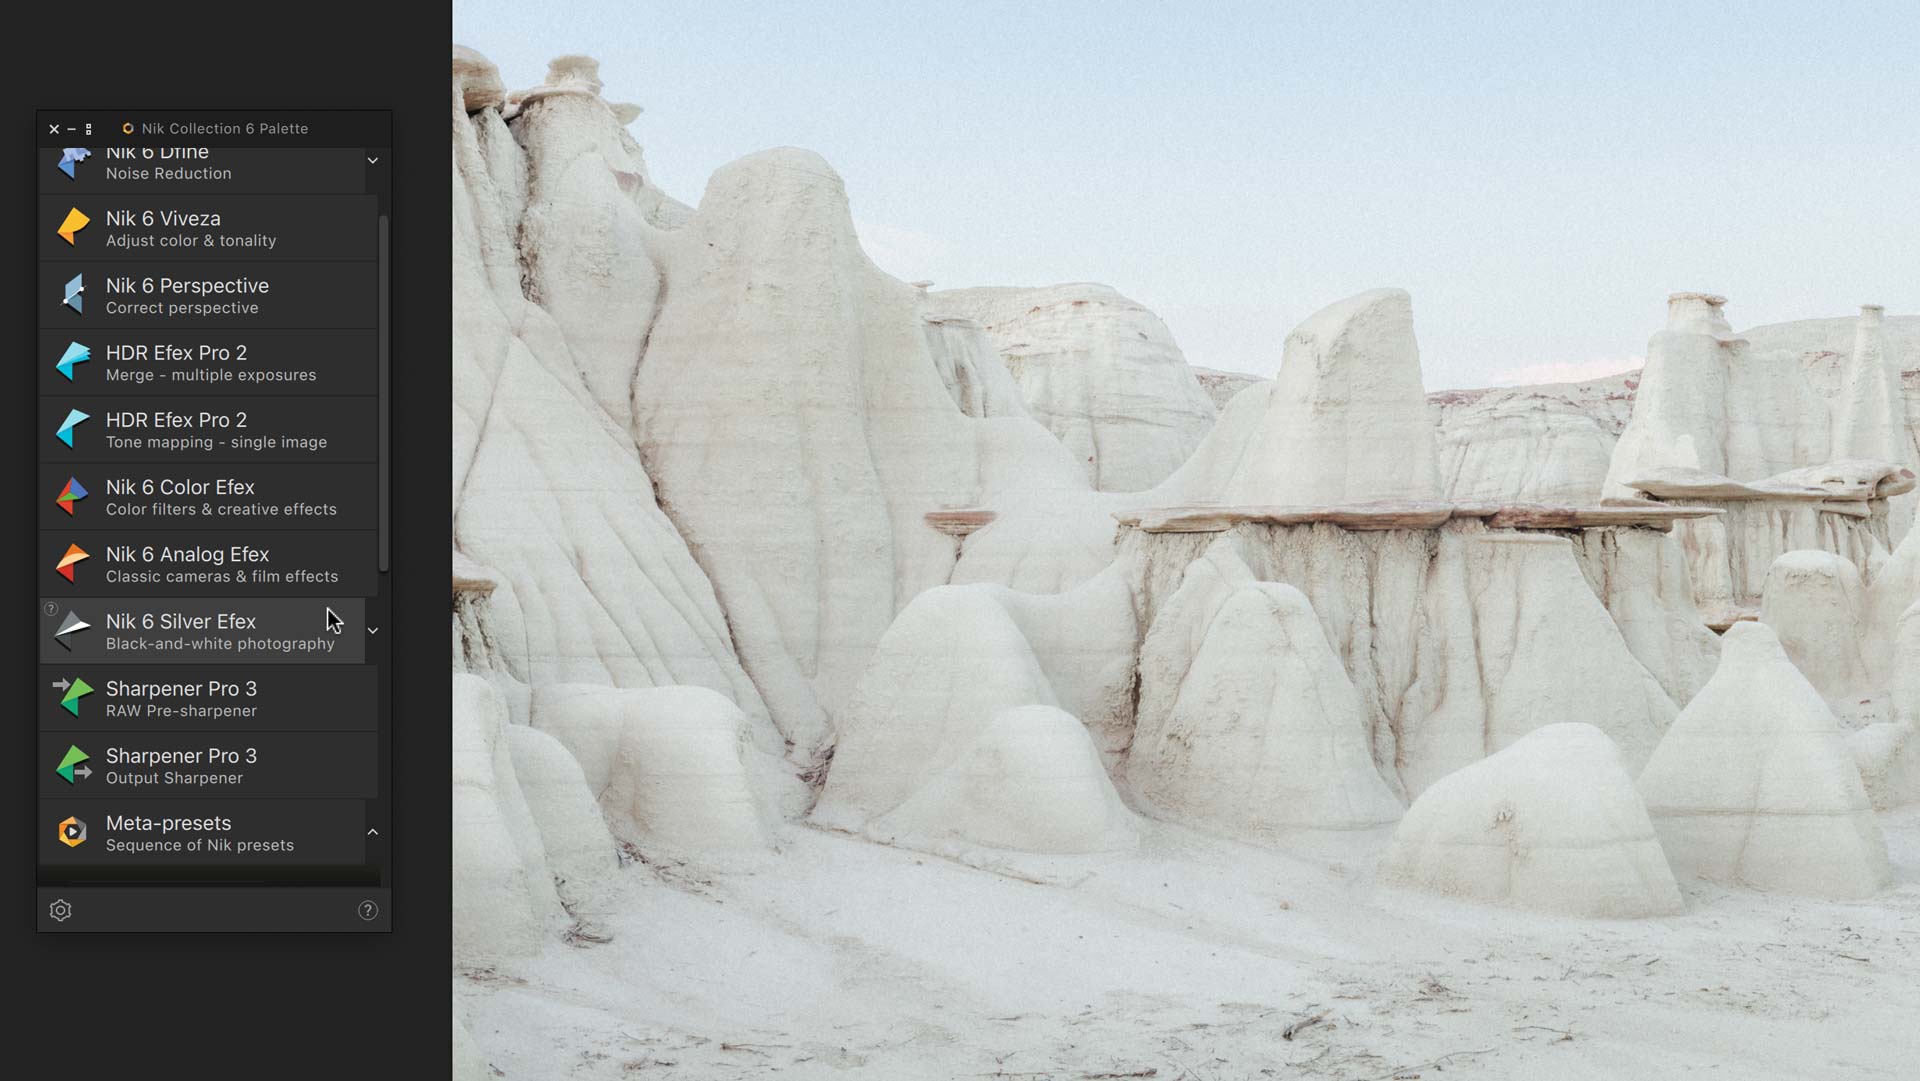
To create a black and white image in Photoshop, simply click "Nik 6 Silver Efex" from the palette, and a newly merged, composite layer will be added to the top of the Layers panel. Edits in Silver Efex are then applied to the same layer on completion.
Final thoughts
Silver Efex has been around since 2008 (that's fifteen years at the time of this review), and has survived the ups and downs of two ownership changes that could have killed the software. Thankfully, that didn't happen.
Silver Efex does feel a little old and creaky, but the product survives because Silver Efex offers a different, more nuanced black and white photography editing experience. Similar results can of course be created using Lightroom, Camera Raw, Photoshop or other applications, so Silver Efex is not an app every photographer will want or realistically need. But for those who are passionate about black and white photography, and would prefer a dedicated tool with more sophisticated grain, film emulations, and more nuanced contrast and brightness tools, there's nothing else out there like Silver Efex.
Buying Silver Efex does require, unfortunately, purchasing the entire Nik Collection, which has limited usefulness for me and the type of photography I do. Viveza has some interesting tools and effects for thickening and adding vibrancy to colors, but I've yet to find a strong use case for the other plugins.
For me and the type of photography I do, Silver Efex is worth the collection's $149 price tag all on its own. The best way to see if Silver Efex is right for you is to download a free trial of Nik Collection v6, available by clicking the button below.